
SocialEngine Opcode Caching on Shared Hosting Environment
When it comes to our websites, we are always looking for two main things – speed and security. Today, we will review some of the available features on FastComet’s SocialEngine Hosting plans, which will improve the performance of your website.
The optimization of a website for better speed is a constant process. It requires implementation and testing whenever you make changes to the SocialEngine performance configuration, so you can ensure that those changes are what you need. Some techniques will work great on your website and others won’t, so it is recommended to test different options. The good thing is that we are here to help you with that!
In SocialEngine, one of the best ways of optimizing the performance of your website is the use of opcode caching. By default, the system uses a file-based caching, but it is much slower than the alternatives. Thus, it is important to reconfigure your website in order to get better results.
Most hosting providers do not offer opcode Caching on their shared hosting plans. The SocialEngine team has an article on how to use opcode caching for best performance and they do not recommend a shared hosting environment for that purpose. They are right in general, but not in this case. We believe that you should be able to use opcode caching for your website, without the need for expensive VPS or a dedicated server for your website. This is why we have implemented mod_lsapi, a new Apache module to serve PHP requests. It allows you the use of opcode caching on our shared hosting plans for your SocialEngine website. You can use APC, XCache, and eAccelerator for better performance and at no additional costs!
Enable APC on Your Account
The SocialEngine team recommends the use of APC on your website. This is why we will show you how to configure that, but the same process can be applied to other types of caching.
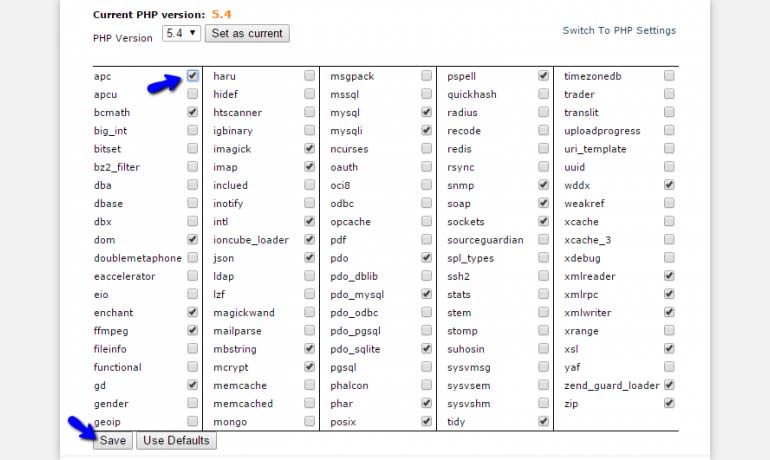
First and foremost, you need to log into your cPanel account and enable APC. You can do that by locating the Software and Services section and then click on the Select PHP Version icon.

You will see a list of all extensions that you can use on your website. Enable APC and click on the Save button below to keep the changes.
Enable APC in SocialEngine
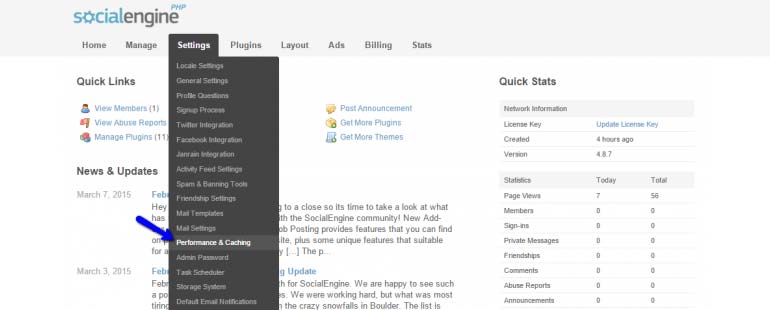
To enable the use of APC in SocialEngine, you need to log in as administrator first. Click on the Settings option from the main menu and then Performance & Caching.
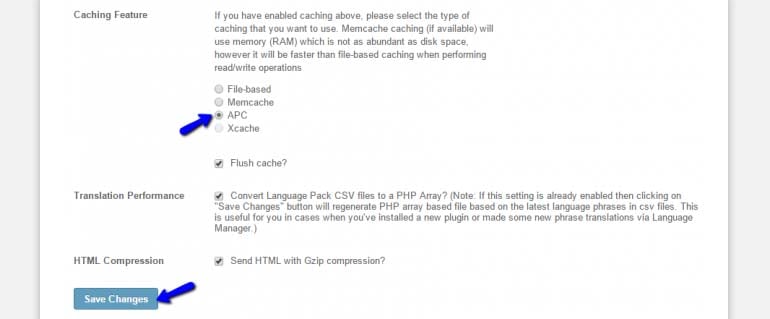
Scroll down to the Caching Feature section and select APC. Choose the Flush Cache option and then hit the Save button. The system will reconfigure your application and it will use APC from now on!
Do you have any other suggestions? Let us know what you think about the APC use with SocialEngine and how beneficial is that for your website. We would love to hear more suggestions about any other performance improvements you have tested.

The latest tips and news from the industry straight to your inbox!
Join 30,000+ subscribers for exclusive access to our monthly newsletter with insider cloud, hosting and WordPress tips!



No Comments