How to manage the products of your Online Store
Updated on Mar 13, 2019
As ZeusCart is all about selling your products, you will need to know of course how to manage these. In the next few lines of this tutorial we will show you how exactly you should be able to fully manage the products on your ZeusCart based Online Store.
To be able to be able to manage the products in ZeusCart, you need to:
Step 1 Access the Products Management page
To manage your ZeusCart product catalog you will need to login into your store's Admin Dashboard and then access Catalog>Products>View Products.

There you will be presented with a conveniently structured table view with all of the products currently added to your ZeusCart based Online Store.
Step 2 Add a new product
To add a new product to your catalog, click on one of the three Add icons from the Product List page. The first Add icon is for physical products, the second one is for digital products and the third is for gift products.

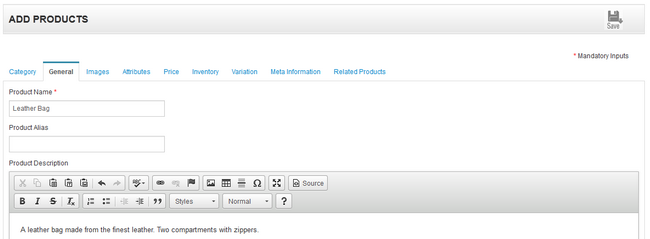
Note that you will be able to add attributes, manage variations and inventory only for physical products. When you have selected your product’s type you will be directed to the Add Product page. On that page there are several tabs with different configuration settings for your new product. You should start by finding a suitable category and filling the General information tab.

Make sure that you have set your product name and product description for your new product. This information will be visible to your visitors and it is important to present your product in the best possible way. Make sure you have a short and relevant meta description of your product so people can find your products in Google and other search engines.
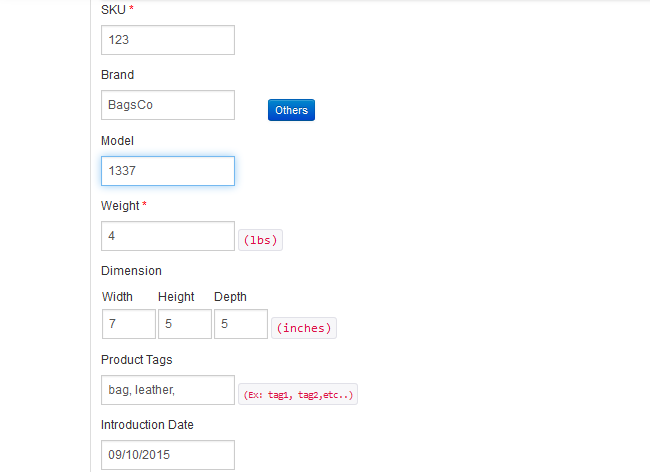
Next you will be able to fill the product’s Stock-keeping unit(SKU), Brand, Model, Weight, Dimensions, Product Tags and Introduction Date.

At the bottom of the page you will find 4 additional on/off buttons to help you Enable/Disable some of your product’s settings.
- Is Featured - Enable this if the product is Featured
- Is New Product - Enablethis if the product has just been added
- Is Discount Product - Enable if the product is discounted
- Visibility at Store Front - Enable if you want to show the product at the Store Front

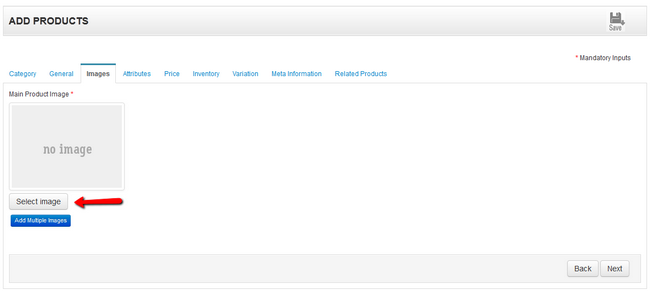
When you are ready you can click Next or scroll up and just select another tab from the product menu like Images or Price.To add an image for your product, go to the Images tab and click on Select image. After you have selected an image the empty window that was empty will update itself with the image you uploaded.

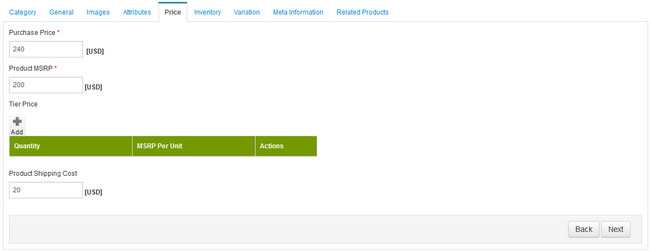
You can now set a price for your Product by going to the Price tab. Here you can add the Purchase Price, the price recommended by the manufacturer and the Shipping cost for the product.

When you are ready with your settings, click on the save button at the top of the page to add the product to your Zeuscart product catalog.
Step 3 Edit and Remove already existing products
To edit an existing product, click on the edit icon next to your product name. The page you will be redirected to is the very same as the one you have used to add a new product in the previous step, however this time the page will be filled with all the settings you have initially configured. Make sure to click the Update button when you are done editing so the change can be applied.
Removing a product is also a piece of cake. If you go back to the Product List where you can see all of the products, you will notice how in the Options column there is a small trash can like icon which if you use, you will be able to delete a product from your Store. Keep in mind that deleted products are not a subject of restore from within your Online Store. Thus you will need to use the Restore Manager provided in the cPanel service so you can be able to restore the Database and the Files of your website.
Congratulations! You now know how to completely manage the products of your ZeusCart website.

Zeuscart Hosting
- Free Installation
- 24/7 Zeuscart Support
- Free Domain Transfer
- Hack-free Protection
- Fast SSD Storage
- Free Cloudflare CDN
- Free Zeuscart Transfer
- Immediate Activation
