How to Create and Manage Products in Zen Cart
Updated on Dec 10, 2015
Adding products in Zen Cart is very easy, as in most e-commerce applications. The only issue you might face is the fact that you will not be able to have both categories and products in the same working field. This means that you will have to create categories and fill them with either subcategories or products and once you have created a product there you will not be able to also create a category.
To manage your products, you will need to:
Step 1 Add a New Product
To add a new product you will first have to login in your Zen Cart’s admin dashboard and navigate to Catalog>Categories/Products section of your main admin panel.

Now access a category/subcategory of your choice and click on the new product button.

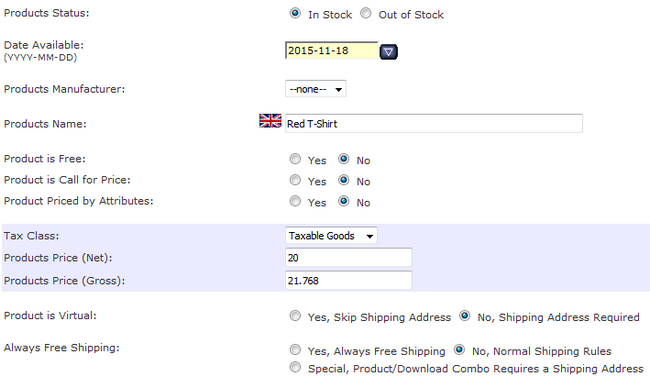
Now you will be able to populate the product’s details:
- Product Status – If the product is available set this to In Stock
- Date Available – The date when the Product will be available
- Product Manufacturer – Select a product manufacturer for this product (you must first add manufacturers via the Catalog>Manufacturers menu in order to use them here)
- Products Name – The name of your new product
- Product is Free – If you want to give this product for Free set this to Yes
- Product is Call for Price – If you set this to yes, the customer will have to call to your store in order to find the price of the product (used for custom items with add-ons that cannot be cataloged)
- Product Priced by Attributes – If set to yes, the product’s price will change depending on the attributes selected by the customer
- Tax Class – Select a Tax Class for this product (It is necessary to select the appropriate tax class for that product. Otherwise taxes won't be calculated appropriately on it during checkout.
- Products Price (Net) – The price that the customer will see if you have chose to not show the price with Tax
- Products Price (Gross) – This is the Price of the product including the Tax for it (Tax Class must be set)
- Product is Virtual – If you wish to sell a digital product, set this to Yes
- Always Free Shipping – If you are running a promotion with free shipping for this product, set this to Yes

- Products Quantity Box Shows – Enable/Disable the Quantity of the product to be visible by the customers
- Product Qty Minimum – The minimum amount of the product needed for it to stay “In Stock”
- Product Qty Maximum – The maximum amount of this product that can be in stock
- Product Qty Units – If you want to sell in batches you need to specify the number of products here
- Product Qty Min/Unit Mix – If set to yes, the customer will have to buy the exact number of products for at least 1 batch as specified in the Product Qty Units setting. For example, if you have a Product Qty Units = 6, the customer will not be able to buy 8 of this product but will either have to choose to buy 6 or fill the next batch and buy 12
- Products Description – A short description about the features of the product

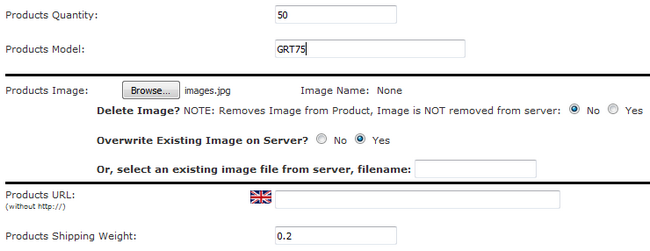
- Products Quantity – The stock amount currently available
- Products Model – The model of the product
- Products Image – The image representing this product
- Products Shipping Weight – The weight of the product needed for the Weight Shipping method

After you have finished filling in the data for the product, please click on the preview button at the bottom of the page and you will be redirected to a preview window of your new product. If you are satisfied with the result, click on the insert button to add this product to your catalog.

Step 2 Step 2 Edit and Remove Products
To edit a product you will need to navigate to the product via the Catalog>Categories/Products menu and click on the Edit icon (e).

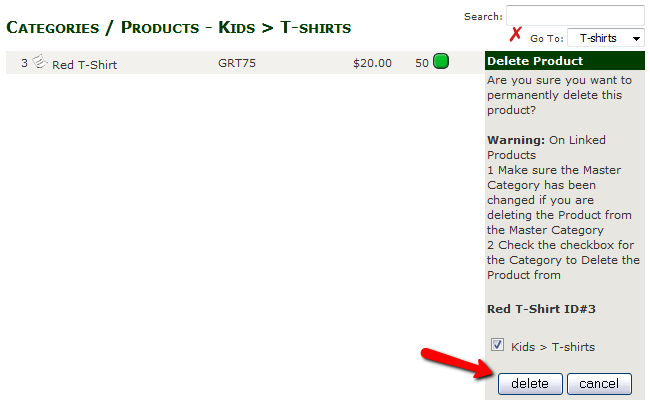
To completely remove a product from your store, you will need to click on the delete icon (x).

You will need to confirm the deletion and select the category from which you are deleting the product.

You will also be able to move products to another category or copy it/link it by using the (m) and (c) icons respectively.
Congratulations, you now know how to manage the products in your Zen Cart Store.

Zen Cart Hosting
- Free Zen Cart Installation
- 24/7 Zen Cart Support
- Free Domain Transfer
- Hack-free Protection
- Fast SSD Storage
- Free Cloudflare CDN
- Free Zen Cart Transfer
- Immediate Activation
