How to Install WordPress via WP-CLI
Updated on Feb 11, 2025
In the previous two parts of this WordPress installation tutorial, we discussed how to install the application via Softaculous and manually. The final method we want to bring to your attention is via the WP-CLI. CLI stands for Command-line Interface, and WP-CLI is the official interface for the WordPress application. It lets you manage your WordPress installation via SSH or a terminal.
The WP-CLI offers commands that can perform many of the actions the administrative dashboard can and some that are not available there. You can manage plugins and themes, clear cache, moderate comments, and more. The command we want to highlight in this tutorial, though, is the one for installing WordPress.
Installing WordPress Via WP-CLI
As with most other things WordPress-related, installing it via the WP-CLI is straightforward. However, since the CLI is not a graphical user interface, you have to be familiar with SSH and its commands. You can check our tutorial here for a few basic ones that should be enough to get you started. Naturally, we will provide all the commands you need to install WordPress via the CLI here.
Of course, before even using the WP-CLI, you must ensure it is installed on your server. Here at FastComet, we pride ourselves on our WordPress hosting capabilities, which is why the WP-CLI is available and ready to use on all our hosting services. No additional setup is required. You can begin using it the moment you choose us as your host. If you are on a server where it is not available, you can check the installation instructions for how to get it for yourself.
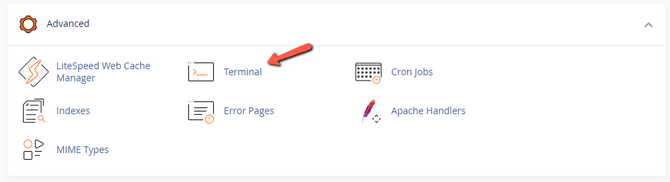
As mentioned earlier, WP-CLI is a command-line utility, so the first step is accessing your preferred interface. We will use the Terminal tool in the Advanced section of cPanel for this tutorial.
It is readily available and does not require logging into your cPanel account via a third-party interface. Of course, you can use any SSH client you wish. Just remember to whitelist your IP for SSH access if you are doing this on our hosting services.
The last preparation step is to create a database. Check out our guide on how to do it in cPanel. Note down the name, user, and password since you will need them during the WordPress installation.
When your database is ready, connect to your hosting server via SSH and head to the directory where you want to install WordPress with this command.
cd name_of_directoryReplace name_of_directory with the name of the directory you want WordPress to live in. For our example, we will use public_html. Once inside, run the following command to download the WordPress core.
wp core downloadAfter a few moments, the WordPress files will finish downloading, and you will see this in your console.

Additionally, you can add an option to download a specific locale to the end of the command. For example, if you want your website to be in German, the command will look like this.
wp core download -- locale=de_DEThe next step is to create a configuration file containing the information your WordPress website will use to connect to its database. That is why we recommended you note down the database name, user, and password earlier. Run this command.
wp config create --dbname=database_name_here --dbuser=database_user_here --dbpass=database_password_hereNaturally, you should place your database information in the respective options instead. Once the process is done, you should see this in your terminal.

If you get an error saying that access is denied, double-check your database information and that you have given full privileges to the user. If you do not get any error messages, then you have one last step: installing WordPress and connecting it to the database. This is all done via a single command that will assign a name to your website, create an admin account, and generate all the necessary tables within the database itself. Here is the command.
wp core install --url=site_url_here --title=site_title_here --admin_user=admin_username_here --admin_email=admin_email_hereAs with the database command, replace the value of each option with the ones you want for your website. It is important to note that if you want to use more than one word for the title, put them in quotes, like this: “FastComet WordPress Website”. When the process is over, you will see a successful message, and the installer will provide you with your admin password.

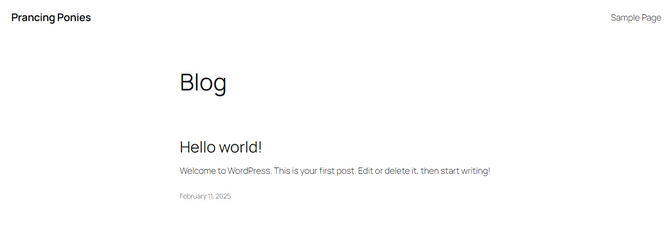
That completes the process! You can now head to your website’s URL and see the default homepage.
Additionally, adding /wp-admin to the end of the URL will take you to the administrative dashboard, where you can log in and begin building your website.
With this, you have successfully installed WordPress via the WP-CLI. While this method lacks the visuals of an installer, it is useful if you do not have access to one. It also saves you from manually downloading and uploading the WordPress files or creating a configuration file yourself. You can do so many things from the command line without going to the admin dashboard or your hosting’s control panel!

WordPress Hosting
- Free WordPress Installation
- 24/7 WordPress Support
- Free Domain Transfer
- Hack-free Protection
- Fast SSD Storage
- Free WordPress Transfer
- Free CloudFlare CDN
- Immediate Activation