How to Integrate Stripe in WordPress
Updated on Dec 6, 2022
When selecting a payment gateway for your WordPress site, the two most popular options are PayPal and Stripe. PayPal used to be one of the only simple payment options for eCommerce sites, but that is no longer the case. Stripe has lower transaction fees and is well-liked in the developer community due to its flexible API. Today, we'll look at four simple ways to set up Stripe for WordPress with no coding required. Stripe can be a great affordable solution for startups, businesses, and those running WooCommerce and EDD shops.
Table of Contents:
What is Stripe?
Stripe is a fast-growing payment gateway that can handle recurring payments and process refunds automatically. It is trusted and used by well-known brands around the world, including Best Buy, Target, Lyft, Docker, HubSpot, Facebook, Shopify, and IndieGoGo.
Stripe was founded by two brothers, John and Patrick Collison, in 2010. It went public in 2011 and has since received multiple rounds of funding. In 2016, it was ranked fourth on Forbes' Cloud 100 list. There are many payment gateways to choose from. Still, Stripe's focus on simplicity, combined with their popular Stripe API, has set them apart from competitors, allowing Stripe revenue to skyrocket, putting it in second place in terms of market share after PayPal.
Their fee structure is much simpler to understand, as it is a flat rate of 2.9% + 30 for those doing less than $1 million per year. They also let you charge credit cards from your own website for free, whereas PayPal charges you $30 per month plus transaction fees. Stripe also does not charge fees for refunds or card authorizations. PayPal, on the other hand, becomes less expensive as transaction volume increases.
Stripe also has a machine learning-powered product called Radar to reduce the number of fraudulent transactions.
Stripe for WordPress
Stripe does not have an official WordPress plugin or integration, but thanks to the amazing WordPress community that has used their API, there are now a lot of great options for easily integrating Stripe on your site. Stripe for WordPress on a basic site, with a form plugin and custom fields, as well as eCommerce platforms like WooCommerce and Easy Digital Downloads, will be covered in detail below. It is critical to note that SSL is required on your Stripe checkout pages in order to securely communicate payment data. Many hosts, including FastComet, provide free SSL certificates through Let's Encrypt. However, if you do not migrate properly, you may end up harming your site.
This tutorial assumes you have a Stripe account. If you don’t, you can sign up for a free Stripe account.
How to Set up Stripe on a Basic WordPress Site
It's quick and easy to install Stripe for WordPress on a simple site. Perhaps you don't have an eCommerce solution and only have one product to sell on a page. This can be a great way to accept payments (and even donations) for an ebook or digital download without adding extra costs to your site. We recommend the free WP Simple Pay Lite for Stripe plugin for this, which you can install in just four simple steps.
They also have a pro version of the plugin that enables recurring payments and a slew of other features, but if you need something simple and quick, the free version will suffice. It currently has over 10,000 active installs and a 4.6 out of 5-star rating.

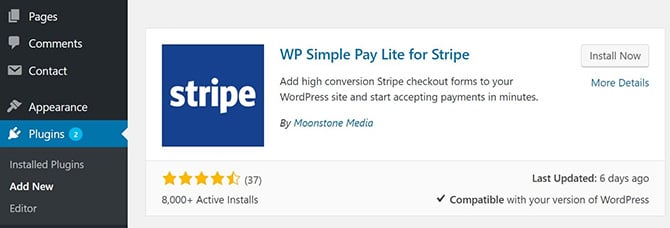
- Download and install the WP Simple Pay Lite for Stripe plugin from the WordPress repository or by searching for it within your WordPress dashboard under Add New plugins.

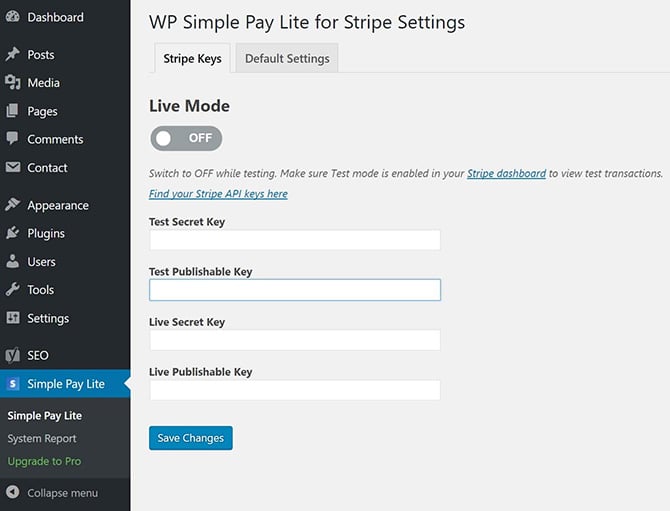
- The first thing you will need to do is click into the settings of the plugin and input your Stripe API keys, which you can grab from your Stripe account dashboard. Then click Save Changes. You'll notice an On/Off switch. You can leave it turned off until everything is configured.

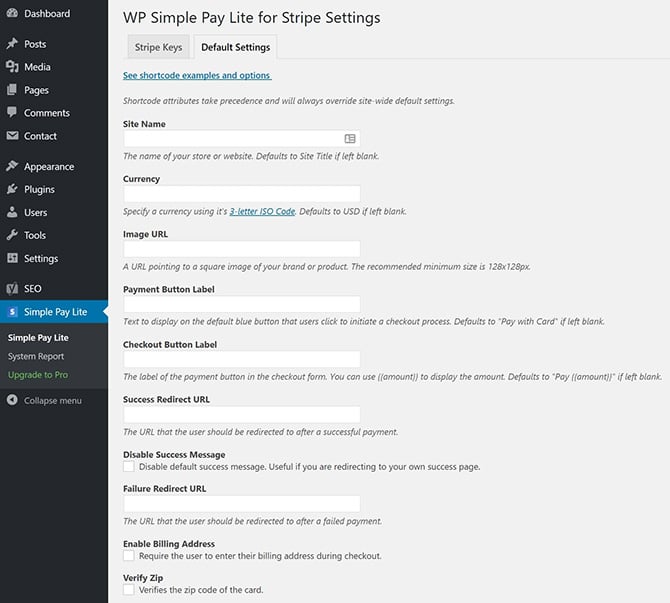
- Navigate to the Default Settings tab. There, you can give your site a name, set the currency, upload an image, and so on. The success redirect URL is an important setting. If you are tracking conversions through a thank you page, you should enable this. See our comprehensive conversion tracking guide. Then scroll down and press the Save Changes button.

You can then insert a payment button on any page or post on your WordPress site with a simple shortcode. Remember that you can change the wording on the payment button in the plugin settings. Here is an example of a shortcode you can paste into your page or post:
[stripe name="My Store" description="My Product" amount="1999"]
And there you have it! It couldn't be easier to integrate Stripe into your WordPress site. If you haven't already, make sure to toggle Live Mode to "On" in the settings. You can also use their free companion plugin, which adds a button to your WordPress editor to make it easier to add payment buttons. There's no need to grab any shortcodes.


WordPress Hosting
- Free WordPress Installation
- 24/7 WordPress Support
- Free Domain Transfer
- Hack-free Protection
- Fast SSD Storage
- Free WordPress Transfer
- Free CloudFlare CDN
- Immediate Activation
