How to Install WordPress via Softaculous
Updated on Dec 6, 2022
It is time to learn how to install the famous WordPress Content Management System. We will begin with installing it via the Softaculous Apps Installer that is a part of our feature-rich hosting services. We will demonstrate how, with just a few clicks, you can have a secure and robust WordPress installation that is ready for content creation.Both novice and expert users will find this installation method convenient, giving their new WordPress project a kickstart.
In This Post:
Access Softaculous
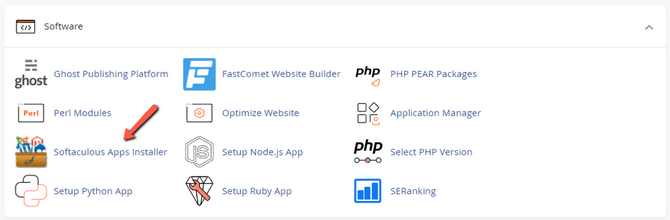
The first step to intalling WordPress via the Softaculous Apps Installer is to locate it in your cPanel account. It is under the Software section.
When you open it you will see the home page. If you would like to learn all about Softaculous' home page and all of its options and functions, check out our tutorial about it here.
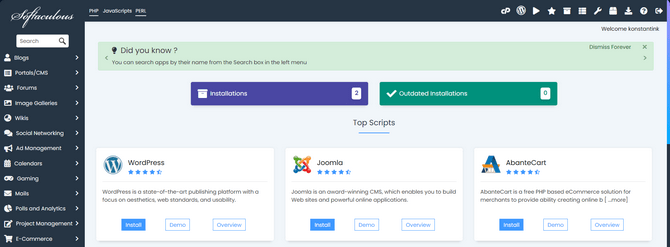
The next step is to locate WordPress. Since it is such a popular piece of software you are guaranteed to find it on the home page as it is in the screenshot. However, you can also search for it via the bar on the top left. It is also under the Blogs section there, too. To begin the installation process, click Install. You can also click the Demo or Overview buttons for further information about the software.
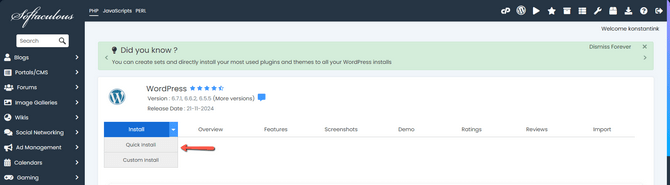
Whichever method you choose, you will always end up on the application's installation page. Here you have two options. By clicking on the drop-down menu next to the Install button you will see Quick Install and Custom Install. Quick Install is the fastest way to get started. There are fewer installation customization options. Custom Install, on the other hand, lets you predefine more aspects of your website.
Configure the Installation
Next, it is time to choose your installation type: Quick or Custom Installation. Whichever method you choose, the core WordPress software will be identical. The main difference is that Custom Installation allows you to change certain aspects of your website as well as install some plugins. For your convenience we will elaborate on both types of installation.
Quick Install
The Quick Install method will allow you to get a website up and running in a matter of seconds. With minimal customisation options, you are a few clicks away from a brand new WordPress website. Keep in mind that it will be barebones so you will have to customise it from the ground up via the dashboard.
With that said, here is what the Quick Install method has in store for you. We will elaborate on each section.
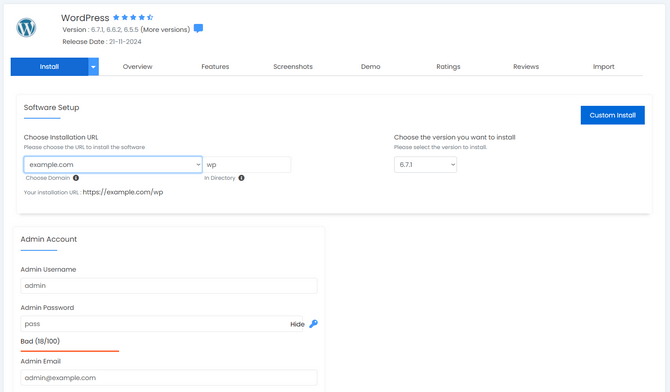
- Choose Installation URL - Here you can select the domain that WordPress will be installed on. It will be the one used to access your WordPress website. You can install it in a subdirectory (like how it is on the screenshot, in the wp subidrectory), or in the root directory. We recommend the latter for ease or access;
- Choose the Version you Want to Install - Select your starting WordPress version. We always recommend the latest available version for security and performance reasons;
- Admin Username - The admin username you want to use;
- Admin Password - The password for the admin user. Please make sure that the password you are entering in this field is Strong, as per the bar underneath it. You can use any of the countless password generators online;
- Admin Email - Theemail for the admin user. You will receive notifications regarding your website on it.
Once you are happy with your setup click the Install button at the bottom. The process will take a few seconds during which Softaculous will download and install the WordPress software in the designated directory. Additionally, it will also create a database and adjust WordPress' configuration file to use that database.
However, if you would like to pick the name of your database, among a few other options, you should use the next installation type.
Custom Install
The Custom Install has all the options the Quick Install does, but it also lets you choose from a few more options. They are conveniently separated in a few sections so here is what each of them is for.
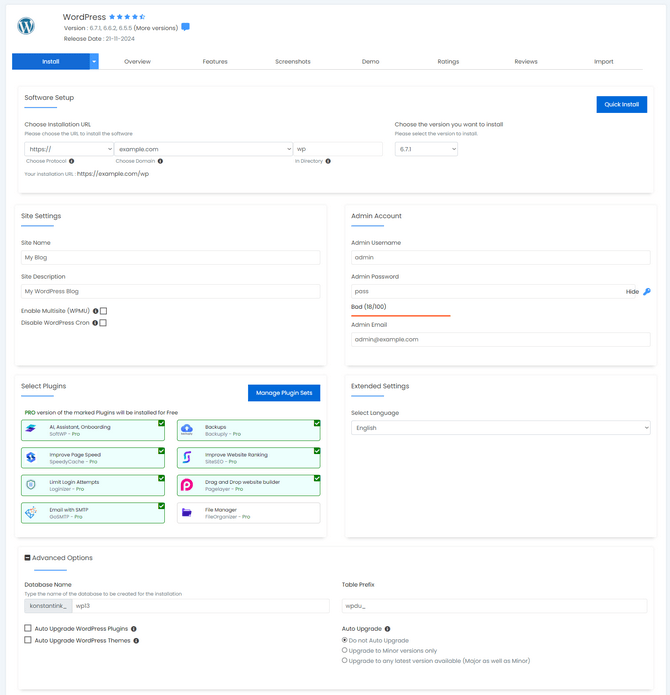
- Choose Protocol - If your site has SSL and HTTPS, then select https:// or https://www. as protocol. You should not select http:// unless you are testing in a local environment. Your website should always be secured via an SSL certificate;
- Choose Domain - Like how it was in the Quick Install section, select the domain you want to use to access your new WordPress website. You can choose to place it in a subdirectory or the root directory of the domain;
- Site Name - Write your website's name here. Softaculous automatically generates one for you, but you can place whatever you need;
- Site Description - You can write a brief description about your website here;
- Enable Multisite (WPMU) - By ticking this checkbox, Softaculous will deploy the WordPress platform with WPMU (Multiuser) enabled. This is only necessary if you want to run multiple WordPress websites from the same installation;
- Disable WordPress Cron - Tick this if you want to deactivate the WP-Cron native functionality. What this cron job does is it automates several WordPress tasks such as checking for core, plugin or theme updates. Deactivating it from here will instead add a cron job to your cPanel to be executed twice an hour;
- Admin Username - The username you would like your admin user to have;
- Admin Password - The password for the admin user. Use a Strong password;
- Admin Email - The actual email on which you will receive notifications regarding your website;
- Select Language - Choose your website's language;
- Select Plugins - You can choose which plugins from the list in this section to be installed alongside the core WordPress software. In case you do not see the one you need in this list you can easily install it from within the WordPress dashboard instead;
- Database Name - Softaculous will automatically assign a value to this option, but you can change the name to something more easily recognizable;
- Table Prefix - If you host multiple WordPress installations, each of their databases will require a unique prefix to maintain separation. Otherwise you do not need to change anything here;
- Auto Upgrade - Enables the Softaculous installer to apply updates whenever such are available automatically, depending on your chosen preference. We advise against automated upgrades just in case one of them causes website instability. Manually upgrading gives users more control over the process;
- Auto Upgrade WordPress Plugins - Checking this option will allow automated plugins to upgrade upon a platform version update. Again, we do not recommend this;
- Auto Upgrade WordPress Themes - Ticking this checkbox will enable automatic themes to upgrade when the installation script is updated. Once more, you should not automatically upgrade any WordPress components.
Once you have set up the WordPress installation the way you want it, click on the Install button at the bottom of the page. That will initiate the process.
Complete the Process
Once the installation process is completed you will see this page no matter which method you chose.
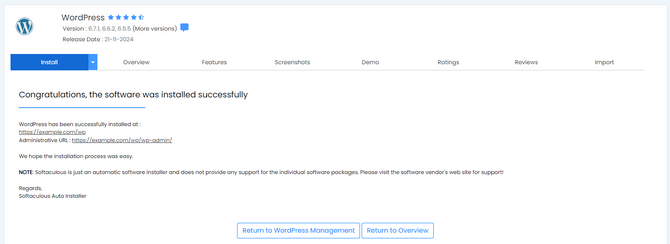
Congratulations! The WordPress application has been successfully deployed using Softaculous. You can click on the first link to head directly to your website. The second link will take you to your website's administrative dashboard where you can use your admin username and password to begin customizing it!
If you need further assistance, we are at your service. FastComet offers free professional WordPress installation on all hosting plans.

WordPress Hosting
- Free WordPress Installation
- 24/7 WordPress Support
- Free Domain Transfer
- Hack-free Protection
- Fast SSD Storage
- Free WordPress Transfer
- Free CloudFlare CDN
- Immediate Activation