How to Manage Tags in WordPress
Updated on Dec 6, 2022
WordPress tags are frequently used to categorize posts based on keywords you may have already established or just provided for the specific post you are creating. Due to the fact that once a tag is created, it may be used in as many posts as you wish, tags allow for the categorization of numerous topics under a single heading.
This lesson will show you how to use the WordPress admin area to add, update, or delete prefabricated posts.
When you complete this tutorial, you will be able to:
How to Access the Tags Page
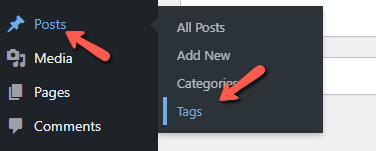
The tags home page in your WordPress Admin Area will be where we start. From your main admin panel, go to the Posts → Tags area.

Once you click on the Tags link, you will be redirected to the Tags page.

The left section of this page is for Add New Tag, and the right section will show you a table representation of the tags already in use.
Add and Edit Tags
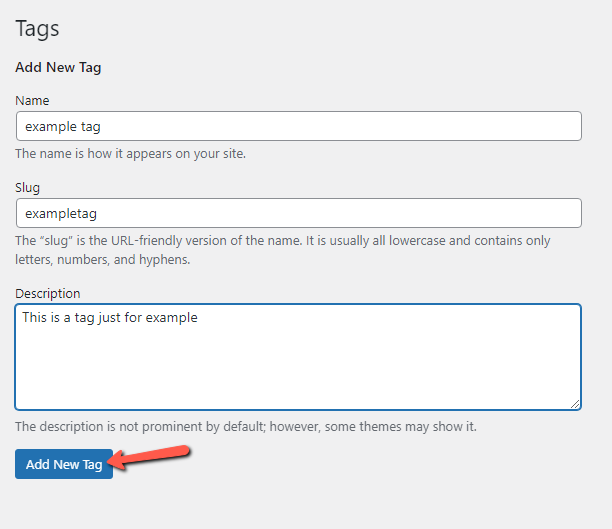
Simply utilize the left-hand side of the page to add a new tag while carefully filling out the necessary fields:
- Name – The actual name of the tag you would like to create
- Slug – The URL-Friendly version of the tag name
- Description – Used for describing the tag you are creating. Usually, it is set for your convenience, and it will not be displayed.
The Add New Tag button must be clicked after you have finished filling out these boxes in order to add the new tag.

The newly inserted tag will be visible in the table view on the right portion of the page, as you can see. Hovering your cursor over the tag name and selecting the Edit button will allow you to edit that tag.

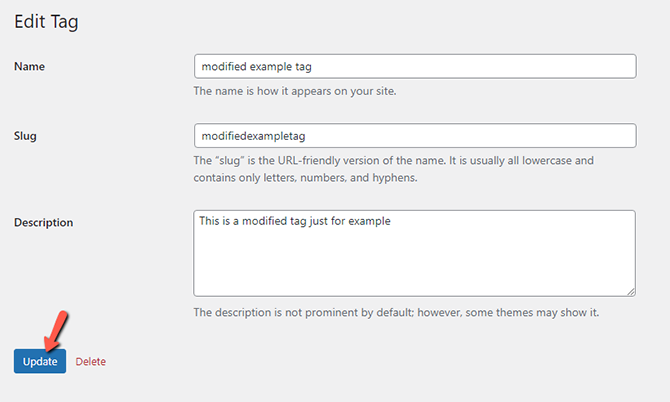
You can edit your tag information using the Edit button's interface. Although the interface is identical to the one you used to add the tag at the start of this lesson, the fields that are presented will already be filled with the data for the particular tag that you are updating. Use the Update button at the bottom of the page to update the information for the specific tag after you have finished modifying it.

You can learn more about how to delete a tag in the final section of this guide.
How to Delete Tags
You must return to the Tags home page or go to Posts → Tags in your WordPress admin dashboard to delete a tag.
Once there, you'll need to look for the tag you want to remove once more in the table view on the right side of the screen. Once you locate it, you must hover over the tag name and click the Delete option that appears, which will be colored in red.

Congratulations, you can now fully manage the tags on your website!

WordPress Hosting
- Free WordPress Installation
- 24/7 WordPress Support
- Free Domain Transfer
- Hack-free Protection
- Fast SSD Storage
- Free WordPress Transfer
- Free CloudFlare CDN
- Immediate Activation
