How to Export Content from WordPress
Updated on Dec 6, 2022
You will occasionally need to use the Export feature offered by the WordPress platform, either for backup purposes or to migrate material from one WordPress installation to another.
You will receive a thorough explanation of how the Export tool functions and how to use it in this tutorial.
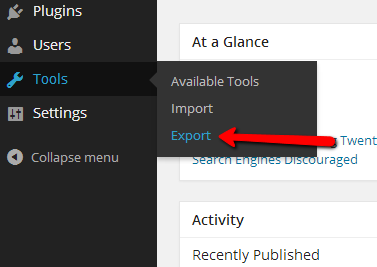
It goes without saying that you must first find the tool. To do this, log in to your WordPress admin area and go to Tools → Export.

Once you reach the export page, you will see a quick summary of the features of the export tool. In essence, the tool will construct an XML file automatically containing the content you have selected for exporting and downloading it to your local computer.
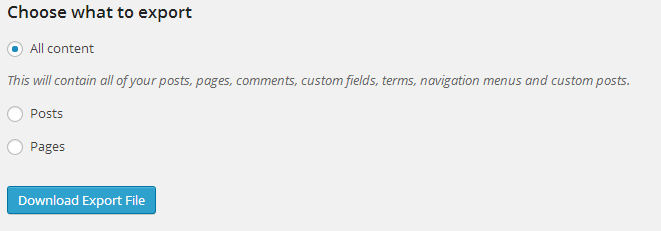
The export options can be found under the Choose what to export interface immediately following the description.

Basically, you must choose the All content export type if you want to export all of your website's content (Pages, Posts). However, there are a few extra settings we'd want to talk about if you need to export only certain posts or pages.
- Posts - You will see a few more options after selecting the Posts type of exported contents:
- Categories – You can choose a specific category to export or all of the categories using this option.
- Authors – You can choose to export either all posts related to a particular author or select All Authors and their linked contents.
- Date Range – The actual date range you want to export the postings from.
- Status — The exported posts' status. You will have the choice to export posts in the Published, Scheduled, Draft, Pending, or Private status using this option.
- Pages - You will see three further options for setting the exported pages after clicking on Pages type of exported contents:
- Authors – Use this option if you want to export the Pages for all writers or just a particular author.
- Date Range - The actual date range you would like the pages exported from.
- Status - The export's current condition. You will have the option to export pages in the Published, Scheduled, Draft, Pending, or Private status using this option.
Use the Download Export File button to start the export and download the relevant .xml file once you've finished selecting the component you want to export.
- Status - The status of the exported contents. This option will provide you with the alternative to export pages in either Published, Scheduled, Draft, Pending, or Private status.
Once you are done choosing the component you would like to export, simply use the Download Export File option so the export can begin and for the .xml file in question to be downloaded.
If you are interested in Importing already exported content, we have a guide for that as well.

WordPress Hosting
- Free WordPress Installation
- 24/7 WordPress Support
- Free Domain Transfer
- Hack-free Protection
- Fast SSD Storage
- Free WordPress Transfer
- Free CloudFlare CDN
- Immediate Activation
