Interface Overview
Updated on Jul 24, 2023
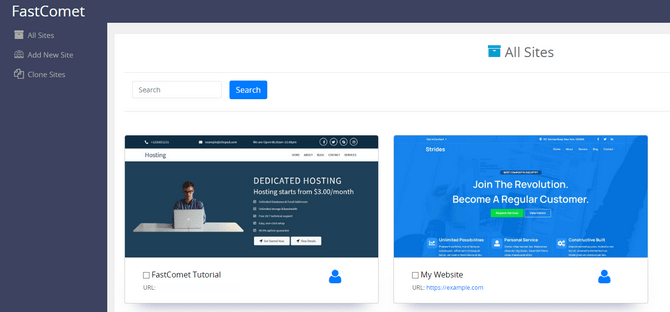
Let’s explore the interface of the FastComet Site Builder before we dive more deeply into each individual component it has and how to edit the website you just created. After creating your website, the dashboard will be populated with it and any other websites you have created previously.

On the left, you will see three buttons:
- All Sites - This will return you to the All Sites page of the dashboard, where you can see your websites;
- Add New Site - Click this if you want to create a new website with the builder;
- Clone Sites - This will allow you to clone an already existing website to a different domain.
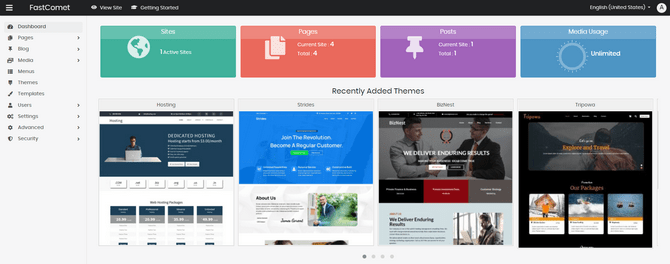
That is it for the main dashboard. The rest of the functionalities are within each individual website. To get to them, hover over your chosen website and click the Login to Site button (second from the left). The next page is the website’s main dashboard.

The main functionalities of the builder are on the left of the screen, and we will talk about them briefly. Later in this tutorial, we will dive into them in more detail.
- Dashboard - This will return you to the homepage of your website’s dashboard;
- Pages - View all currently existing pages or add a new one;
- Blog - View, create and manage your posts;
- Media - Upload and manage media files such as images or videos;
- Menus - Create and manage menus;
- Themes - Browse and install new themes;
- Templates - Create and edit templates for your website;
- Users - Manage user accounts;
- Settings - The Settings and Advanced tabs offer backend configurations you can make to your website;
- Security - Offers security measures and options to make your website more resistant to hacking attempts.
In the following parts of this tutorial, we will discuss these options in more detail and show you what they can do.

Website Builder Hosting
- Drag and Drop
- 24/7 Website Builder Support
- Free Domain Transfer
- Hack-free Protection
- Fast SSD Storage
- Free Cloudflare CDN
- Free Website Templates
