How to Upgrade SocialEngine to latest release
Updated on Dec 22, 2015
An upgrade of the SocialEngine core is recommended when you notice that there is a new release available. Each new SocialEngine version introduces a number of bug fixes and extended functionality for your website. In this tutorial, we will review the process of upgrading the SocialEngine core easily. If you follow our instructions carefully, you will also have a backup copy of your working website so you can restore it if something goes wrong with the upgrade.
Start a SocialEngine website in just 3 minutes:
To help you get started with SocialEngine our Technical Support team provides Free SocialEngine Installation and Upgrade.
- Free SocialEngine Upgrade by our Support Team
- Free Domain Name for Life
- 24/7 Technical Support team
- Optimized SSD SocialEngine Hosting
- Fast and Secure Servers
To complete the SocialEngine upgrade, please follow these steps:
Step 1 Create a full backup
The first step of the process is to ensure that you have a working copy of your website as a backup. If something goes wrong with the upgrade of your SocialEngine installation, you will be able to restore your website to a working state. This is the reason why we always recommend that you generate a full backup of your website before major changes like an upgrade of the SocialEngine Core.
Create a Backup
It is recommended to create SocialEngine backup, before making major changes on your website. This allows you to restore it to a fully operational state if something goes wrong.
The actual upgrade process is as easy as a game with SocialEngine. You simply need to follow the instructions and the system will complete it for you automatically.
Step 2 Download the upgrade package
The first step of the process is to download the upgrade package of your SocialEngine installation. You can do so via your Control panel at the official SocialEngine website. It is located at the bottom of the list of available downloads.

Alternatively, you can simply contact our Technical Support team and they will gladly create a backup of your website and then upgrade the SocialEngine Core for you. The process will be handled by our SocialEngine specialists so you will not have to worry about the actual upgrade or errors on your website after that.
Step 3 Initiate Upgrade
You can proceed with the actual upgrade process of your SocialEngine website. For that purpose, you will have to access the administrative area of your website first. Navigate to the Manage tab and then Packages & Plugins.

Click on the Install New Packages button, which will allow you to upload the upgrade package.

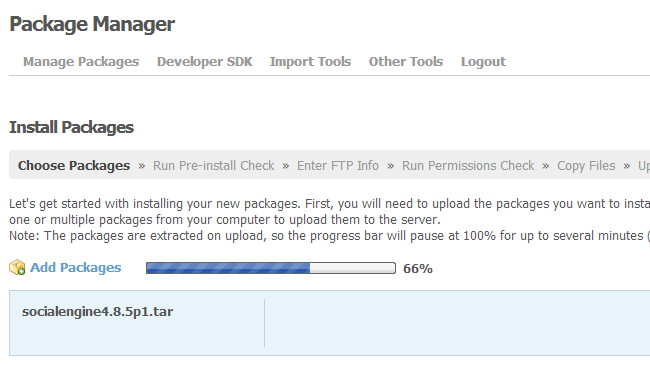
Select the Add Packages button and locate the upgrade archive from your local computer. The system will start uploading of the package and then extracting it. You will see a progress bar and messages on the screen for that purpose.

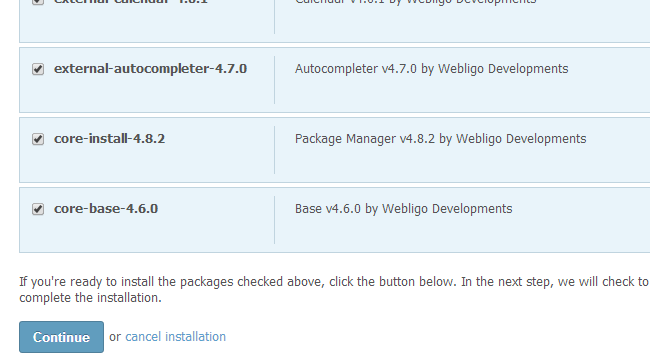
Once the extraction is completed, you will be presented with a list of all components on your website that will be upgraded during the process. You need to select them all and then click on the Continue button at the bottom-left corner of the screen.

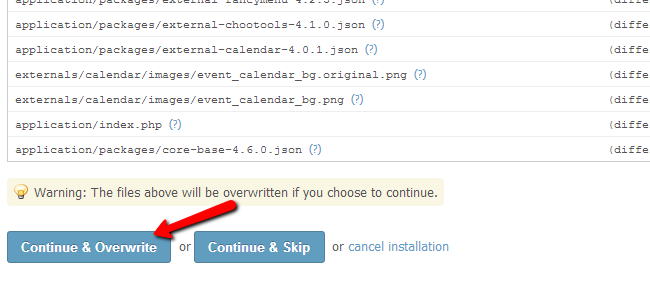
The system will display a list of the actual changes that will be performed on your website. The files that will be modified will be presented there as well. Review that information carefully and then click on the Continue & Overwrite button to proceed.

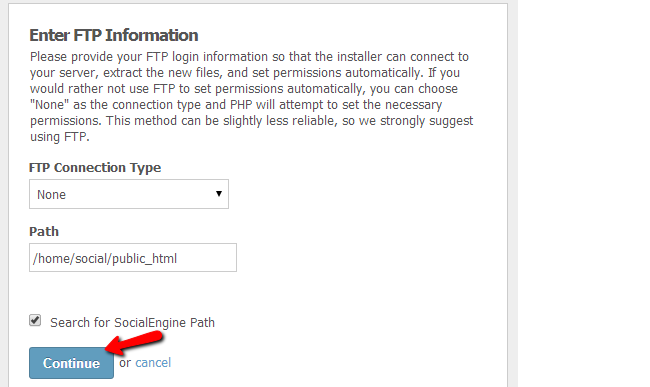
Choose a connection type for the process. This can be set to existing FTP account or to None if you do not have such created for your SocialEngine installation.

Click on the Continue button throughout the next steps. They are informative and you will not have any issues on them. Once the upgrade process is ready, you will be presented with a successful message on the screen.

SocialEngine Hosting
- Free SocialEngine Installation
- 24/7 SocialEngine Support
- Free Domain Transfer
- Hack-free Protection
- Fast SSD Storage
- Free Cloudflare CDN
- Free SocialEngine Transfer
- Immediate Activation
