How to install module in SocialEngine
Updated on Dec 10, 2015
It is important to generate a full backup of your SocialEngine website before any new installations or major changes on it. This way, if something goes wrong with your website, you will always have a working copy that can be restored. This is a good practice, which will allow you to edit and manage your SocialEngine installation without worrying that it may get corrupted.
Create a Backup
It is recommended to create SocialEngine backup, before making major changes on your website. This allows you to restore it to a fully operational state if something goes wrong.
The installation or management of additional modules in SocialEngine is easy. The process is almost fully automated and it is easy to complete it.
To install a new module on your SocialEngine website, you first need to download it on your personal computer. The addons for SocialEngine should be in a .tar format.
When you have the addon on your local computer, you can proceed further with it’s installation. For the purpose of this tutorial, we will install the Photo Albums module, which is one of the most popular SocialEngine modules.
You need to navigate to the Manage option on the top menu and then Packages & Plugins.

Click on the Install New Packages button.

Click on the Add Packages button. It will allow you to select the archive of the module from your local computer. Once you select your module, the system will start uploading it to the server for you.

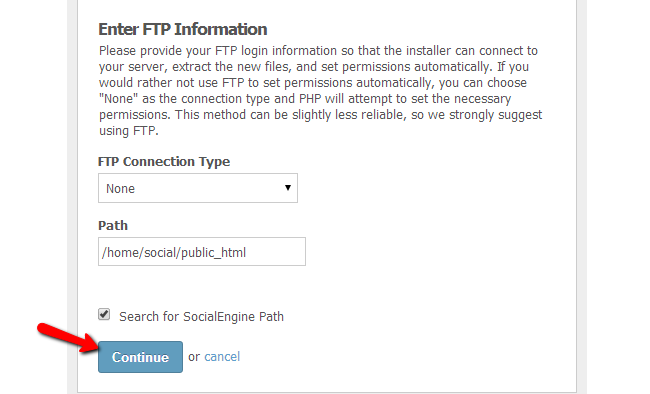
The system will inform you about the installation of the new module. Edit the following options:
- FTP Connection Type: Set this to None or to your FTP account details.
- Path: Enter the path of your SocialEngine installation. The system will usually complete that for you.

Click on the Continue button throughout the next informative steps. This will complete the installation process for the new addon on your website.
The new module is now installed on your website and you will be able to review it within the list of available addons.


SocialEngine Hosting
- Free SocialEngine Installation
- 24/7 SocialEngine Support
- Free Domain Transfer
- Hack-free Protection
- Fast SSD Storage
- Free Cloudflare CDN
- Free SocialEngine Transfer
- Immediate Activation
