Let's Encrypt Certificate Management
Updated on Apr 30, 2024
Attention!
This part of our tutorial is outdated. The Let's Encrypt plugin for cPanel has been discontinued and is no longer available. All Let's Encrypt certificates are now handled by AutoSSL. For more information, please read our blog post on the topic.
In this part of our tutorial we will discuss the practical usage of the Let’s Encrypt software. We will show you how to install, reinstall and remove a Let’s Encrypt certificate.
How to Install a Let’s Encrypt Certificate
Note
For Let’s Encrypt to be able to issue an SSL certificate on your domain, that domain must point to the server Let’s Encrypt is on. For instance, if you are using our hosting services, your domain must point to your chosen server with us via an A record. Otherwise Let’s Encrypt will not be able to install the certificate on your domain. This applies for all subdomains related to the domain as well.
Installing an SSL certificate on your website via Let’s Encrypt is very easy. All it takes is a few clicks. Just follow the steps we have described below.
- Open your cPanel;
- Head to the Security section and click the Let's Encrypt SSL icon;

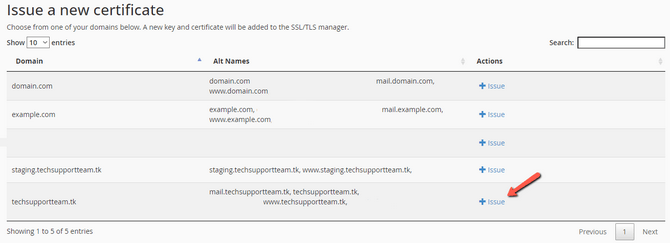
- The next page is split in two. The top part shows all certificates which are currently installed by Let's Encrypt. The section below, Issue a new certificate, is where you issue the certificates from. Click +Issue for the domain you want to secure;

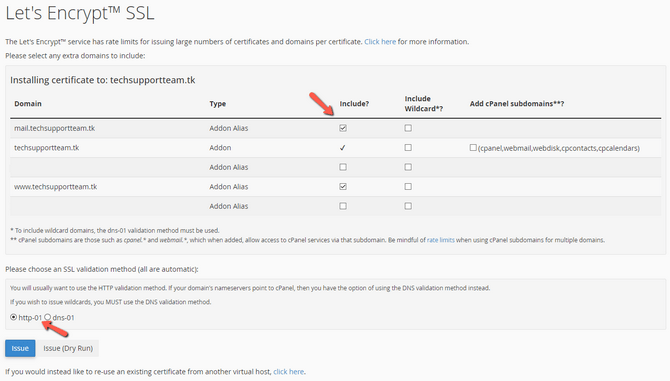
- Select the subdomains you want the certificate to cover by ticking them. The HTTP-01 validation method should have already been selected for you, so leave it as it is. DNS-01 is used when issuing a Wildcard certificate, but for all other certificates HTTP-01 is fine;

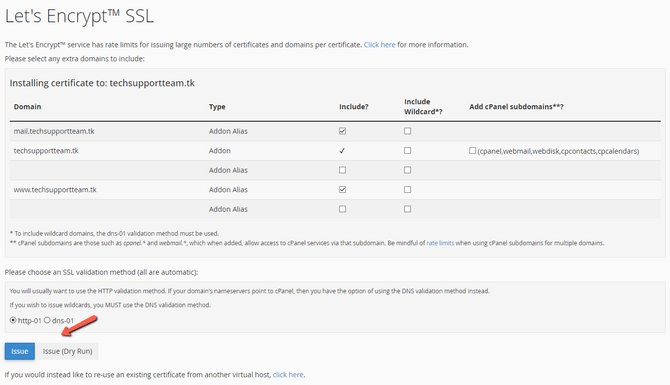
- Once everything is done, hit Issue. You can also click Issue (Dry Run) to test your domain's DNS setup or the connection to Let's Encrypt and see if an SSL certificate can be issued. That is useful because Let's Encrypt does have rate limits on how often or how many certificates it can issue to a specific domain.

If the installation is successful, you will see a successful message informing you the certificate was installed on the particular domain. Please allow a minute or two to pass after which your website will be accessible through https://. If that is still not the case, clear your browser’s cache since it might be loading a cached version of the website.
How to Reinstall and Remove a Let’s Encrypt Certificate
The Let’s Encrypt certificate is valid for three months and should renew automatically. If you want you can renew it any time during the three months it is valid. To reissue the certificate, log in to your cPanel and navigate to Let's Encrypt. From there, click on Reinstall to renew the certificate.

To remove the certificate, click Remove and if you wish to get your certificate's details, click View.


High Security Hosting
- Network Firewall
- Web Application Firewall
- Brute-force Protection
- Exploits and Malware Protect
- CageFS Security
- ModSecurity Manager