How to optimize the loading speed of your Store
Updated on Sep 12, 2016
When a Store is filled with a products up to a level where the loading speed of the pages is affected this is the time when the owner should consider the optimization of the Store. The process itself is relatively simple and it uses mostly the integrated optimization tools of PrestaShop 1.6. In the next few lines of this tutorial we will discuss the different optimization techniques you can use for optimizing the loading speed of your store.
To optimize the loading speed of your Store, you need to:
Access the Performance Settings
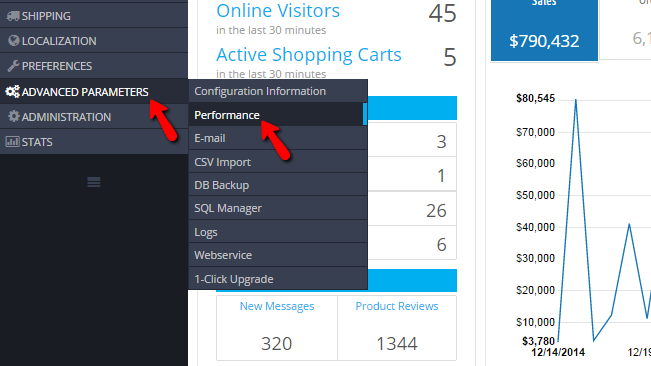
All the implemented optimization options are conveniently stored into the Performance page of the PrestaShop 1.6 Back office. In order to access that page you will need to actually login into the Back Office and then to navigate to Advanced Parameters → Performance.

Once there you will find quite a lot of options to choose from and in the second step of this tutorial we will provide you with detailed information on all of them so you can determinate what you should use in order to have your Online Store's loading speed optimized to the edge.
Use the provided Optimization Techniques
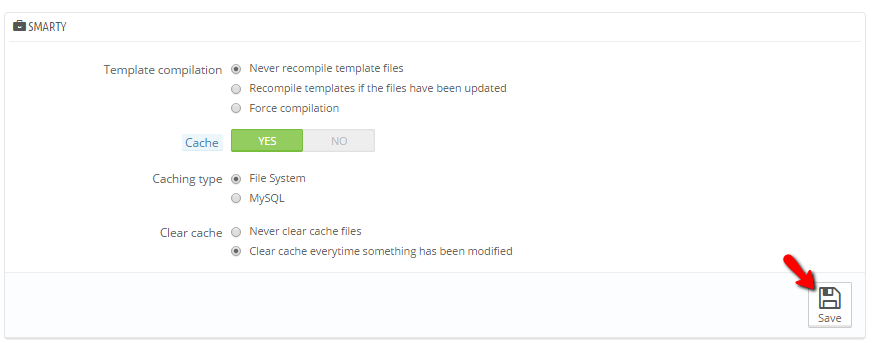
The first section of the Performance page is called Smarty. This names stands for a template engine which is widely used by few php based frameworks. The options you will need to consider in this section are:
- Template compilation - This option is used when the static files for the template used by your PrestaShop should be compiled. We strongly recommend for this option to remain unchanged or "Recompile templates if the files have been updated"
- Caching type - The Smarty template engine has an integrate cache feature and here you can choose if the cache should be stored in the files or in the database. For optimal performance we recommend for the cache to be store in the files of your Store
- Clear cache - This option is used to define when exactly the cache of your Store should be cleared automatically. We recommend for this option to remain as it is by default or "Clear cache everytime something has been modified"
Once you are done with the configuration of these settings please use the Save button located at the bottom of that section.

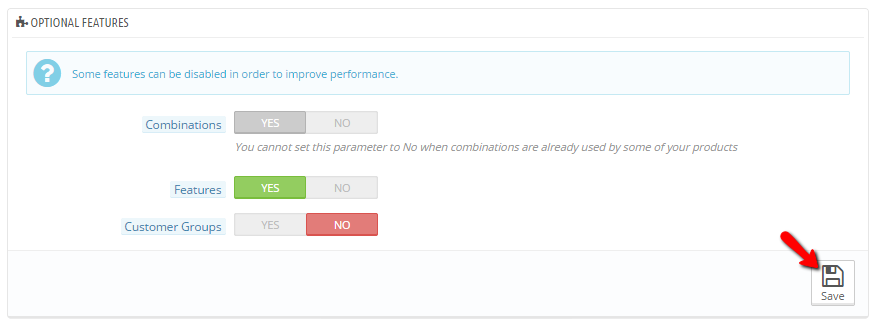
The next section of settings you will be able to find is called Optional Features and the options you will be able to find there are:
- Combinations - This option will allow you to disable any active combinations from your store in order for the overall performance to be improved
- Features - This option will allow you to disable the features for your products
- Customer Groups - This option will allow you to disable the grouping of the customers of your Store
Once you are done editing the options of this section please use the Save button located at the bottom of the section.

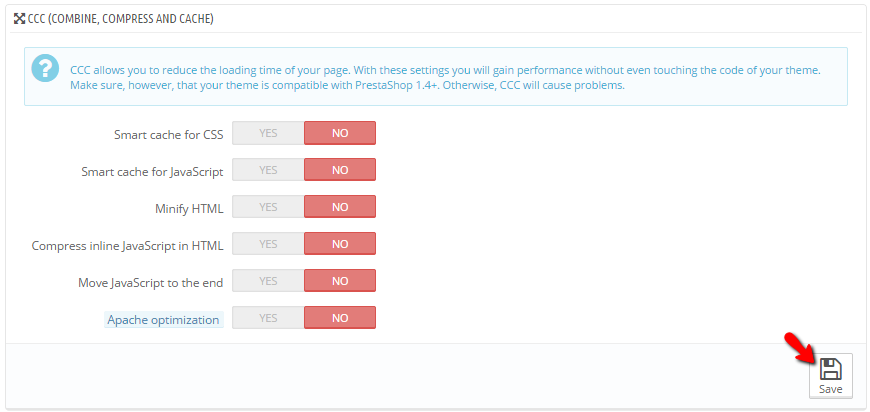
The next section is called CCC or COMBINE, COMPRESS AND CACHE. These options will dramatically boost the performance and the loading speed of your website, however you should activate them once you are ready with the design of your store due to the fact that if you activate these earlier you might notice how the design changes you are implementing will not be displayed on your Store.
The options available in this section are:
- Smart cache for CSS - This option will allow for all the CSS files to be cached based on the configuration performed previously (in the database or on the file system)
- Smart cache for JavaScript - This оption will allow you to enable the cache for the Javascript files again on the filesystem or in the database depending on the configuration performed earlier.
- Minify HTML - The minification of static components is something which became more and more popular over the past few years as it transforms the HTML code for your website into non-human readable format which is reducing the overall size of the page
- Compress inline JavaScript in HTML - This option will allow your website to compress the javascript code along with the HTML
- Move JavaScript to the end - This option will move all the javascript code if the end of the code for your website so all the components can be loaded before the Javascript code
- Apache optimization - This option will automatically add directives to the .htaccess of your Online store which are based on the widely used Apache web service. The optimization will mostly target the compressing and the cache of static contents by your client's browsers
Once you are done with all these settings you will need to use the Save button located at the bottom of the page.

The last section you will need to configure is the CACHING section and there you will be able to enable and define the cache method your website should be using. For optimal performance we recommend the Memcached method as we support it on our shared hosting environment. Note however that you will need to submit a support ticket so our technicians can provide you with the credentials which should be used for the configuration of the Memcached service.

Once you are done with the configuration of this last section you should again use the Save button so the configuration can be saved.
Congratulations! You can now fully optimize the loading speed of your website based on your needs!

PrestaShop 1.6 Hosting
- Free Installation
- 24/7 Tech Support
- Free Domain Transfer
- Hack-free Protection
- Fast SSD Storage
- Free Cloudflare CDN
- Free Website Transfer
- Immediate Activation