Installing a New Template in PrestaShop
Updated on Dec 10, 2015
Building a good looking online store can not only bring new customers, but also can verify the identity and the quality of the products you are selling. Currently over the web there are quite a lot of PrestaShop templates you can search for and once you find the correct one you will be able to easily install and configure it on your store.
If you are not quite convinced that the templates over the web are with good quality or their resources are questionable you can always trust the authors of the application with their template gallery.
There you will be able to find large amount of trusted and optimized templates which you will be able to choose from.
Assuming that you have chosen the template you would like to use, this tutorial will illustrate how you should install the theme and activate it for your Store.
To install a new Theme, you need to complete the following steps:
Import a Theme
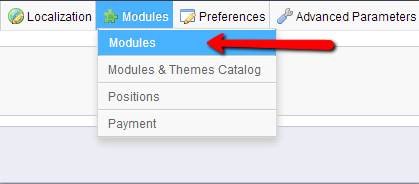
First we will import the theme into your Store. This can be done easily via your Store's admin backend → Modules → Modules.

This will display the home page for all of the modules installed or not on your Store. Search for a module called Import/export a theme. When you find it make sure that the module is installed and simply click on the Configure link bellow the module's Description.

The Configure link will redirect you to the module's configuration page where you should be able to import the new theme you would like to use. In order to import the theme you have few options you should consider.
- Import from your computer - The easiest option of them all. You simply point the theme archive located on your computer and the importer will upload and install the theme with few clicks.

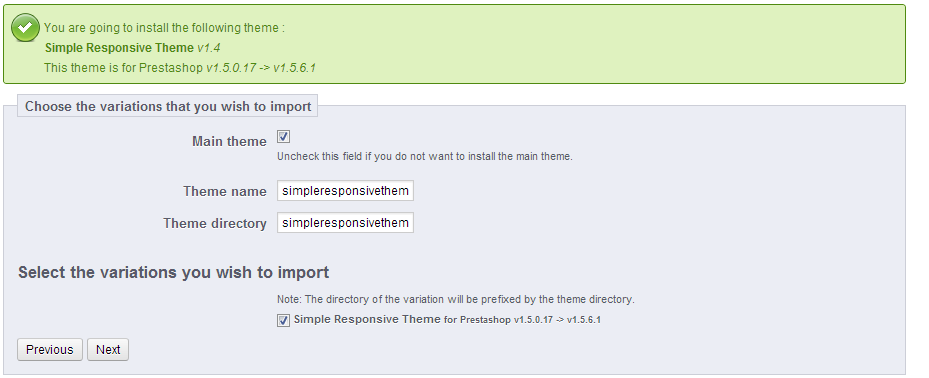
Once you point the archive please press the next button located in the interface so the import process can begin. On the next page, if the import file is the correct one you will be prompted with a summary message for your new theme.

Please press the Next button so you can move forward with the installation.
Install a Theme
On the next page you should select the modules that should be installed with the concrete theme, disabled due to theme requirements and also the native module configuration. Once you are done with this task please press Next.
The last page from the installation will give you a brief summary on what has been installed like the theme components and custom modules. If there are no warning messages please press the Finish button which will finalize the installation of your template.
- The next option is for a template to be imported from the web. For this option you will need the exact URL to the theme archive - for example http://example.com/themename.zip

- Once you point the exact URL for your theme the installation process is the same as the one described in the previous option.
- The last option is for the theme to be imported directly from the folder of the Import/Export a theme module. This option requires for you to upload the theme archive in the following folder located in your Store's root path: modules/themeinstallator/import/
Once the theme is uploaded there you will be able to choose the theme archive from the drop down list and to press the Next button which will initiate an installation procedure the same as the one we have described for the first module.

Assuming that you have installed your theme it is time for the same to be activated.
Activate the Theme
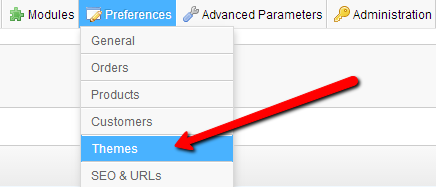
Most of the themes you are installing via the Import/Export a theme module will be automatically activated, however if they are not you should simply go to your Store's backend → Preferences → Themes and activate the new theme.

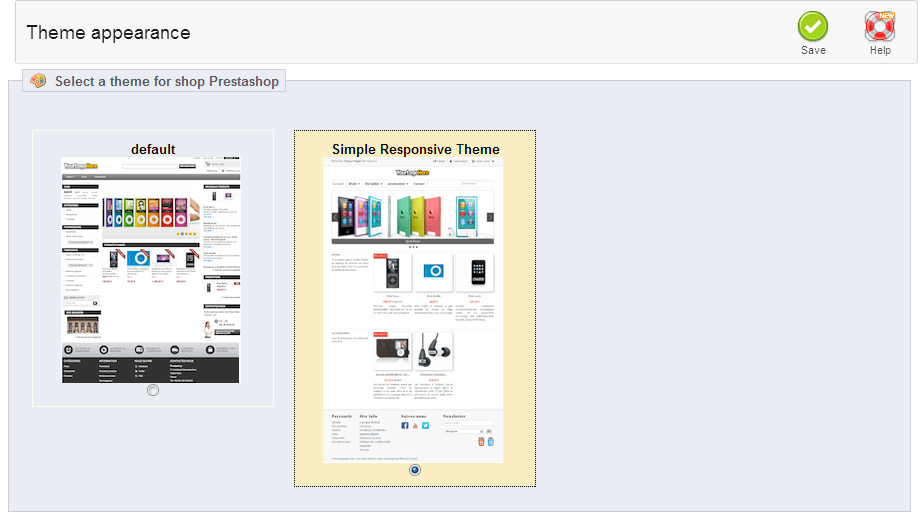
Once you are on the Themes home page you should be able to select the newly installed theme and to press the Save button so your new theme can be activated.

For the purpose of this tutorial we have used a freely distributed theme called Simple Responsive Theme.
Congratulations! You have successfully installed a new template in PrestaShop 1.5!

PrestaShop Hosting
- Free Installation
- 24/7 Tech Support
- Free Domain Transfer
- Hack-free Protection
- Fast SSD Storage
- Free CloudFlare CDN
- Free Website Transfer
- Immediate Activation
