Activating the SEF URLs on your Store
Updated on Dec 10, 2015
Enabling your Store to be more recognizable by the search engines and respectively to have a good positioning in related searches can be a task which requires the attention of SEO specialists.
Fortunately PrestaShop provides the users with the option to activate Search Engine Friendly URLs which will dramatically optimize the ranking of your web-site due to the key words that can be found in the URL.
To set up SEF URLs for your PrestaShop, you will need to:
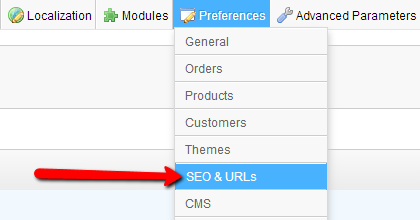
Access the SEO and URLs menu
Enabling this option and respectively managing the names of your pages is fairly easy in PrestaShop. In order to access the home page for the Search Engine Friendly URLs you will need to login into your Store's admin backend and navigate to Preferences > SEO and URLs.

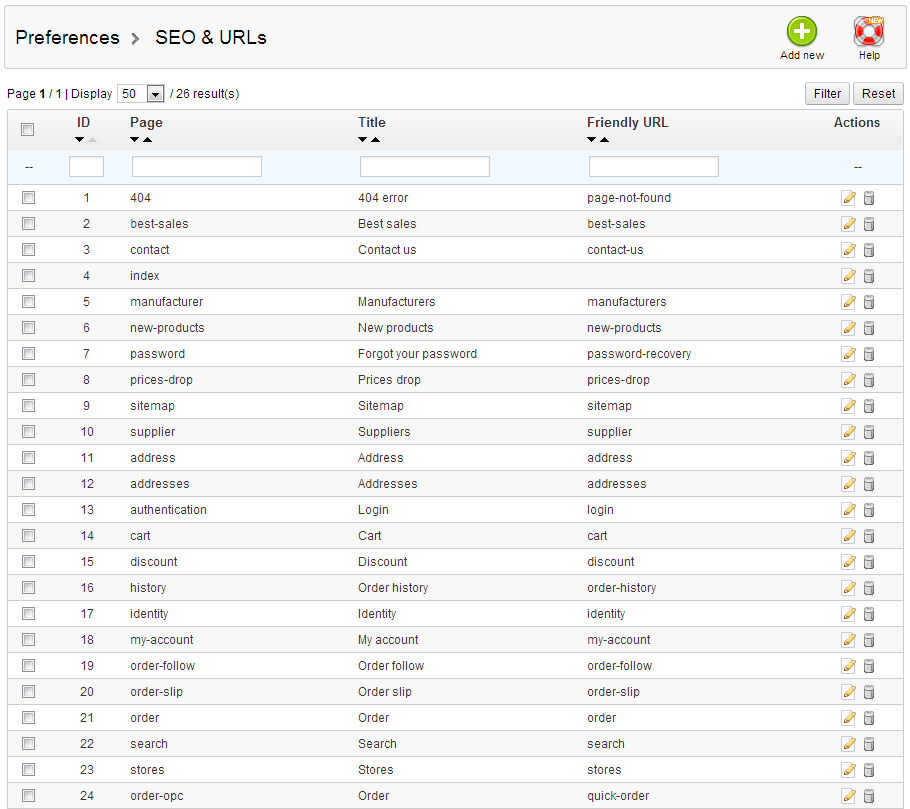
The landing page you will be redirected to is quite easy and intuitive. At the top you will be presented with a table view for all of the currently active pages from your store which already have SEF URL configured.

In order to edit already existing page please use the editing icon located at the end of every entry in the table view or if you would like to delete an entry please use the deletion icon.
In order to add a new page to the list (page you might have just created you can check our tutorial for how to create pages in PrestaShop) you should simply press the Add new button located at the top action bar.

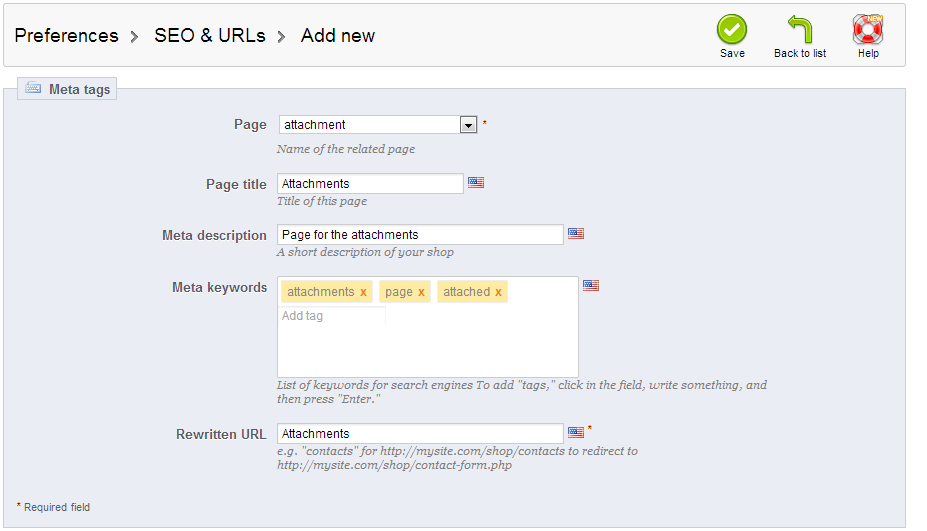
Then you will be redirected to the Meta tags interface where you will be able to add the new page. The interface is quite simple and by filling all of the required fields you will be able to easily add a new page to the SEF URLs pages.

- Page - A list of the currently existing pages on your Store.
- Page tittle - The tittle you would like to be displayed for this page.
- Meta description - Short description what your page will be for.
- Meta keywords - Any related keywords contained on the page.
- Rewritten URL - The displayed name of the page in the URL
Once all of the fields are filled with information simply press the Save button so your new page can be saved and you will be able to notice the newly added page at the bottom of the table view located at the SEO and URLs home page.
Activate SEF URLs
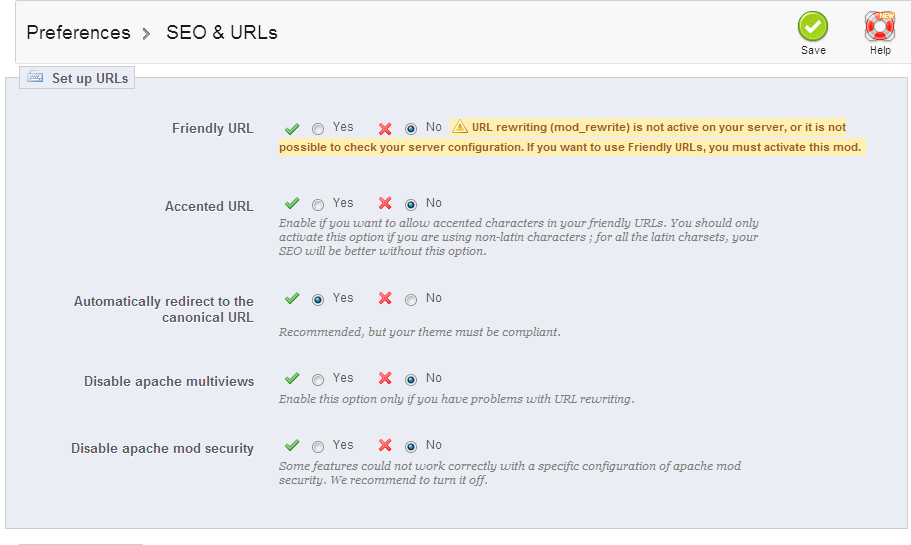
When you confirm that all of the pages you would like to have SEF URLs activated are configured and presented in the table view it is time to activate the actual feature. This can be easily done if you scroll down the SEO and URLs home page and locate the "Set up URLs" interface.

At this interface you will notice few options that need to be configured but most importantly you will need first ensure that the web server module called mod_rewrite is activated. If the module in question is not activated you will be provided with a warning message informing that you should activate the module in order to use SEF URLs.
- Friendly URL - The actual option that enables/disables SEF URLs.
- Accented URL - This option is if you would like to use characters in your URL different than the standard latin characters. If you are planning to use latin characters only you should leave this option deactivated.
- Automatically redirect to the canonical URL - Use this option only if your template supports it.
- Disable apache multiviews - This feature is quite handy if your shop is displaying large amount of 404 Not Found errors to your clients due to mistake in the URL your client is using. In such cases the multiviews module will present a content closes to the URL the client requests and will not redirect the client to the 404 Not Found error page.
- Disable apache mod security - ModSecurity is a security module for the apache service which is examining each and every request made to your Store and respectively the response your Store returns. Usually this module is providing good level of security for your store, however if you are not familiar with that module, it is recommended to disable it for your store using this option.
Once all of these options are configured depending on your needs please use the Save button located at the action bar right above the Set up URLs interface in order for the options to be saved.
Congratulations! You can now easily manage the SEF URLs on your Store!

PrestaShop Hosting
- Free Installation
- 24/7 Tech Support
- Free Domain Transfer
- Hack-free Protection
- Fast SSD Storage
- Free CloudFlare CDN
- Free Website Transfer
- Immediate Activation
