How to setup Oxwall Cronjob
Updated on Dec 10, 2015
In this tutorial we will guide you on how to setup the default Oxwall cronjob via cPanel. The cPanel control panel interface provides an easy to use interface via which you can configure your cronjob in just a few clicks.
Need Help with Oxwall?
FastComet Oxwall Hosting package is specially optimized to provide fast and secure hosting environment for Oxwall with free 24/7 Oxwall Technical Support.
To proceed with the setup login your cPanel and click on the Cronjobs icon under the Advanced section.

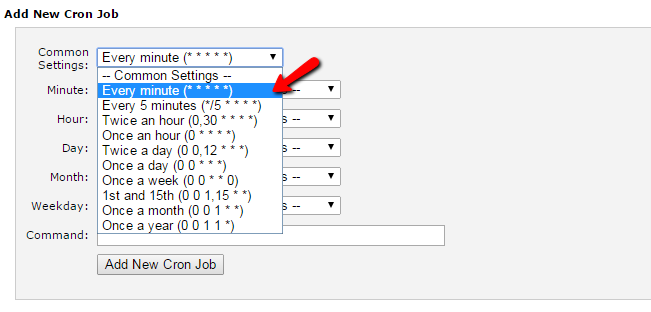
On the Cronjobs page select the period for your cronjob via the drop down menu. Oxwall recommends to have your cron set to run every minute. If your hosting provider have any limitations on the cron execution you may select a different period for your cron.

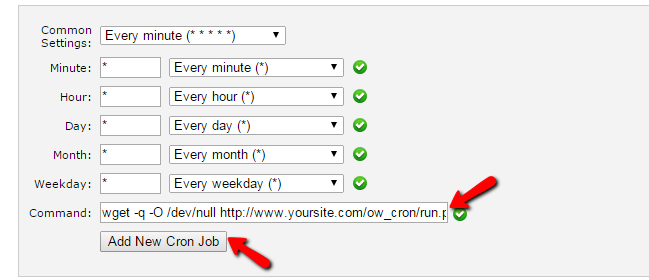
When you have the Oxwall cron time frame selected input the following command into the Command field:
wget -q -O /dev/null http://www.yoursite.com/ow_cron/run.php
Remember to change 'yoursite.com' with your actual domain name.
When you are ready, click on the Add New Cron Job button below.

In case you experience any difficulties with the suggested setup above or your cron does not work the wget might be missing on your account or hosting server. As an alternative you may use curl or lynx to access your cron file. Try one of the following commands:
lynx http://www.yoursite.com/ow_cron/run.php

curl http://www.yoursite.com/ow_cron/run.php
If both the curl and lynx are not available on your host you may execute the cron using the php binary. To apple this method change the command to:
/usr/bin/php /home/username/public_html/ow_cron/run.php
Be advised that you should make sure that this is the correct path to your php binary and apply the correct path to your Oxwall cron file.

Oxwall Hosting
- Free Oxwall Installation
- 24/7 Oxwall Support
- Free Domain Transfer
- Hack-free Protection
- Fast SSD Storage
- Free Cloudflare CDN
- Free Oxwall Transfer
- Immediate Activation
