Best Practices
Updated on Mar 13, 2019
Maintaining the size of the database used by your website is a critical routine which every website owner should consider implementing in their workflow. This will help the website not only to avoid downtime, but also will provide its visitors with that next level experience which separates the good websites from the best ones. In the next lines of this tutorial, we will provide critical pieces of information on the best practices of maintaining the database size of our customers' web hosting accounts.
Choose your application from the list:
General Database Maintenance
In order to maintain your databases in a fair size, you should regularly check their sizes and use the phpMyAdmin Database Management application to:
Note that you must always optimize your tables after you reduce their size.
Furthermore, you can always contact our Technical Support Team and ask them to check if there are any slow queries detected for certain database on your account. Please note that as a slow query we consider each query that takes more than 2 seconds to execute. The typical reason for those is a large set of data being requested.
How to reduce the size of a WordPress Database
WordPress is an Open Source platform utilized by more than 80% of the websites we host on our Shared Web Hosting packages. At its core, WordPress was meant to be a blogging platform, but the community demand made it one of the best CMS which can be configured and extended basically to any type of website like Online Store, Forum, Social Platform, Video Sharing website and so on.
As such, WordPress receives quite a lot of attention from plugin authors and theme developers extending it every day. The vast amount of available plugins offers different functional components which every WordPress website owner can take advantage of.
In the context of database maintenance, WordPress does not offer any tools for database management by default. However, the extendability which is included allows for different plugins to be installed in order for its database to be properly maintained.
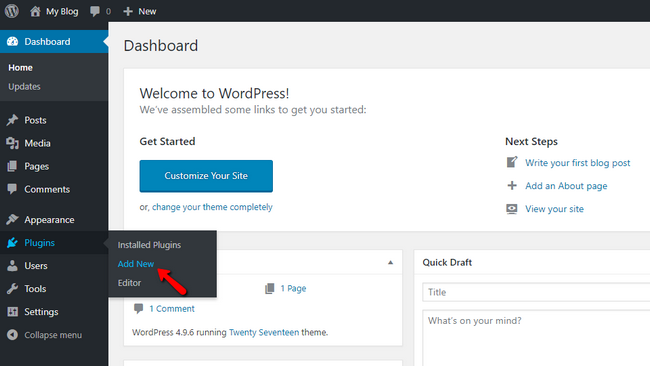
One of the greatest plugins for database maintenance we have used so far is WP-Optimize. To install that plugin on your website, you will need to access your WordPress admin Dashboard and to navigate to Plugins → Add New.
Once there enter the name of the plugin in the Search bar and click on the Install Now button once the plugin is found in the list of plugins.
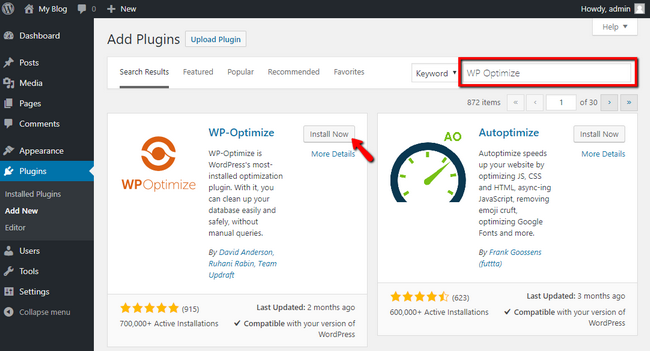
When the plugin installation process finishes, you will be presented with a blue Activate button in place of the Install Now button which you have already pressed.
Once the activation is completed a new menu item called WP-Optimize will appear in your WordPress Admin Menu. Click on it, and you will land on the plugin's administrative page. By default, WP-Optimize will select the tables that can be safely optimized. To quickly optimize those please click on the Run All selected optimizations button at the top of the page.
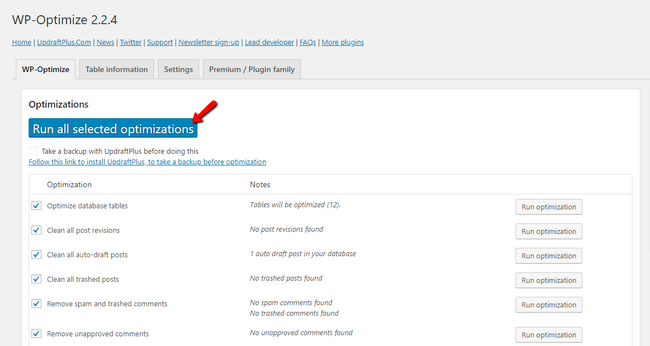
Slowly but surely the plugin will optimize the selected tables reducing their size significantly especially if the website is old and such optimization was never performed.
Of course, if that does not free much disk space you can always fulfill the General Database Maintenance procedure described initially in this tutorial or check our blog post on how to reduce the size of your WordPress database for more tips on the matter.
How to reduce the size of a Magento 1.9 Database
Magento is probably one of the most (if not the most) reliable and stable Open Source application for building and maintaining E-Commerce website. It is often the choice of large companies for BTB and BTC product sales.
Typically, the database of Magento has pretty low size when the application is initially installed. With the website being developed, however, the database slowly but steadily becomes larger in size. Logically as a main reason for that is considered the administration of the online store and more precisely the increasing product base.
However, that is not the case. Probably one of the most negative sides of Magento is the way how multiple logs are being preserved in the main database of the application. Up to now, we are familiar with the following tables that can be safely cleared periodically for the 1.9 branch of Magento:
log_customer
log_visitor
log_visitor_info
log_url
log_url_info
log_quote
report_viewed_product_index
report_compared_product_index
report_event
catalog_compare_item
For the manual clearing of these tables you can check our phpMyAdmin tutorial and more specifically the section "How to reduce the size of Database Tables?". Since you have to choose the tables to be emptied, please consider the above-provided tables as safe to be cleared no matter what.
Another way of maintaining a healthy database size is to use the provided official tools by Magento. By default, these tools are not enabled. To enable these, the Store Administrator will have to dig into tons of settings and configurations which is often inconvenient and requires a deeper knowledge of how the application operates. Fortunately, we will fully cover the required steps of achieving that in the next few lines.
To enable cleaning for the logs from your Store Administration, please navigate to System → Configuration.
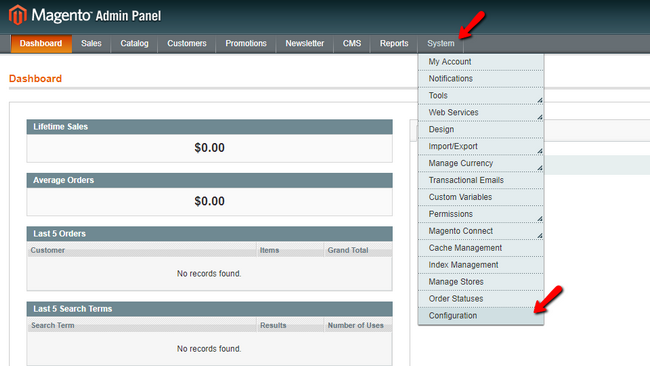
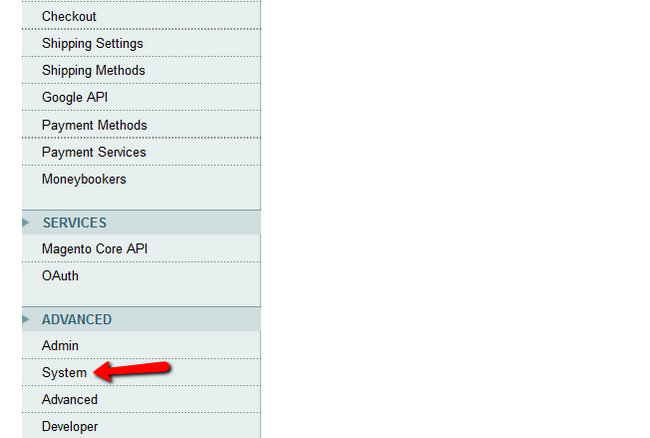
There you will need to scroll down to the bottom of the page and choose the menu item System from the left vertical navigation menu.
You will be presented with a set of foldable sections representing different System configurations. The fifth one should be called Log. Click on it so you can expand the Log configuration options.
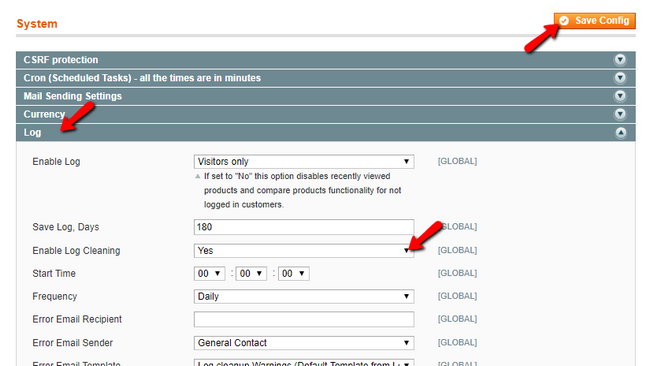
Then please select Yes from the drop-down list under the Enable Log Cleaning option and ensure that the Frequency will be set to daily. Finally, save the configuration using the Save Config button at the top right side of the page.
You can entirely disable the logging by using the first option in the Log list of System Configurations. To do that, change the value of the Enable Log option from Visitors Only to No and save the configuration again using the Save Config button located at the top right side of this interface.
Since in Magento 2.x the database is way more optimized, and the only option to maintain the database is following the General Database Maintenance procedure described initially in this tutorial.
How to reduce the size of a PrestaShop Database
PrestaShop is another great and reliable application for creating and managing an Online Store. The database of the application is well optimized, and apart from the few statistic tables, there are no other tables that can be cleared. Of course, since the application can be extended with many third-party modules that can vary.
In the general scenario, however, the following tables can be safely emptied due to the fact that they mostly keep statistic data following our phpMyAdmin tutorial for emptying tables. Of course, if you are NOT willing to lose statistic data, please avoid clearing those.
ps_connections
ps_connections_page
ps_connections_source
ps_page_viewed
ps_guest
Also, if clearing these do not reduce the database size that much you can consider Optimizing and further clearing other tables as well, following the suggested actions in our General Database Maintenance section of this tutorial.
How to reduce the size of a Drupal Database
Drupal is another Open Source platform that can be transformed in basically anything you might need from a website. The specific thing with it, however, is that it more developer oriented making it a bit hard for the users just starting with it.
Still, if you have a Drupal-based website, then most probably you will need to maintain the database size in reasonable numbers. The database of the Drupal application contains a few tables that can be safely cleared without actually losing much. Following our phpMyAdmin tutorial for emptying tables you can consider the following tables that can be emptied:
sessions
cachetags
cache_bootstrap
cache_config
cache_container
cache_data
cache_default
cache_discovery
cache_dynamic_page_cache
cache_entity
cache_menu
cache_page
cache_render
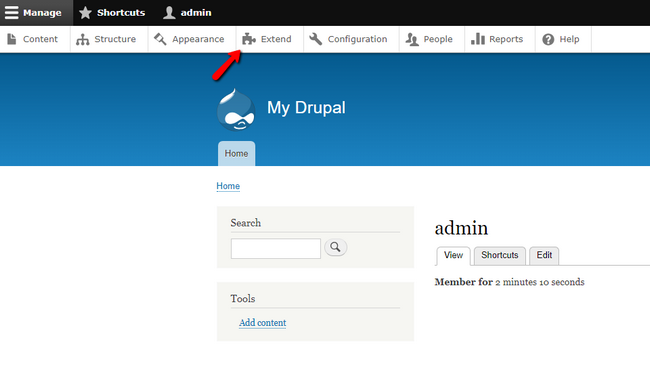
If you do not feel confident in clearing these, you can always use a plugin which will help you clear and optimize all the tables of your database. The plugin is called OptimizeDB and to install it you will need to first login into your Drupal admin area. Then you will have to navigate to the Extend link which can be found in the top horizontal menu.
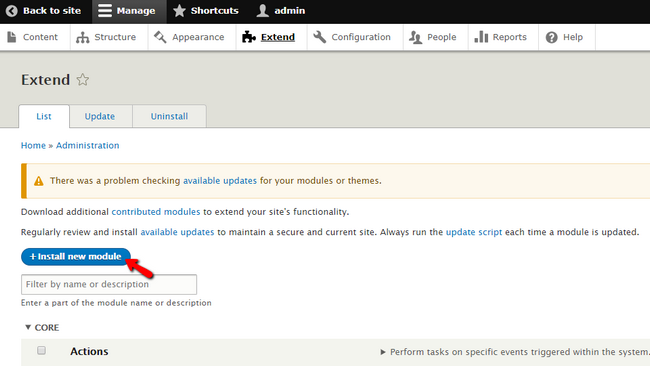
Next, you will have to click on the Install new module button so you can begin the installation process.
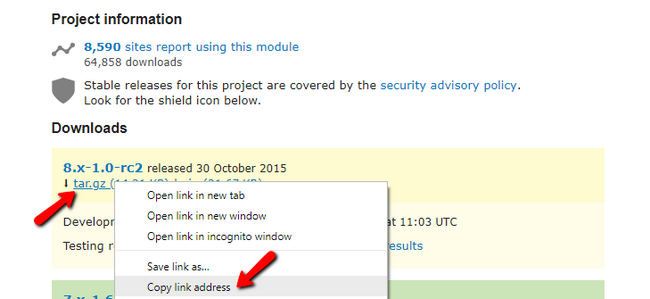
In the next interface, you will have to input the URL to the module. You can find that on the home page for that module right under the Downloads section. Please copy the URL of the tar.gz archive.
Next go back to the Drupal plugin installation page and paste the URL into the Install from a URL field:
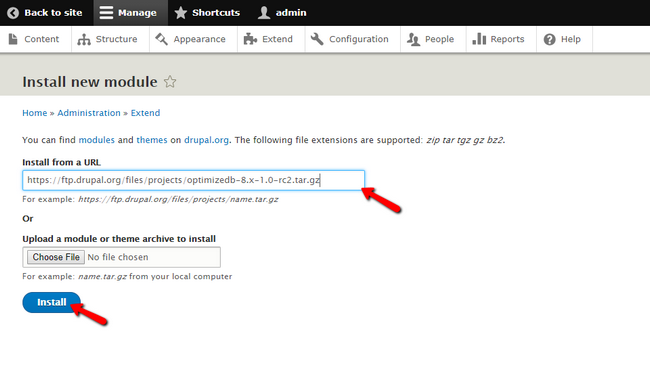
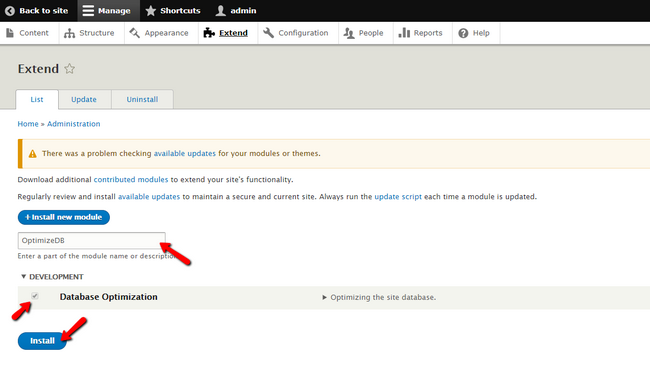
Finally, please click on the Install button so the installation can begin. Once the module is installed, you will have to activate it. To do that please go back to the Extend page of your website and search for the name of the module – OptimizeDB.
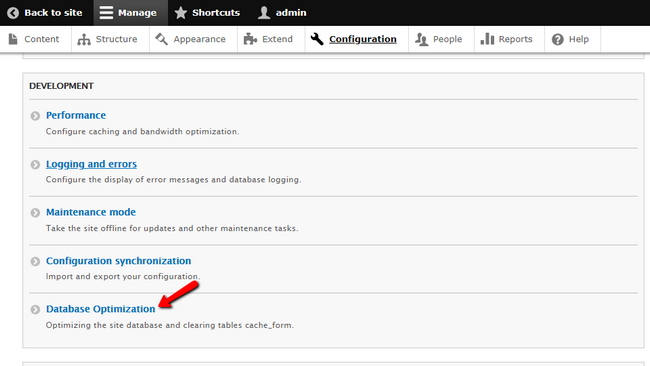
When the activation of the module is completed, please navigate to the Configuration section of your Drupal website and search for the Database Optimization feature under the Development group of features.
The OptimizeDB plugin is separated into two areas. Frist, you will be presented with the general Database Optimization area where you will have a single option of optimizing all the tables.
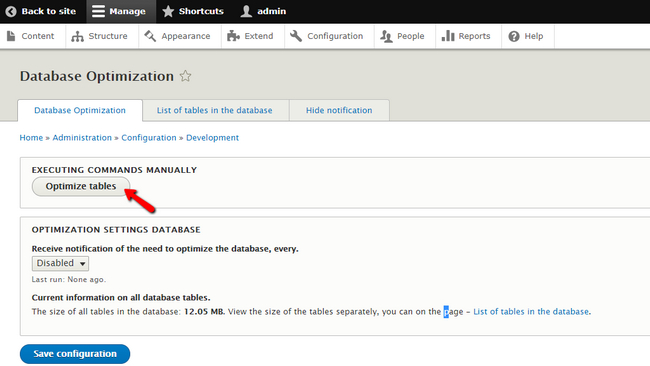
Clicking on that button once will optimize all the tables in your database reducing their size significantly.
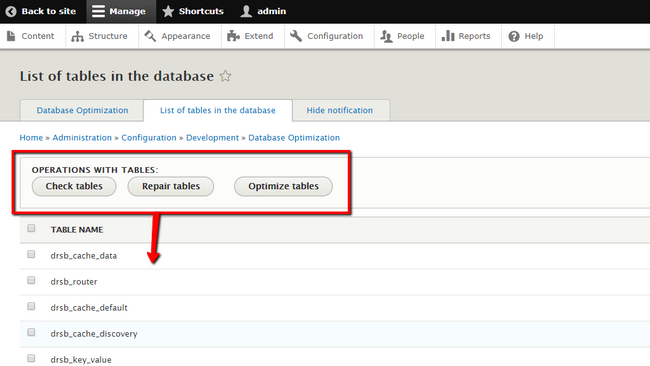
The second area is called "List of tables in the database" and there you will find detailed information for each and every table. Also, you will find the options for Check Tables used to check the selected tables for errors or breaks, the Repair Tables which will help you repair the broken tables in your database and finally the Optimize Tables option which will optimize the selected tables from the list below.
Of course, if that does not resolve and database size related issues, you might want to look for professional help utilizing the services of an expert Drupal developer who will be able to analyze and then propose further actions so the database size can be reduced.
How to reduce the size of a Joomla Database
Joomla is also a commonly used Open Source application which is extended thanks to thousands of plugins and modules. Although you will probably find many plugins for the optimization of the database tables, there are no much not to say none is offering to clear large database tables. The reason for that is actually in the way how Joomla is built. The application does not produce large log or cache tables which allows for its database to remain in reasonable margins in terms of size.
Still, in the past, we have released a great tutorial covering the optimization of Joomla database which you can safely follow so you can maintain a good database size.
Of course, the General Database Maintenance procedure described initially in this post can also be performed in case of a dramatic increase in the size of your Joomla Database.

Optimized SSD Web Hosting
- Free Domain Transfer
- 24/7 Technical Support
- Fast SSD Storage
- Hack-free Protection
- Free Script Installation
- Free Website Transfer
- Free Cloudflare CDN
- Immediate Activation
