How to Add Products in Magento 1.x
Updated on Mar 8, 2019
Adding products to your Magento store is a pretty straight forward process. We assume you have already created your Product Categories and Attribute Sets. You can find the required steps to achieve this in our previous chapters of our Magento tutorial.
To add a new product, please login your Magento Admin Dashboard and navigate to Catalog → Manage Products from the main top navigation menu.

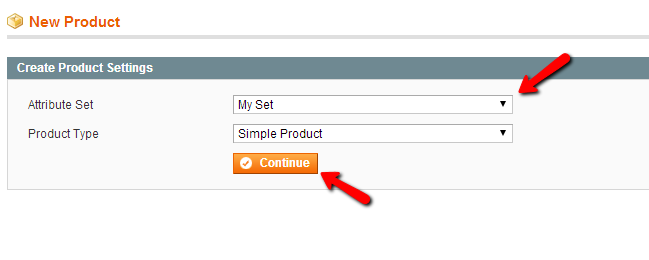
On the new page click on the Add Product button on the right side of your screen. On the new page, select the desired attribute set or use the default one and the product time then click the Continue button.

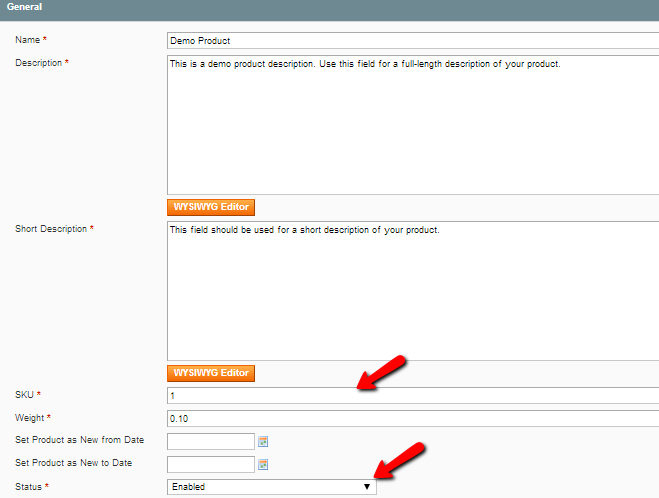
This will bring you to your product configuration page. Please input the required fields such as product name, short and full product description as well as the product SKU and enable the product via the status drop down. Be advised that the SKU should be an unique number which will be associated with your product and it is used by the Magento store to differentiate products.

When you are ready click on the Prices tab from the menu on the left to configure your product price and any promotional price periods if you would like to offer certain discount for a period of time.

To upload your product images, please refer to the Images tab from the menu on the left and use the Browse Files... button. When you have all the images selected click on the Upload Files button.

You can check all the available options if you need to further tweak your product settings but one of the most important options that need to be covered is the product quantity located under the Inventory tab. Please click on the Inventory tab on the left and fill in the quantity available for this product and put the product "In Stock" via the Stock Availability drop down menu.

When you are ready click the Save button on the top of the screen.

Magento Hosting
- Free Installation
- 24/7 Magento Support
- Hack-free Protection
- Fast SSD Storage
- Free Domain Transfer
- Free Magento Transfer
- Immediate Activation
- Free Cloudflare CDN
