Middleware
Updated on Jul 11, 2024
In this part of our Laravel tutorial, we will explain everything you need to know about middleware. First, let's answer the obvious question: What is middleware?
When talking about middleware, the general description is this: software that provides functionalities to applications beyond those available from the operating system. That is a bit too general for our purposes, so let's narrow it down to the context of Laravel. When talking about Laravel applications, middleware is code that acts like a filter for HTTP requests. Middleware can be assigned specific conditions, depending on the middleware itself, which will then redirect HTTP requests to the application according to those conditions.
A very simple and practical example is the authentication middleware Laravel comes with. Let's say, only logged-in users can access your application. When an HTTP request is made to the application, it goes through the middleware first. It checks if the request is made by an authenticated user. If not, the middleware will redirect the request to the login page; otherwise, the request goes through, and the user accesses the application.
Another example is logging. Middleware can log certain details about each incoming HTTP request. For instance, you can have a middleware log the origin of each HTTP request sent to your application.
If we imagine the connection between user and application as a straight line, middleware can be anywhere on that line, intercepting requests and redirecting them along or away from the line depending on the conditions and directives it must follow. It is like a luggage scanner at an airport: if your luggage meets the criteria, it goes through; otherwise, it is taken away elsewhere.
Next, we will discuss how to create and apply middleware.
This post includes:
Working with Middleware
Creating and applying middleware can be best described in four steps:
- Generating - As the first step, generating the middleware will perform three tasks: create the middleware file, place it in the appropriate directory, and add a basic template within that file for creating the middleware;
- Implementing Logic - Next, you have to assign logic to the newly created middleware. This process will likely take the longest as you have to code the behavior of the middleware directly into the file. There are several examples in the /app/Http/Middleware directory that you can follow if you don't have a premade one;
- Registering - Next, you must register your new middleware in Laravel's HTTP Kernel services. That serves two purposes. One is to assign it a name or an identifier that will allow you to apply the middleware within your application easily. The second purpose is to integrate the middleware into the Middleware Pipeline. The pipeline is the order of things Laravel handles incoming HTTP requests. Registering the middleware adds it to the chain of events that occur when a request comes in;
- Applying - Finally, apply the middleware to the routes you want it to affect. Each time that route is accessed, the middleware will trigger depending on the conditions you have specified.
Those steps seem logical and perfectly straightforward. Now, let's actually take a look at an example of middleware and explain each step in further detail.
Example
Firstly, creating the middleware. That is done with a simple command:
php artisan make:middleware NameOfMiddleWareHere
For our purposes, we will create a middleware that returns a custom response header alongside your application's typical response headers. Such a custom response header can be useful if you want to add custom metadata to the specific route within the application or if you want your application to track specific metrics or other diagnostic information. In our example, though, it will be a simple bit of text for the sake of simplicity. As this is Laravel, though, you can do nearly anything you want with the custom headers. In our case, this is what the command will look like:
php artisan make:middleware AddCustomHeader
Once the command finishes, a new file is created in app/Http/Middleware called AddCustomHeader.php. By default, it will look like this.
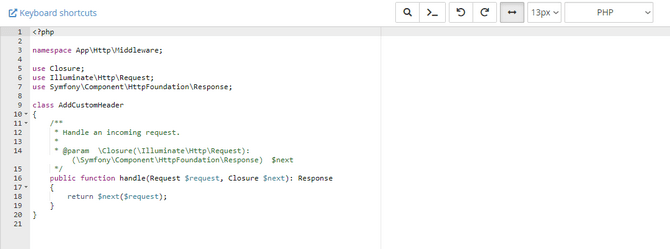
It is time we added some logic to it, though. Let's tell it what its purpose is in this application! This is the code we will be using.
<?php
namespace App\Http\Middleware;
use Closure;
class AddCustomHeader
{
    public function handle($request, Closure $next)
    {
        // Add custom header to the response
        $response = $next($request);
        $response->headers->set('X-Custom-Header', 'Hello from Custom Middleware');
        return $response;
    }
}
But what do each of these lines of code mean? Let's take a deeper look.
- namespace App\Http\Middleware; and use Closure; - The former declares that the use Closure class belongs to the App/Http/Middleware namespace. If you recall from a previous part of this tutorial, namespaces are a means of organizing code in PHP. That way, users can avoid naming conflicts between different parts of the application;
- class AddCustomHeader - This is the beginning of our custom header middleware. From this line below begins the definition of the AddCustomHeader class: the logic of the middleware;
- public function handle($request, Closure $next) - Next up, the first part of our middleware's logic. This line defines the handle method of the middleware, which says how it will behave. It has two parameters:
- $request - This represents the incoming HTTP request;
- $next - This is an instance of the Closure class. It represents the next middleware or route handler the request will be passed to after this middleware has done its job. Basically, it instructs the HTTP request to move on to the next middleware or route handler in the chain of events of request handling;
- // Add custom header to the response - The code under this comment is what adds the custom header to the response;
- $response = $next($request); - This will pass the current request to the next middleware or route handler along the pipeline;
- $response->headers->set('X-Custom-Header', 'Hello from Custom Middleware'); - Finally, our custom header. It sets the custom header (prefixed by X-) and gives it a value of "Hello from Custom Middleware";
- return $response; - The last step of the process involves returning the response to the user.
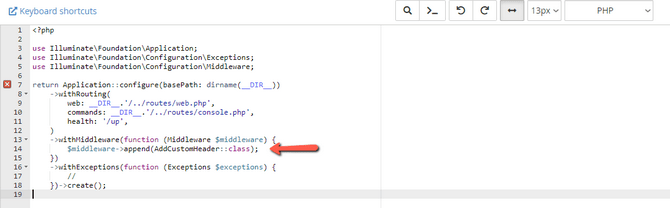
With that, we have assigned logic to our middleware. We are almost done; the bulk of the work is completed! All we have to do next is register and apply it. Firstly, let's register it. To do that, open the bootstrap/app.php file and place this code under the withMiddleware(function (Middleware $middleware) line.
$middleware->append(AddCustomHeader::class);
What this does is it adds an identifier to the file. That identifier, or key, is how we will easily add the middleware to our routes. What the line of code does is it tells the application that AddCustomHeader is the key (which can be anything, as long as it is unique). Now, we can use the key to add it to our routes. When defining a route we can invoke it like this.
use App\Http\Middleware\AddCustomHeader;
Route::get('/example, function () {
    // ...
})->middleware(AddCustomHeader::class);
Finally, we place the middleware in the route we want it to affect. In the code above, the route is /example, and when requested, it will return its typical response alongside our custom header response. And that is it! You just created a piece of middleware! While this example is very basic, we hope it illustrates just how easy it is to actually create one.