Mailable Classes
Updated on Jul 11, 2024
It is now time to create some emails! In Laravel, each type of email the application sends is represented as a mailable class. They are stored in the app/Mail directory, which will be automatically created when you generate your first mailable. To do that, use this command.
php artisan make:mail NameOfMailableClassHere
The mailable class is basically a template for a specific type of email. For instance, an invoice and an order confirmation email would have their own separate mailable classes. This is what a default, unedited mailable looks like.
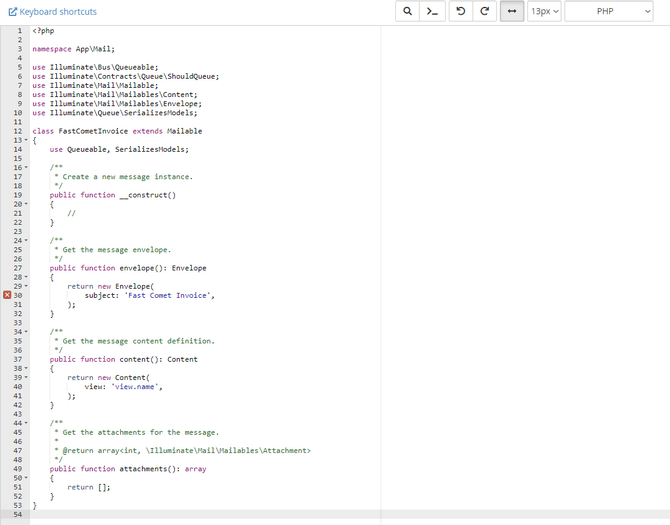
You can see that the email is separated into three major sections: envelope, content, and attachments. The envelope uses the Illuminate\Mail\Mailables\Envelope object to define the email's subject and recipient (sometimes). Meanwhile, the content uses the Illuminate\Mail\Mailables\Content object to define the Blade Template that will be used to generate the message content. Let's look more closely at how to create a mailable and start from the top.
This Post Includes:
Configuring the Sender
The mailable's default configuration doesn't actually include a from field, so let's add that first, like this.
/**
 * Get the message envelope.
 */
public function envelope(): Envelope
{
    return new Envelope(
        from: new Address('[email protected]', 'Billing Team'),
        subject: 'Fast Comet Invoice',
    );
}
Additionally, we can specify a replyTo field if necessary. That way, any replies to the email will go to that address.
/**
 * Get the message envelope.
 */
public function envelope(): Envelope
{
    return new Envelope(
        from: new Address('[email protected]', 'Billing Team'),
        replyTo: [
            new Address('[email protected]', 'John Smith'),
    ],
        subject: 'Fast Comet Invoice',
    );
}
What if your application uses the same email for all its outbound messages, though? It'd be annoying to have to add this code to every single mailable, right? That is why Laravel can accept a global email address, eliminating the need to specify it each time. Go back to the config/mail.php file and find the Global "From" Address section in it.
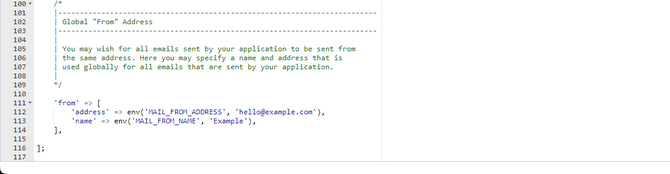
Simply define your email address and name, and you are all set! You can even add a global "reply to" address to this file! Like this:
'reply_to' => ['address' => '[email protected]', 'name' => 'App Name'],
With that, the envelope section of our mailable should be all squared away. Now, time for the content.
Configuring the Content
The content of your email can either be a view or plain text. As we already know, a view visually represents the application. In this case, it is a visual representation of an email message: its text, any graphics it may have, and so on. Since you can create a view via the Blade Templating engine, you have complete control over how it looks and what it says. If we go back to the mailable we created earlier, we can define a view we have already created for use as the email template.
/**
 * Get the message content definition.
 */
public function content(): Content
{
    return new Content(
        view: 'invoice.unpaid.sent',
    );
}
With this, the InvoiceUnpaidSent view will be used when sending the specific email. Alternatively, you can create a plain-text template (view) and specify that in the content section.
/**
 * Get the message content definition.
 */
public function content(): Content
{
    return new Content(
        view: 'invoice.unpaid.sent',
        text: 'invoice.unpaid.sent-text'
    );
}
Finally, the email template can also have embedded inline images. That way, images can be a part of an email's content instead of an attachment. Simply use the embed method followed by the path to the image.
<body>
    Here is an image:
    <img src="{{ $message->embed($pathToImage) }}">
</body>Configuring the Attachments
Finally, we can specify some additional attachments to round off our new mailable. The easiest way to do this is to attach a file from within the application, on your computer, or from the file storage system that Laravel offers.
To attach a file from within the application itself or from your computer, simply invoke the Attachment class and its fromPath method like this.
use Illuminate\Mail\Mailables\Attachment;
/**
 * Get the attachments for the message.
 *
 * @return array<int, \Illuminate\Mail\Mailables\Attachment>
 */
public function attachments(): array
{
    return [
        Attachment::fromPath('/path/to/file'),
    ];
}
You can provide a relative path to the file if it is located in the same directory as your Laravel application. Alternatively, you can define an absolute path to the file on your computer. Let us clarify.
- Relative Path - A relative path describes the location of a file or directory relative to the application's own working (root) directory. For example, in Laravel, you have the root directory and all the other subdirectories: app, bootstrap, cache, config, database, public, etc. However, the application's "working" directory is still the root where it technically starts. So, when defining a relative path to a file, we start there. Let's say there is an image file in the app subdirectory. To add it as an attachment, all we need to put as a path is app/image.png because the application already works within its own directory. It doesn't "work" throughout your entire computer;
- Absolute Path - On the other hand, an absolute path is the full, exact chain of drives and directories an application must follow to reach a file. While a relative path uses the "root" of the application itself, an absolute path uses the "root" of the file system. You are likely more familiar with absolute paths since we use them on a computer almost daily. Here is an example to clarify everything: C:\Users\YourUsername\Documents\image.png. As you can see, we start from the root of the file system (in this case, disk C) and make our way to the file itself, following the directories.
When attaching a file to Laravel directly from the file system (whether from within the application itself or from your computer), you can use a relative or absolute path to define where the file is. Just remember to give your application permissions if you are having it look in your computer for the file.
On the other hand, if you use Laravel's file storage system, you can attach a file using the fromStorage method.
/**
 * Get the attachments for the message.
 *
 * @return array<int, \Illuminate\Mail\Mailables\Attachment>
 */
public function attachments(): array
{
    return [
        Attachment::fromStorage('/path/to/file'),
    ];
}
You can also use the fromStorageDisk method to specify the disk you want the application to look into if it differs from the default one.
/**
 * Get the attachments for the message.
 *
 * @return array<int, \Illuminate\Mail\Mailables\Attachment>
 */
public function attachments(): array
{
    return [
        Attachment::fromStorageDisk('s3', '/path/to/file')
    ];
}
Finally, regardless of the attachment method you use, you can also specify the file's name and MIME type. The example below is for the file storage system, but it also works with the other method.
/**
 * Get the attachments for the message.
 *
 * @return array<int, \Illuminate\Mail\Mailables\Attachment>
 */
public function attachments(): array
{
    return [
        Attachment::fromStorage('/path/to/file')
                ->as('name.png')
                ->withMime('application/png'),
    ];
}Additional Configurations
To customize the mailable you just created, you need to add a custom header and custom metadata.
To add additional or custom headers to your outgoing emails, you only need to define a headers method in the mailable, which returns the Illuminate\Mail\Mailables\Headers class. The class accepts the messageId, references, and text parameters. For example:
use Illuminate\Mail\Mailables\Headers;
/**
 * Get the message headers.
 */
public function headers(): Headers
{
    return new Headers(
        messageId: '[email protected]',
        references: ['[email protected]'],
        text: [
            'X-Custom-Header' => 'Custom Value',
        ],
    );
}
Additionally, you can also add tags and metadata to your mailable. Those can be added in the envelope section of the mailable.
use Illuminate\Mail\Mailables\Envelope;
/**
 * Get the message envelope.
 *
 * @return \Illuminate\Mail\Mailables\Envelope
 */
public function envelope(): Envelope
{
    return new Envelope(
        subject: 'Order Shipped',
        tags: ['shipment'],
        metadata: [
            'order_id' => $this->order->id,
        ],
    );
}
Next up, let's learn how to send emails with Laravel!