Eloquent
Updated on Jul 11, 2024
The Eloquent model allows for interaction with a Laravel application's database. The more complex description of Eloquent would be that it is an Object Relational Mapper that facilitates the handling of database records by representing them as objects. It works as an abstraction layer on top of the database engine that handles the application's data. In other words, it allows the user to interact with a database: to insert, update, or delete records or execute complex SQL queries.
In this tutorial section, we will learn how to work with Eloquent: how to create an Eloquent model, what it looks like, and how to manipulate it. This section is very similar to the previous section of this tutorial, where we discussed raw SQL queries but in a more straightforward way. You will find out that the name is rather fitting.
You Will Learn About:
Creating an Eloquent Model
Before we can use Eloquent to manipulate our application's database, we need to create a model that will connect to a table in that database. You can create as many models as your database has tables or only for the ones you wish to work with specifically. For our purposes, we will work with only a single table, so we will create only one model. There are a couple of commands we can use for this purpose.
php artisan make:model NameOfModelHere
or
php artisan make:model NameOfModelHere -migration
The first command creates just the model, while the second one also runs a migration after the model is created. We will use only the first command and create a Post model that will interact with the posts table from earlier in this tutorial. Before we move forward, though, let's discuss how Eloquent decides which model will interact with which table.
By default, you don't need to specify the table to which the model will be attached. The way Eloquent decides that is by using the plural version of the name of the model itself. For instance, by default, the Post model will be used to manipulate the posts table in the database. There is no need to specify that or adjust anything when creating the model. It is the default Laravel behavior, and it picks up on the naming on its own. There is a way to specify the table; we will look at that in just a moment. Firstly, let's create a model and take a look at it. We will use this command.
php artisan make:model Post
Once the command is done, it should not take more than a moment, we can find the created model in the /app/Models directory of the application with this code in it.
<?php
namespace App;
use Illuminate\Database\Eloquent\Model;
class Post extends Model
{
    //
}
What this code says is that the Post class extends the Model. As we mentioned previously, extending is another way of using. Therefore, Post is a model. We can specify a name for the table this model interacts with by changing the code to this.
<?php
namespace App\Models;
use Illuminate\Database\Eloquent\Model;
class Post extends Model
{
    /**
     * The table associated with the model.
     *
     * @var string
     */
    protected $table = 'posts';
}
Using the $table attribute, we determine the table this model will work with. With that said, let's move to reading, inserting, and modifying data in the database.
Reading Data
For the purposes of our tutorial, we will use the database we created in the previous section. If you haven't created a database, we recommend checking it out, or our database tutorial. With our database in place, though, it is time we connect the Eloquent model we created with the Laravel application so we can start working with it. To do that, we need to add a route to the web.php file for the Eloquent model.
<?php
use App\Models\Post;  // Ensure the correct namespace is used
Route::get('/read', function() {
    $posts = Post::all();
    foreach ($posts as $post) {
        echo $post->body;
        echo '<br>';
    }
});
The URL we assigned is /read, and since we already have some entries in the database, we will see an output similar to this when we visit the URL in a browser.

You might have noticed that we used the all() method in the route above alongside a foreach() loop. We did that to see all the entries in the database table. If you want to get only a specific post, you could instead use the find() method like this.
Route::get('/find',function(){
$posts=Post::find(3);
return $posts->title;
});
That will retrieve only the specified record from the database table. Next, let's learn how to use the Eloquent model to insert data.
Inserting Data
Using Eloquent to insert data into a database table is similar to a raw query but a bit more straightforward. It follows the same general rules, though: add a route to web.php, go to that URL, and data is inserted depending on the code you wrote. Here is an example of adding a new entry to our posts table.
<?php
use App\Models\Post; // Ensure the correct namespace is used
Route::get('/insert',function(){
$post=new Post;
$post->title='Konstantin';
$post->body='FastComet Writer';
$post->save();
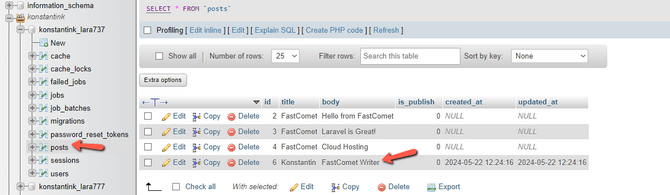
}); The URL we specify is /insert, and then you can see the rest of the necessary elements of the entry. Then, all we need to do is go to that URL and check the database afterward. The new entry should be in the posts table if everything goes well.
Next, let's look at how to update existing data using Eloquent.
Updating Data
Now that we know how to insert data into a database via Eloquent, it is time to learn how to change it. We needn't explain how such an action is crucial when it comes to maintaining databases. It is perfect if you have a table of users and need to change someone's role on your website: you simply edit the existing entry instead of creating a whole new one. With that said, let's learn how to use Eloquent to update a database entry.
As per usual, we start by creating the necessary route in the web.php file.
<?php
use App\Models\Post;  // Ensure the correct namespace is used
Route::get('/update',function(){
Post::where('id',6)->update(['title'=>'George','body'=>'Manager']);
});
As you can see, we have set the URL to /update and specified the posts table (indicated by Post since we know Laravel will automatically assume the plural of that name). We are instructing the code to look at the entry with ID of 1 and update the information within it. Very easy to read, wouldn't you agree? Let's see the results when we go to that URL.
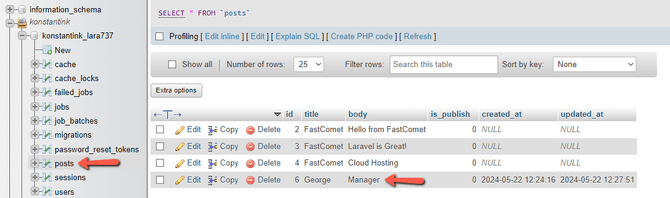
The entry with ID of 1 has changed since the last time we saw it, and it has the new values we specified in the code above. Next, deleting data!
Deleting Data
We have learned how to view, insert, and update data in a database. Next, we will show you how to delete it. There are a couple of methods to do that: delete() and destroy(). Ultimately, they do the same thing – remove a record from a database – but some key differences exist. Here are a couple of examples of how each works. Firstly, we use the delete() method and request that the record with an ID of 1 be deleted.
Route::get('/delete',function(){
$post=Post::find(6);
$post->delete();
});
Next, the destroy() method, and this time we are asking for the record with ID of 2 to be removed.
Route::get('/destroy',function(){
Post::destroy(2);
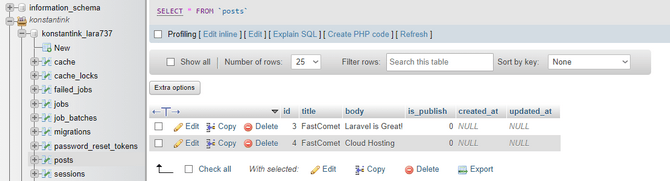
}); As shown in the picture below, only entries 3 and 4 are left.
You can request multiple rows be deleted with the destroy() function by placing their IDs in square brackets.
Route::get('/destroy',function(){
Post::destroy([3,4]);
});
What is the difference between these two methods, though? The technical explanation is that the delete() method is an instance method that can target a specific model instance. On the other hand, delete() is a static method that can be used on a model class directly and can accept an array or list of IDs as individual arguments. Or, put in more simple terms: delete() offers better flexibility when working with a particular instance, while destroy() is better suited for deleting in bulk.
That concludes our look into Eloquent for Laravel. As you can see, it is very similar to working with raw queries, but it is a more eloquent method. The name is very fitting!