How to install extensions in Bolt
Updated on Dec 10, 2015
In this section of the Bolt tutorial series, we'll see how to install and manage extensions through the administrative dashboard.
Create Backup
It is recommended to create Bolt backup, before making major changes on your website. This will allow you to restore it to a fully operational state if something goes wrong.
To operate with extensions in Bold, you need to know how to:
Install Extensions in Bolt
To install extensions on your website, you will have to log in as administrator first. Move your mouse pointer to the Extras option on the main menu and then View/Install Extensions.

You will be redirected to the extension installation page. Here, you will notice a link that will take you to the official Bolt extensions directory. See the screenshot below for clear view on that.

There you can see various stats about different extensions, such as the most downloaded lately or the newest additions. Once you’ve chosen the extension that you wish to install on your website just copy the text bellow the name of the module.

Then go back to the extension install/management page on your website and paste the text in the search field, a drop down menu will appear from which you must find the extension that you are searching for (usually this will be narrowed down to one selection).

When you locate the name of the extension in the drop down menu just click on it, and then click Browse Versions. After the version search is complete a window will pop up on your page. From the popup window select the version that you wish to install, then click on Install This version.

Stable Versions
We advise you to always use the latest stable version of the extension, in order to avoid any issues or bugs with it.
After the installation is complete you will be notified with a new popup.

Manage Extensions in Bolt
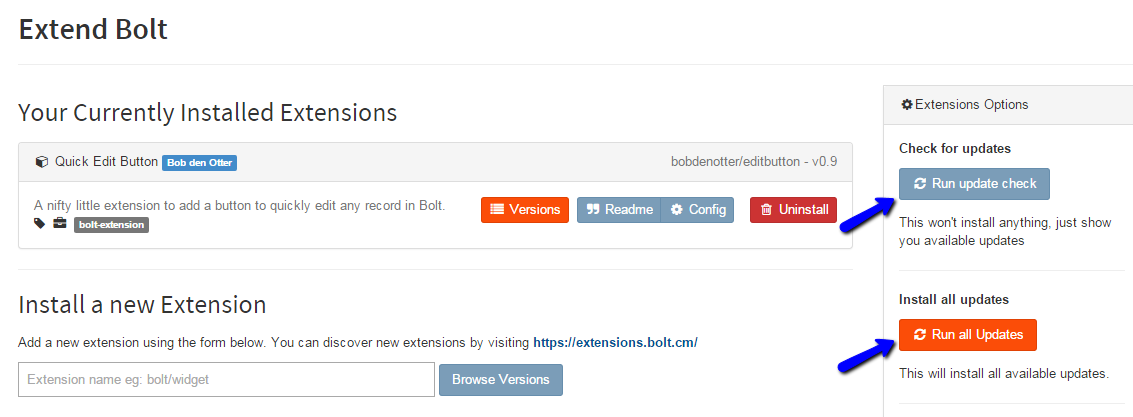
You can manage your extensions by going to the View/Install Extensions page. There you can see all the installed modules and the different options for them. Let us review all of the options so you can get a better understanding on what they offer.
- If you select the Versions option, it will browse all the available versions of the module. This is useful if you wish to reverse to an older version, or you simply want to test.

- The Readme option is a documentation on how to configure and modify the extension. This is written by the developer of the extension and if you are having difficulties understanding the documentation, you can contact them for more information.

- The Config option will allow you to directly edit the extension's configuration file through your dashboard. Refer to the Readme section of the extension for more information on how to configure it.

- The Uninstall option will remove the extension completely from your website.

- Another useful options that you can use are the Run Update Check and Run All Updates.

This will check the existing extensions on your website and inform you if there is an update.

Bolt Hosting
- Free Bolt Installation
- 24/7 Bolt Support
- Free Domain Transfer
- Hack-free Protection
- Fast SSD Storage
- Free Bolt Optimization
- Free Bolt Transfer
- Free Cloudflare CDN
