How To Connect to Your Account Over SFTP
Updated on Feb 14, 2022
Security should always be a priority for everyone, especially when it comes to managing your account.
There are various methods to connect to your application remotely. Some of them are more secure than others. The two commonly used secure methods are Secure Shell (SSH) and Secure File Transfer Protocol (SFTP). Both of those methods are supported on all FastCloud plans that provide SSH and SFTP access.
Using Secure Shell (SSH) is one of the safest ways to connect to the server as it is using an encrypted connection, unlike FTP where you log in by username and password. That password is then transmitted over the Internet without being encrypted. FTP is one of the oldest and most used Internet protocols. However, there are security risks when using it.
What are FTP, SSH, and SFTP?
FTP
File Transfer Protocol (FTP) is a client-server protocol that depends on two-way communication channels between two peers. FTP is used for transferring files over a computer network between a client and a server.
Using FTP is considered unsafe because a password needs to be entered for the transfer. That password is then transmitted over the Internet without being encrypted. FTP may be one of the oldest and most used Internet protocols, but there are security risks when using it.
- The user name and password are transferred in plain text when logging on and can be easily recognized.
- When using an FTP connection, the transferred data may go off to a remote computer and not arrive at their intended destination. Third parties can then download data from the remote system to their own computers, or existing data can be viewed and edited. This is a significant risk, especially when it comes to transferring company confidential information.
- FTP can be used to determine the passwords of specific users because the password is transferred in clear text when logging on. As a result, even users with unauthorized access to the particular network may record the password information.
The above goes to show that it’s advisable to use SFTP connections and ensure that data is securely transferred.
SSH
Secure Shell is a safe method for communication between two computers or servers over an open network like the internet. SSH provides strong authentication and encrypted data communications, making it a much-preferred choice among users with the required knowledge to use it. When using Secure Shell, any device in the middle of the two-way connection is unable to decipher the communication. Only your end device or server can decrypt the information that is being exchanged.
SFTP
SFTP, which stands for Secure File Transfer Protocol, is a separate protocol package built into SSH that can implement FTP commands over a secure connection.
It’s the recommended option when it comes to file transfer.
Here are the reasons:
- SFTP adds a layer of security;
- With SFTP, all transferred data is encrypted (not sent in plain text);
- With SFTP, you can edit files directly on the server without having to download them and reupload them again, as it is with FTP.
How to Connect with SFTP
To use SFTP on our servers, there are two things that you need to do first:
- set up SSH keys in order to access your server
- connect to your server or application using SSH
To be able to use the SSH key on a device, you must first enable the IP address associated with that device via your client area's SSH Access quick action icon. More on this can be read in our SSH Access List tutorial.
- After this is done, open your cPanel → SSH Access:

- Click on the button Manage SSH Keys:

Please see this guide to set up SSH keys in order to access your server if you have not done so already.
- Click on Generate a New Key:
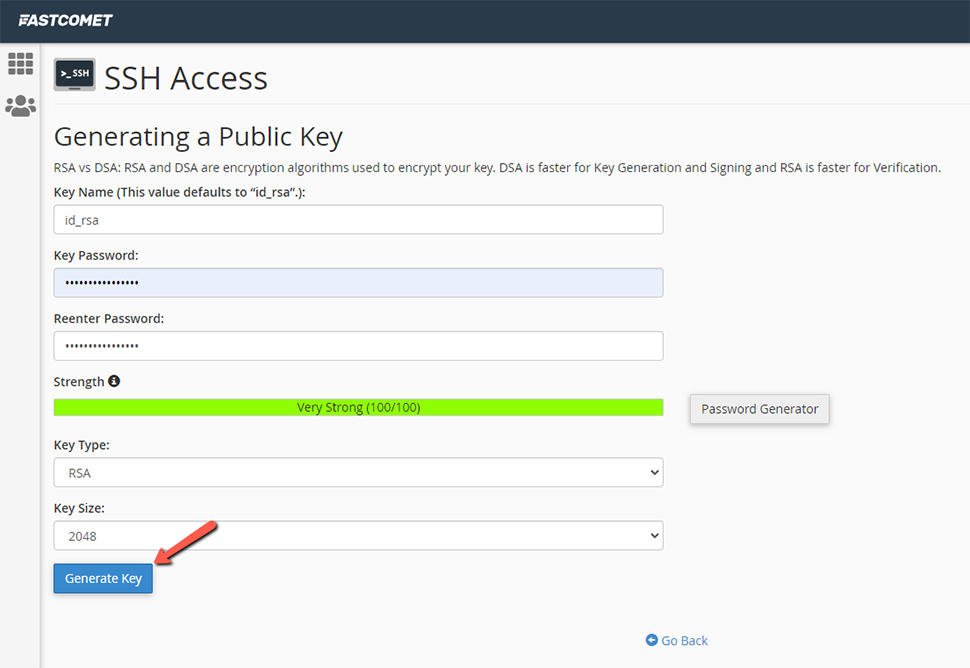
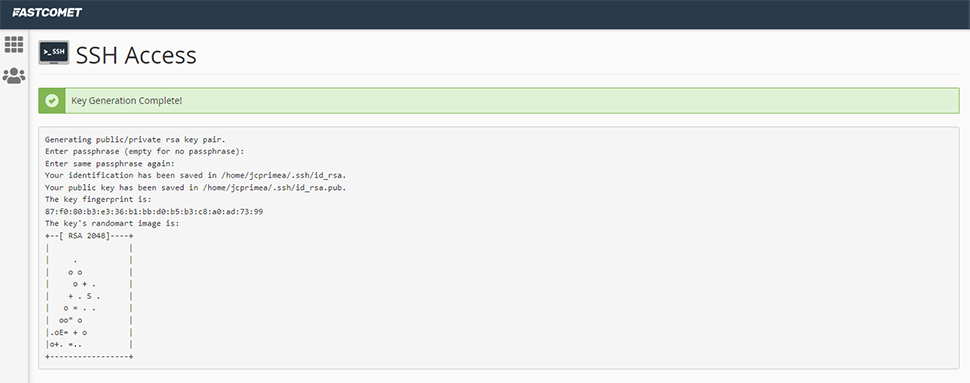
- You should see a screen similar to this one here:
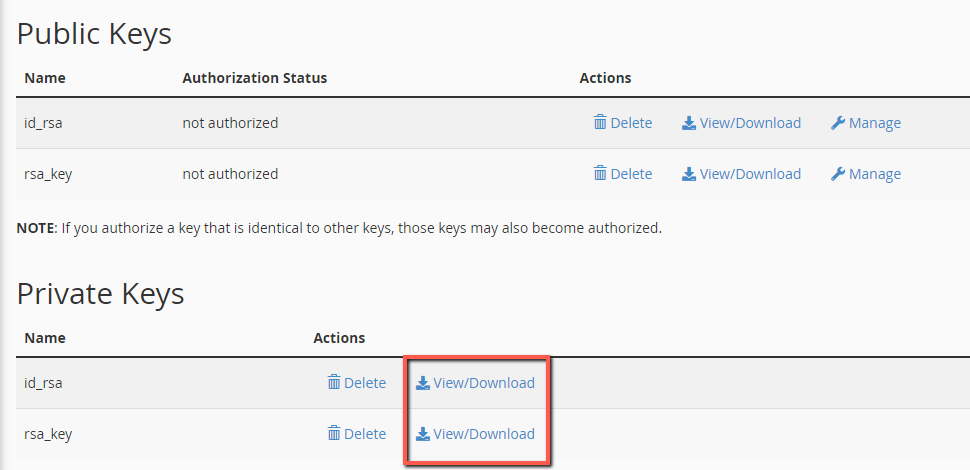
- Go back to the page Manage SSH Keys → locate your private key → click on the link view/download:
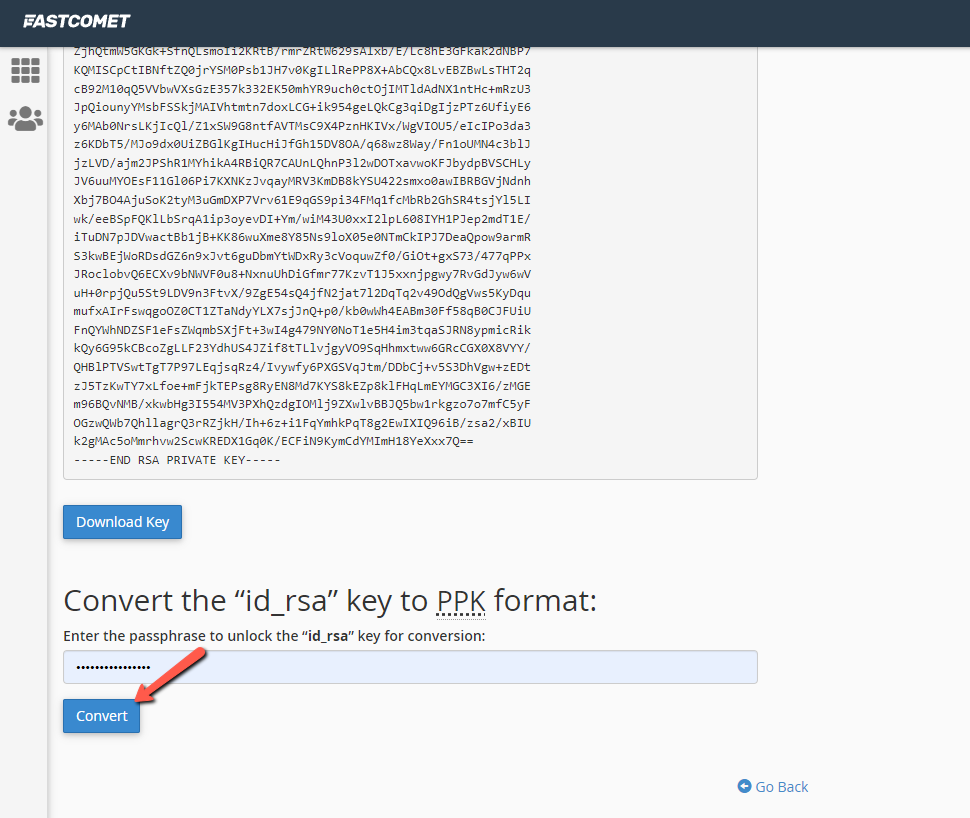
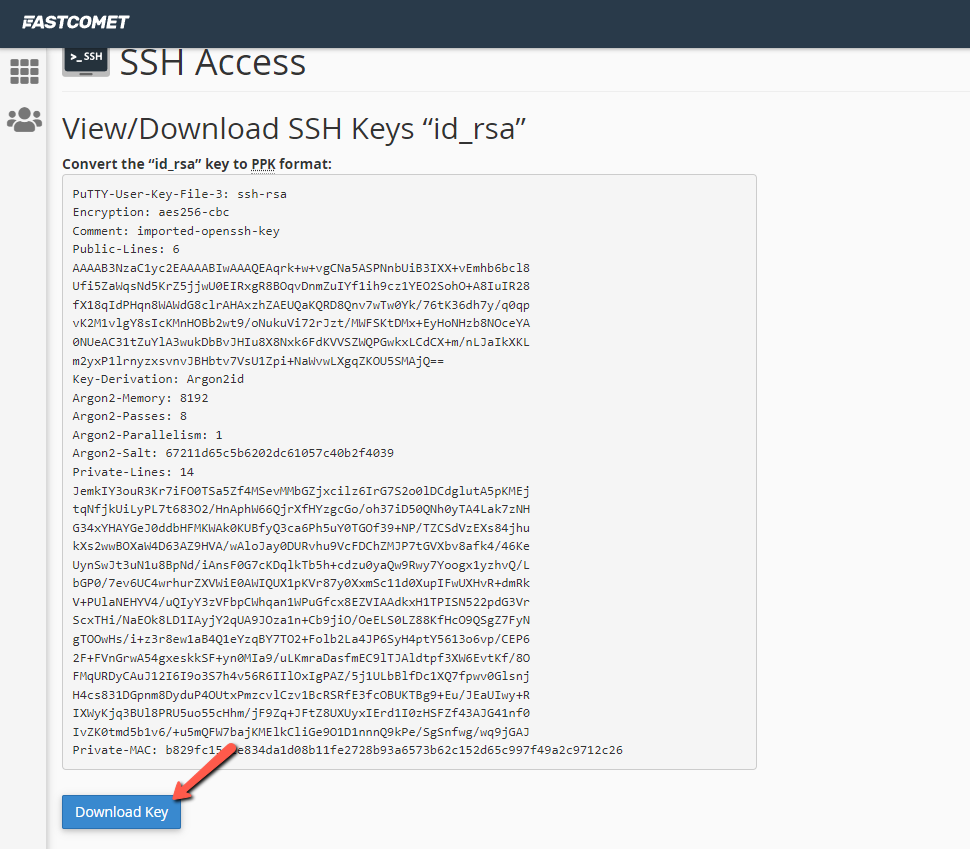
- On the next screen, you will see an option to convert your key to a .ppk file (required by most FTP clients). Enter your password and click on Convert:
- Download your .ppk file:
- Open FileZilla. From the menu bar, click on Edit → Settings:

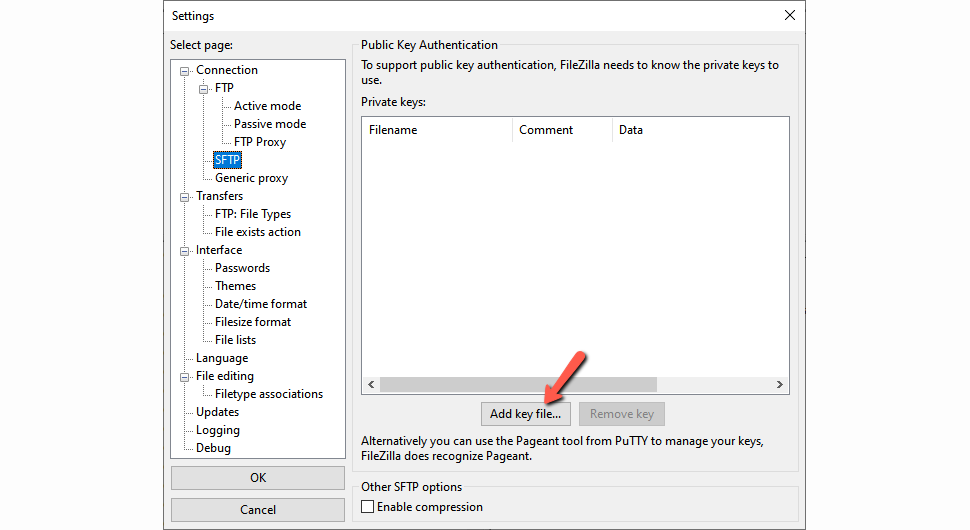
- Select SFTP from the left menu and click on the button Add key file…:
- Select the .ppk file that you previously downloaded.
- You will be prompted to convert the file to a supported but unprotected format (no password), confirm it by clicking the Yes button and then type your password;
- Save it somewhere on your computer;
If you are a FastComet client, you do not need to download the SSH Key. All you need to do is:
- Connect to your server using the following login credentials:
SFTP Server: sftp://host
SFTP Username: your cPanel username
SFTP Password: your cPanel password
SFTP Port: 17177 (FastComet custom port)
Note:
The username and the password for the connection to your hosting account via SFTP are the same as your cPanel's username and password. You cannot connect with an FTP account that was created via cPanel → FTP Accounts.
Below, you will find information about initiating connections using SSH and SFTP separately.
How to Connect via SSH/SFTP on Windows
There are a few ways to connect to a server via SSH on Windows:
- Free third-party tools such as PuTTY.
- The built-in SSH Terminal;
- Microsoft PowerShell for Windows (Terminal).
How to Use the SSH Terminal on Windows
The first thing to do here is to go to your taskbar Search Section and type Command Prompt. When the Command Prompt displays, enter it.
With FastComet, you are working on a custom SSH port - 17177 (not the default port 22). In that case, you open an SSH session as follows:
ssh [email protected] -p 17177
Where ‘user’ is your FastComet username and ‘server.ip.address-or-remote-hostname’ is the IP address or the hostname of the server you are trying to connect to.
You will be asked for your password, and after you've successfully authenticated, you can exit back out by typing:
exit
Now we can establish an SFTP session by issuing the following command:
sftp -oPort=17177 [email protected]
You will connect the remote system, and your prompt will change to an SFTP prompt.
How to Connect via SSH/SFTP on Linux/Ubuntu
On an Ubuntu system, you can find a launcher for the terminal by clicking on the Activities item at the top left of the screen. Тhen typе the first few letters of “terminal,” “command,” “prompt,” or “shell.” The developers have made sure that the launcher is set up with all the most common synonyms, so you should have no problems finding it.
Other versions of Linux, or other flavors of Ubuntu, will have a terminal launcher located in the same place as your other application launchers. However, it may be hidden away in a submenu, or you may have to search for it from within the launcher.
If you are unable to find a launcher, or if you just want a faster way to bring up the terminal, most Linux systems use the same default keyboard shortcut to start it, which is Ctrl-Alt-T.
After you have opened the Linux/Ubuntu terminal, don’t forget that with FastComet, you are working on a custom SSH port—17177 (not the default port 22). In that case, you open an SSH session as follows:
ssh [email protected] -p 17177
Where ‘user’ is your FastComet username and ‘server.ip.address-or-remote-hostname’ is the IP address or the hostname of the server you are trying to connect to.
You will be asked for your password, and after you've successfully authenticated, you can exit back out by typing:
exit
Now you can establish an SFTP session by issuing the following command:
sftp -oPort=17177 [email protected]
You will connect to the remote system, and your prompt will change to an SFTP prompt.
How to Connect via SSH/SFTP on macOS
There are a few ways to connect to a server via SSH on Windows:
- The built-in SSH Terminal;
- Free third-party tools such as FileZilla;
How to Use the macOS Terminal
By default, the Terminal.app is located in the Applications → Utilities folder. Double-click on the icon to start the client.
With FastComet, you are working on a custom SSH port - 17177 (not the default port 22). In that case, you open an SSH session as follows:
ssh [email protected] -p 17177
where ‘user’ is your FastComet username and ‘server.ip.address-or-remote-hostname’ is the IP address or the hostname of the server you are trying to connect to.
You will be asked for your password, and after you've successfully authenticated, you can exit back out by typing:
exit
Now we can establish an SFTP session by issuing the following command:
sftp -oPort=17177 [email protected]
You will connect the remote system, and your prompt will change to an SFTP prompt.
If you don’t want to type the command every time, you can save a remote connection. Follow the steps below:
- Select Shell → New Remote Connection... from the top menu;
- Under the Server column, click on the + icon to add a new connection;
- Enter the hostname when prompted by the dialog;
- Enter your username in the User field and click Connect.
Basic SSH and SFTP Commands
SSH Commands
lsordir- list the contents of the current directory on the server;cd- change current directory on the server;pwd- show the present working directory on the server;put- upload a file to the server;get- download a file from the server;chmod- change the permission on a file;rename- rename a file on the server;mkdir- create(make) a directory on the server;rm- delete a file on the server;rmdir- delete an empty directory on the server;exit- quit the session.
SFTP Commands
The most useful command to learn here is the help command. It gives you access to a summary of the other SFTP commands. Type either of these in the prompt:
help
or
?
This will display a list of the available commands:
bye- quit sftp;cd path- change remote directory to 'path';chgrp grp path- change group of file 'path' to 'grp';chmod mode path- change permissions of file 'path' to 'mode';chown own path- change owner of file 'path' to 'own';df [-hi] [path]- display statistics for current directory or filesystem containing 'path';exit<.code> - quit sftp;get [-Ppr] remote [local]- download file;help- display this help text;lcd path- change local directory to 'path'.
How to Transfer Files with SFTP
SFTP allows you to transfer files between two machines securely.
As we mentioned, you can use PuTTY when working on Windows. The software can be used on Mac and Linux/Ubuntu, too but has some additional configuration to go through.
Additionally, on any desktop machine, you can use a Graphical user interface (GUI) SFTP client like FileZilla to connect to the remote server and download or upload files.
The SFTP Command is useful when you work on a server without GUI, and you want to transfer files or perform other operations on the remote files. However, it’s also the preferred method for advanced users since it can be superior when it comes to getting the job done quickly.
Downloading Files with the SFTP Command
To download a single file from the remote server, use the get command:
get filename.zip
When downloading files with sftp, those files are downloaded to the directory from which you typed the sftp command.
If you want to save the downloaded file with a different name, specify the new name as the second argument:
get filename.zip new_filename.zip
To download a directory from the remote system, use the recursive -r option:
get -r remote_directory
If a file transfer fails or is interrupted, you can resume it using the reget command.
The syntax of reget is the same as the syntax of get:
reget filename.zip
Uploading Files with the SFTP Command
To upload a file from your local machine to the remote SFTP server, use the put command:
put filename.zip
The output should look like the following:
Uploading filename.zip to /home/remote_username/filename.zip filename.zip 100% 12MB 1.7MB/s 00:06
If the file you want to upload is not located in your current working directory, use the absolute path to the file.
When working with put, you can use the same options that are available with the get command.
To upload a local directory, you would type:
put -r locale_directory
To resume an interrupted upload:
reput filename.zip
Conclusion
There are lots of threats to data sent over the Internet. Hackers aim to impersonate users, hijack servers, intercept usernames and passwords, and tamper with data while it’s being transmitted. SFTP is the file transfer protocol that provides protection against such malicious attacks during any point of the transfer process, and thus everyone should prefer the SFTP protocol over FTP.
We hope you find this article useful. Discover more about FastCloud - the top-rated Hosting Solutions for personal and small business websites in four consecutive years by the HostAdvice Community!

SSD Cloud Hosting
- Free Domain Transfer
- 24/7 Technical Support
- Fast SSD Storage
- Hack-free Protection
- Free Script Installation
- Free Website Transfer
- Free Cloudflare CDN
- Immediate Activation
