How to Move WordPress from a Local Server to a Live Site
Updated on May 12, 2023
WordPress users, particularly those who want to publish their WordPress site on a live server, frequently ask, "How do I make a WordPress site live?" Fortunately for you, the answer is simple: use one of the two WordPress migration methods we will discuss in this article.
So your WordPress website is complete, and you want to migrate it from your localhost to a live site/hosting, correct? Building and testing your websites on a local host is a good practice because anything that goes wrong does not affect your live website.
In this tutorial, we will walk you through the configuration process and demonstrate how to upload and transfer your WordPress site from a localhost to a hosting/live site using two simple methods.
This post includes:
Why Move WordPress From a Local Server to a Live Site?
Building your WordPress blog on a local server allows you to test changes to your website without disrupting visitors. When you've finished fine-tuning your website, the next step is to publish it from your local server to the internet.
Let's go over two different methods for moving your site from a local server to a live server.
The first method, which is recommended for beginners, makes use of a WordPress migration plugin.
The second method will demonstrate how to manually transfer WordPress from a local server to a live site.
You can select the method that is most convenient for you:
- Method 1. Move WordPress from a local server to a live site using a plugin
- Method 2. Manually move WordPress from a local server to a live site
Before You Migrate Your WordPress Site
A few things must be in place before you can migrate WordPress from a local server to a live server. First, we'll assume you have a WordPress site running on your computer's local server (also known as localhost) and have full access to it.
You'll also need a domain name and web hosting. Finally, you'll need an FTP program and knowledge of FTP to upload your local server site to the live site. We have an excellent tutorial on FTP, if you would like to learn more.
Ready? Let's get started with migrating your WordPress site.
Method 1: Transfer WordPress from Local Server to Live Site Using a Migration Plugin
This method is simpler and more suitable for beginners. To migrate WordPress from localhost to a live site, we'll use a WordPress migration plugin.
Install and Setup the Duplicator Plugin
The first step is to install and activate the Duplicator plugin on your local site. For more information, see our step-by-step guide about installing a WordPress plugin.
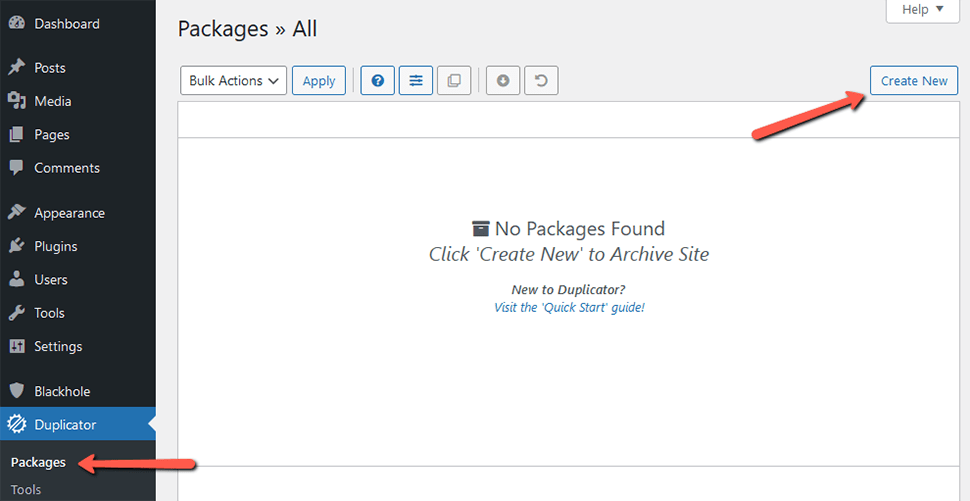
After activation, navigate to the Duplicator → Packages page and click the Create New button.

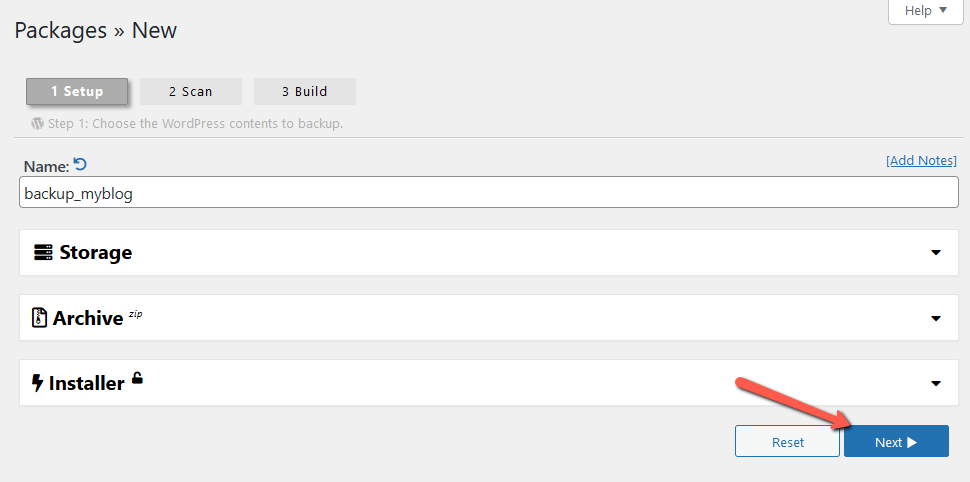
This brings you to a screen where you can give your backup a name. Then, click the Next button.

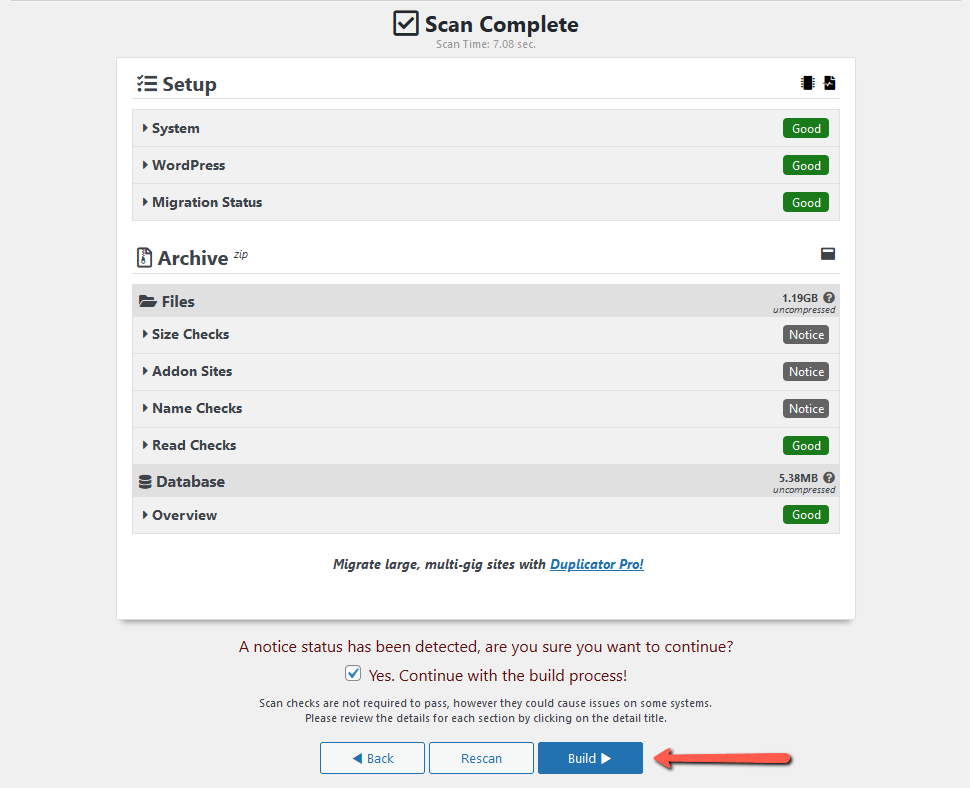
Duplicator will now perform some checks to ensure that everything is in order. If all of the items are marked Good click the Build button.

Depending on the size of your website, this process may take a few minutes. You must keep this tab open until the process is finished. When you're done, you'll see download options for the Installer and Archive packages. To download both files to your computer, click the One-Click Download link.
The Archive file contains an exact copy of your WordPress site. It includes all of your WordPress core files, as well as your images, uploads, themes, and plugins, as well as a backup of your WordPress database. The Installer file is a script that will completely automate the migration process by uploading the archive file containing your website.
Create a Database for Your Live WordPress Website
You must first create a MySQL database for your new live website before running the installer or uploading the WordPress website from localhost to your hosting server. If you already have a MySQL database, you can skip this step.
To create a database, go to the cPanel dashboard of your hosting account. Then, in the Databases section, select the MySQL Database Wizard icon.
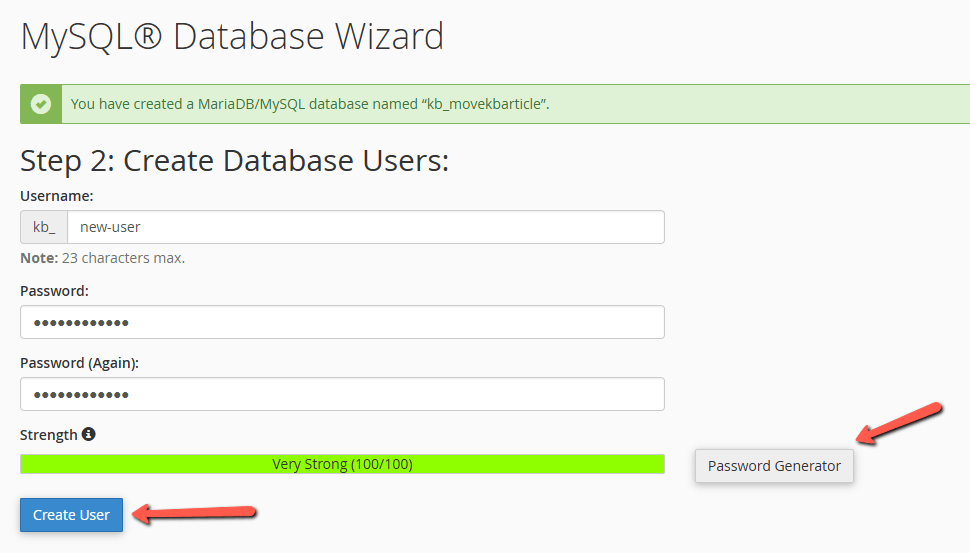
On the following screen, there is a field for creating a new database. Simply give your database a name and click the 'Create Database' button. Following that, you must enter a username and password for your new user before clicking the 'Create User' button.

Next, you need to add the user you just created to the database. First, click the ‘All Privileges’ checkbox. Then, scroll down and click the 'Save Changes' button to save your modifications.
Your database is now complete and ready for use with your WordPress site. Keep a record of the database name, username, and password. This information will be required in the following step.
Upload Files from Local Server to Live WordPress Website
Now, you need to upload the archive and installer files from your local site to your hosting account. First, connect to your live site using an FTP client. Once connected, make sure that the root directory of your website is completely empty. Normally, the root directory is the public_html/, but it can be any directory you have assigned to your website.
Some WordPress hosting companies install WordPress for you when you sign up. If you have WordPress files there, you must remove them.
Then, from Duplicator, upload the archive.zip and installer.php files to your empty root directory.
Run The Migration Script
After you have uploaded the migration files, you need to visit the following URL in your browser:
https://example.com/installer.phpPlease replace 'example.com' with your own domain name. The Duplicator migration wizard will be launched as a result. The installer will run a few tests before starting the script.
You will be prompted to enter your MySQL host, database name, username, and password in the Setup section. Localhost is most likely your host. Then, click the 'Validate' button to ensure that the information you entered is correct.
To proceed, click the 'Next' button. Duplicator will now import your archived WordPress database backup into your new database. It will also redirect URLs from your local site to your new live site. You can now enter the WordPress admin area of your live site by clicking the 'Admin Login' button.
Duplicator will automatically clean up the installation files once you log in to your live site. That's it; you've successfully transferred WordPress from your local server to your live site.
Method 2. Manually Transfer WordPress from Local Server to Live Site
In this method, we will show you how to manually move WordPress from your local server to your live site. It will come in handy if the first method doesn’t work or you prefer to do it manually.
Export Local WordPress Database
The first step is to export your local WordPress database. That will be done with phpMyAdmin.
Navigate to https://localhost/phpmyadmin/ and select your WordPress database. Then, from the top menu bar, select the Export option.
You can select Quick or Custom as the export method. Custom will give you more options for exporting your database.
However, we recommend that you select Quick and then click the Go button to download your database.
Upload WordPress Files to Live Site
We'll now need to transfer all of your website files to the live site. To begin, launch your FTP client and connect to your web hosting account. Alternatively, use the cPanel File Manager.
Once you've connected to your live site, make sure the files are uploaded to the correct directory. Select and upload your local WordPress files to your live server.
Create a MySQL Database on Your Live Site
You can begin importing your database to the live server while your FTP client is uploading your WordPress files.
Because most WordPress hosting providers, including FastComet, provide cPanel to manage your hosting account, we'll demonstrate how to create a database using cPanel.
- To begin, sign in to your cPanel dashboard and select the MySQL Database Wizard icon from the Databases section.
- On the next screen, you can create a new database. You need to provide a name for your database, then click Create Database. cPanel will now automatically create a new database for you.
- Next, you need enter a username and password for your new user, and then click Create User.
- After that, you need to add the user you just created to the database. Check the All Privileges checkbox.
- Then, scroll down and click ‘Make Changes’ to save your changes.
You’ve successfully created a new database for your live WordPress site.
Import WordPress Database on Live Site
The following step is to import your WordPress database.
Navigate to your cPanel dashboard, scroll down to the Databases section, and select phpMyAdmin.
This will take you to phpMyAdmin, where you should select the database you created earlier. Your new database will be displayed in phpMyAdmin with no tables.
Then, in the top menu, select the Import option. On the import page, click the Choose File button and then select the database file you saved in the first step from your local site.
After that, click the Go button at the bottom of the page. Your database will automatically be imported to phpMyadmin.
Change the Site URL
Now, you need to change the site URL in your database so that it will connect with your live WordPress site.
- In phpMyAdmin, look for the
wp_optionstable in your database that you just imported above. If you changed your database prefix, then instead ofwp_options, it might be {new_prefix}_options. - Next, click on the ‘Browse’ button next to
wp_options. Or, click the link in the sidebar to open up the page that has a list of fields within thewp_optionstable. - Then, in the
options_namecolumn, you need to look for the siteurl table. Click the ‘Edit’ icon. - This brings up a window where you can edit the field. In the input box for
option_value, you’ll see the URL of your local install. You need to insert your new site URL in this field. - Then, you can save the field by clicking the ‘Go’ button.
- Next, you need to follow the same steps as above for the home option name. The wp_options menu can be a few pages long, usually, the home option will be on the second page. Then, update the home URL, so it’s the same as your live site URL.
Setup Your Live Site
Now that you’ve imported the database and uploaded your content, it’s time to configure WordPress.
At this time, your site should be showing an ‘Error establishing a database connection’ error.
- To fix this, connect to your website using an FTP client and open up the
wp-config.phpfile. - You’ll be looking for the following lines of code:
// ** MySQL settings - You can get this info from your web host ** //
/** The name of the database for WordPress */
define( 'DB_NAME', 'database_name_here' );
/** MySQL database username */
define( 'DB_USER', 'username_here' );
/** MySQL database password */
define( 'DB_PASSWORD', 'password_here' );
/** MySQL hostname */
define( 'DB_HOST', 'localhost' );
- You will need to provide the database name, username, and password you created earlier.
- Next, save the
wp-config.phpfile and upload it back to your WordPress hosting server. - Now, when you visit your website, it should be live.
- After that, you need to login to your WordPress admin panel and go to Settings → General. Then, without changing anything, scroll to the bottom and click the Save Changes button. This will make sure that your site URL is corrected anywhere else that it needs to be.
- Once you’ve done that, go to Settings → Permalinks, then scroll down and click Save Changes to ensure that all post links are working fine.
Fix Images and Broken Links by Updating Paths
Broken links and missing images are common when migrating a WordPress site from one domain to another or from a local server to a live site.
The following SQL query can be used to easily update the URLs.
UPDATE wp_posts SET post_content = REPLACE (post_content, 'localhost/test/', 'www.yourlivesite.com/');- Simply go to phpMyAdmin, click on your database, and then click on SQL from top menu and add the query above.
- Make sure you change it to your own local site and live site URLs, and click the Go button.
That’s it! You have now successfully migrated WordPress from your local server to a live site.
Hopefully, now your live website is up and running smoothly.
Conclusion
We hope the article helped you understand “How to make a WordPress site live” and also how to publish your WordPress site on a cloud server.
Now that you know both processes of taking your WordPress website from Localhost to a live server, we’re sure you think it’s an easy process.
After you have your domain name and website up and running, you’re all set to make a mark online!
We hope you find this article useful. Discover more about FastCloud - the top-rated Hosting Solutions for personal and small business websites in four consecutive years by the HostAdvice Community!
Related articles
- How to Create a Custom Home Page in WordPress
- How to Fix the “Installation Failed: Could Not Create Directory.” Error in WordPress
- How to Set Up a Virtual Event Website With WordPress
- How to Fix Updating Failed and Publishing Failed Errors in WordPress Page and Post Editor
- How to Access WordPress Installation with a Temporary URL

WordPress Hosting
- Free WordPress Installation
- 24/7 WordPress Support
- Free Domain Transfer
- Hack-free Protection
- Fast SSD Storage
- Free WordPress Transfer
- Free CloudFlare CDN
- Immediate Activation
