How to Fix Laravel Routes Not Working on a Shared Host
Updated on Oct 19, 2022
Laravel is a leading framework that offers exceptional syntax. It’s the preferred framework by many developers. However, if you have just deployed your first Laravel project on a shared hosting server, you may eventually stumble upon a specific issue—your newly-added routes may not work. Laravel routes not working on live servers is a problem that definitely needs to be resolved as quickly as possible to make sure all your website pages are publicly available. In this post, we will provide possible solutions.
Note:
Laravel should always be served out of the root of the "web directory" configured for your web server. Do not attempt to serve a Laravel application out of a subdirectory of the "web directory." Doing that could expose sensitive files existing within your application.
Table of Contents:
Method 1: Clear Route Cache
When you are deploying your Laravel application to production, you should typically take advantage of Laravel’s route cache. Using the route cache drastically decreases the amount of time it takes to register all of your application's routes. To generate a route cache, execute the route:cache Artisan command:
php artisan route:cache
After running this command, your cached routes file will be loaded on every request. Here is the moment to remember that if you add any new routes, you will have to generate a fresh route cache. That’s the reason for you to only run the route:cache command during your project's deployment.
If you stumble upon the issue of new routes not working, try using the route:clear command to clear the route cache:
php artisan route:clear
If that does not fix the issue, continue with the second method.
Method 2: Fix index.php and .htaccess Location
The index.php and .htaccess files locations have to be in the same folder. You need to do the following:
- Check where your
index.phppage is located; - Check where your
.htaccessfile is located.
Note:
Because of being a hidden (dot) file, .htaccess often gets forgotten. This is one of the most common cases for many issues, one of which is Laravel routes not working properly on a live server.
You need to find the .htaccess file. You can do this by using the cPanel File Manager or an FTP client such as FileZilla. For this example, we will use the File Manager.
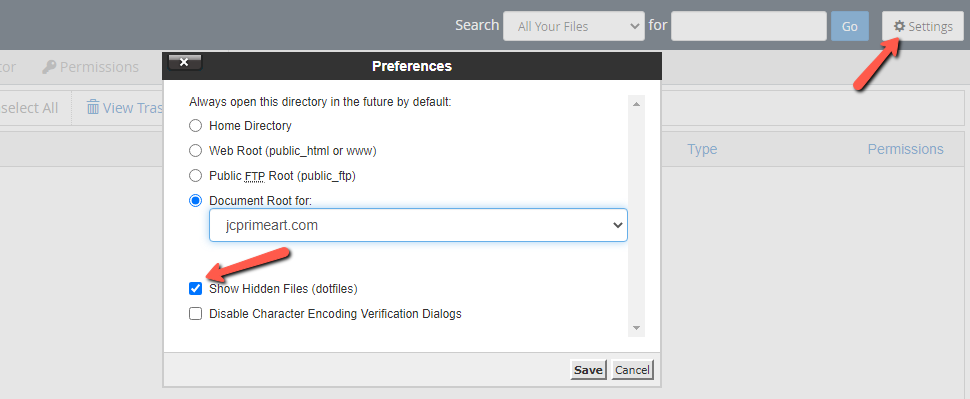
As we mentioned, the .htaccess file is by default. So, if you don’t see it in the File Manager, you need to go to Settings → Show Hidden Files → Save:

In case you still can’t find the .htaccess file after you’ve made hidden files visible, that means it hasn’t been generated. You can create any file by using your File Manager +File (New File) option at the top-left corner. In this case, you need a .htaccess file.
After making sure your index.php and .htaccess files are in the same directory, your Laravel routes should work properly on the FastComet shared server.
If this method does not work, we have a third option for you.
Method 3: Create a Symbolic Link to public_html
When both methods do not work for you, you should try creating a symbolic link from the public directory to the public_html directory. A symbolic link creation may sound complicated, but after going through the steps we provide, you will see that it’s a quick fix. Here is what you have to do:
- Rename the
public_htmlfolder topublic_html_oldor something similar. You are doing this to deactivate the directory instead of deleting it. - Using SSH, implement the following command:
ln -s /home/user/laravel_project/public /home/user/public_html
Where user is your username and laravel_project is the name of the folder where your Laravel application is located.
Contact us for Assistance
In case none of the methods in this post worked for you, feel free to contact our technical support experts via a support ticket. They will answer you swiftly and help you resolve the issue of Laravel routes not working on shared hosting.
We hope you find this article useful. Discover more about FastCloud - the top-rated Hosting Solutions for personal and small business websites in four consecutive years by the HostAdvice Community!

SSD Cloud Hosting
- Free Domain Transfer
- 24/7 Technical Support
- Fast SSD Storage
- Hack-free Protection
- Free Script Installation
- Free Website Transfer
- Free Cloudflare CDN
- Immediate Activation