How to Disable PHP Execution in Certain WordPress Directories
Updated on Aug 16, 2019
WordPress is a CMS that makes specific directories writeable by default. This way, you and other users with access are able to easily upload themes, images, plugins, and videos to the site. Setting correct permission for who can see which files and what actions a user could take significantly improves the security posture of your site.
This guide is to show you how to disable PHP executions in WordPress using the .htaccess file. In the post, you will find:
The Problem - Vulnerable to Hacker Attacks
Having some directories writeable by default makes your site vulnerable to hacker attacks. Hackers can use the function to upload backdoor access files or malware to your WordPress site. The malicious files would usually be disguised as core WP ones. They would mostly be written in PHP and can run as background processes in order to gain full access of everything on your site. This is not something you would like, is it?
There is a fix, and we will share it with you. What you have to do is disable PHP executions in certain directories where they are not needed. Doing that will make sure that any PHP file will not run in those particular directories.
Could this Have a Negative Impact on Your Website?
Depending on the directory you choose, there could be a negative impact on your website. This is not for beginners, so in case you decide to disable PHP execution in one of the important directories, your WordPress site could stop working. It is of vital importance that you understand what you are doing before you go on to disable any PHP execution.
Disable PHP execution from the uploads directory. There shouldn't be any PHP executions in the uploads directory, which means that stopping PHP executions in the uploads directory won't impact your WordPress site. It's completely safe to do and will additionally improve WordPress security in general.
Also, it's important to understand that if your site has already been hacked, this is not a fix. This is a prevention measure. If you have been hacked, you will need to locate any files that have been compromised or added and delete them. Remember one of the most powerful tools a website has at its disposal is an up to date backup of their website.
Disable PHP Execution to Improve your Site's security via .htaccess
Most WordPress websites have the .htaccess file in their root folder. It is a powerful configuration file used to password protect the admin area, disable directory browsing, generate SEO friendly URL structure, etc. In case you are a regular WordPress user, you probably already know the location of the .htaccess file. However, if you need to disable PHP execution for a particular directory, you will need to create a new file. Follow the steps below:
- Go to cPanel → File Manager.
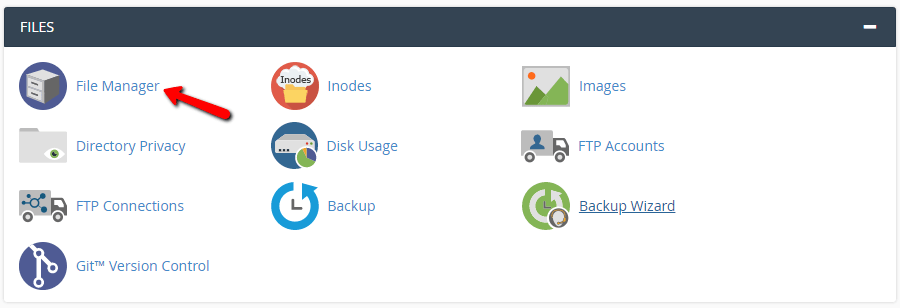
If you see an empty directory, what you need to do is open the root directory. Your website data is hosted inpublic_html; - Search for the
.htaccessfile and press right-click over it to edit. Also, you can use the Edit option on your cPanel navigation menu;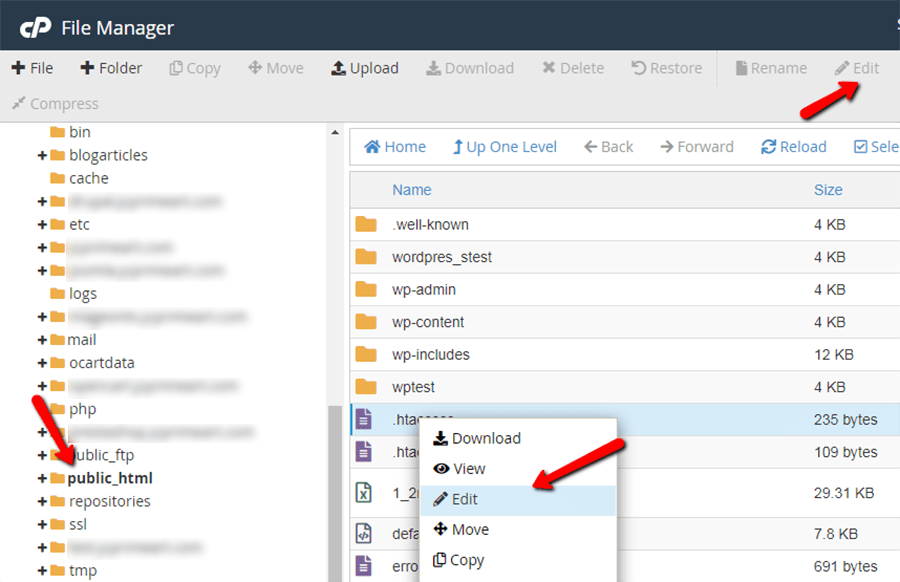
- You are going to see a pop-up. Click Edit and a new tab will open. There, you will see the familiar coding lines, but if you are not a tech-savvy person, don’t be afraid;
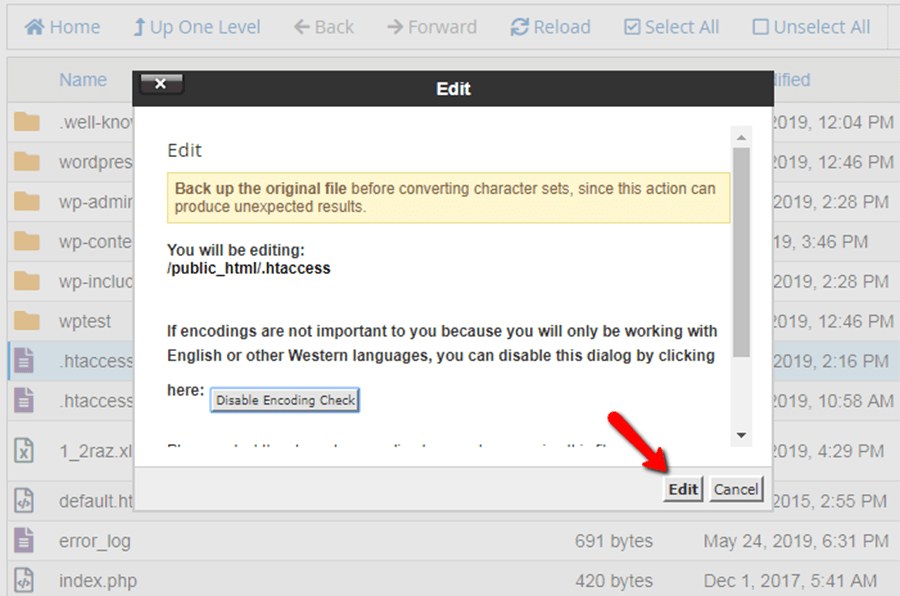
- Paste the following code snippet before
# End WordPress:
<Files *.php>
deny from all
</Files>
- Now, it’s time to save all changes. Click on Save Changes which is at the top-right corner.
- You have successfully disabled PHP execution for your WordPress core, but it will be best if you can do it for some of the sensitive directories as well. For example, you should secure the
wp-content/uploadsdirectory where every media file is available. - To do this, you would have to navigate to the
wp-contentfolder and open Uploads. As you know, there isn’t any.htaccessfile in this directory, so you need to create a new file. It's an easy job, the .htaccess file is a simple .txt file, and you can create it by clicking on the File option from your main navigation menu.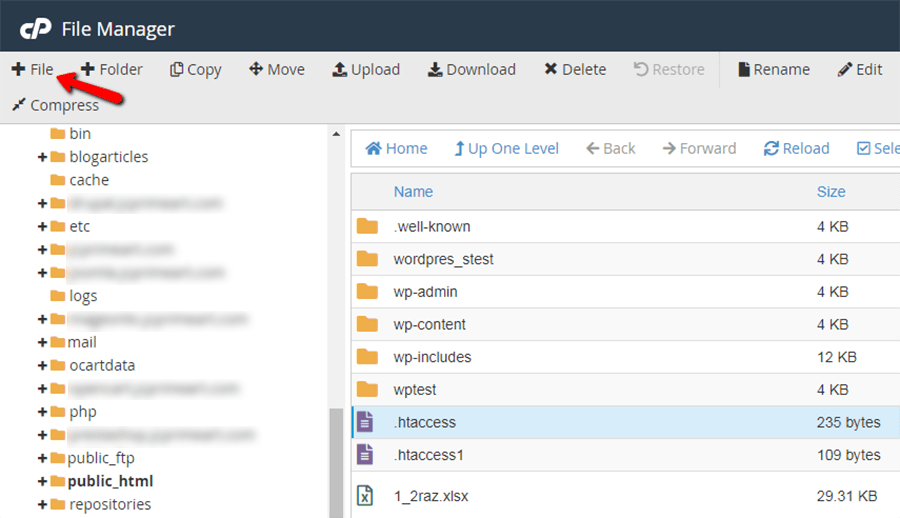
Go ahead and follow the steps below:
- After a pop-up appears, you need to fill out
.htaccessand click on the button Create New File;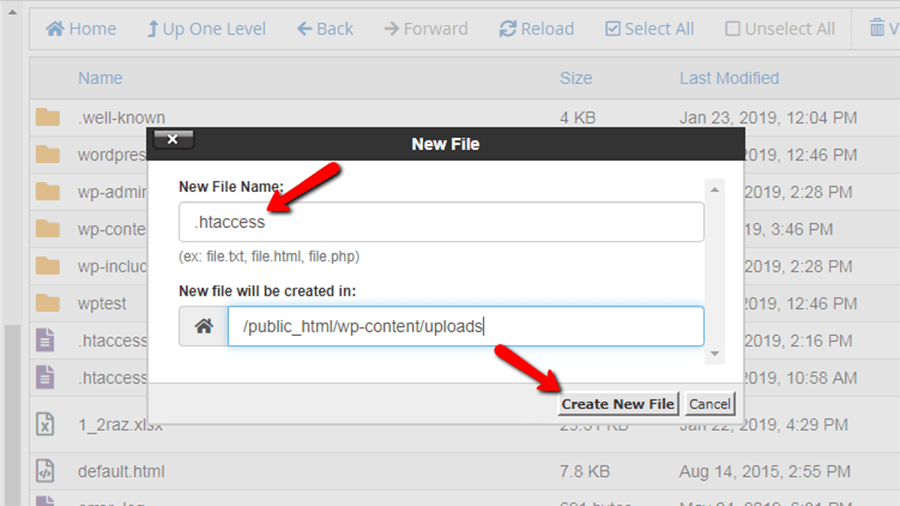
- Refresh your page, so that you are able to see the file. Many complain that they cannot see it, because they often do not have “show hidden files” enabled. You will be able to see that the file has a dot prefix, which signifies that it’s hidden by default.
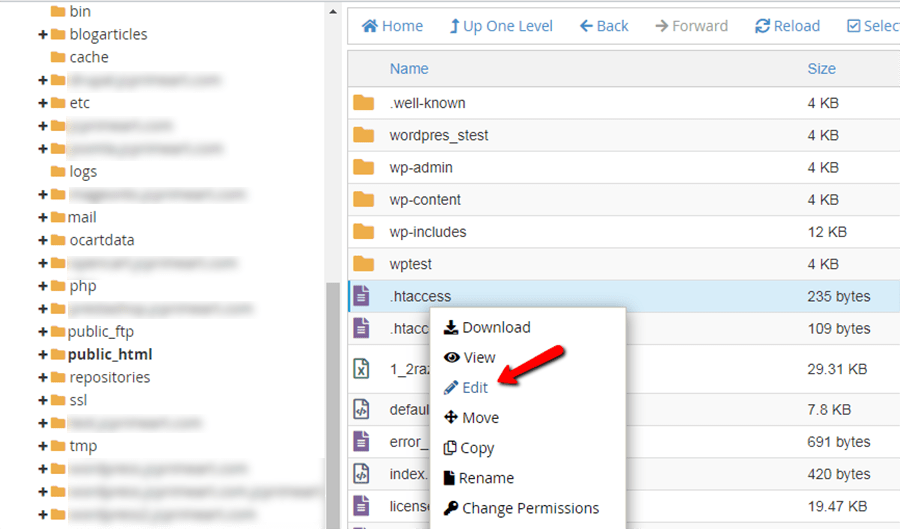
- Right-click to edit and paste the same three lines of code as shown above. You don't need to add anything extra in this file, because it controls only the
wp-content/uploadsdirectory, not your whole WordPress site. Save the file, and you're all set.
You can also disable PHP execution for wp-includes by following the same method.
Contact us for Assistance
Let us remind you that you can always submit a support ticket. Our 24/7 working technical support team is always there to assist you with anything hosting related. Make sure to explain your issue as well as you can to our team, and they will get on it right away.
We hope you find this article useful. Discover more about FastCloud - the top-rated Hosting Solutions for personal and small business websites in four consecutive years by the HostAdvice Community!

WordPress Hosting
- Free WordPress Installation
- 24/7 WordPress Support
- Free Domain Transfer
- Hack-free Protection
- Fast SSD Storage
- Free WordPress Transfer
- Free CloudFlare CDN
- Immediate Activation