How to Fix 404 Errors After Changing WordPress Permalinks
Updated on Feb 28, 2020
In case you have changed the permalinks of your WordPress site or it did not have permalinks at all previously, you could face the 404 Error on your Homepage. Not to worry, you should know this technical issue is quite common. This post is to help manage your permalinks and fix the annoying 404 Errors. You will maintain your SEO rankings, in addition to keeping visitors happy.
There are a total of 6 easy steps to follow:
Document all Current Permalink Settings and URLs
Having a plan is always a good thing, thus documenting the current permalink settings is one of the things you should do. We recommend doing the following:
- Write down or take a screenshot of your WordPress site's current permalink settings. You will need this in the second step;
- In case you are using the "default" settings, you will be able to skip steps 2 and 4. That's because WordPress automatically redirects for you. However, you would still need to do steps 3 and 5;
- Write down some current URLs to test them later;
- Try getting at least 15 URLs. Once you test them and see that they work, you will feel much more confident that everything is okay.
Make the Necessary Redirects
By default, WordPress would attempt to redirect any changed/moved content. However, it does not always work, and you should not rely on WordPress for this specific functionality. With that said, there are two easy ways to set up redirects in WordPress:
- Use the free Redirection plugin - manage redirects from the WordPress Dashboard. Once the plugin is installed and activated, go to Tools → Redirection and input the 404 page URL in the Source URL box and the new location in the Target URL box. Keep in mind that since Redirection is a plugin, it would have some influence over your site performance;
- Use cPanel - manage your redirects via cPanel. This option is what you should prefer since everything you do is on a server-side level, thus your site performance will not be affected. Also, it means one less plugin to worry about. If you are a FastComet client, you would be using the Apache web service, which gives you the third option to use the
.htaccessfile for setting up redirects, which we address in Step 4.
Switch the Permalinks Setting
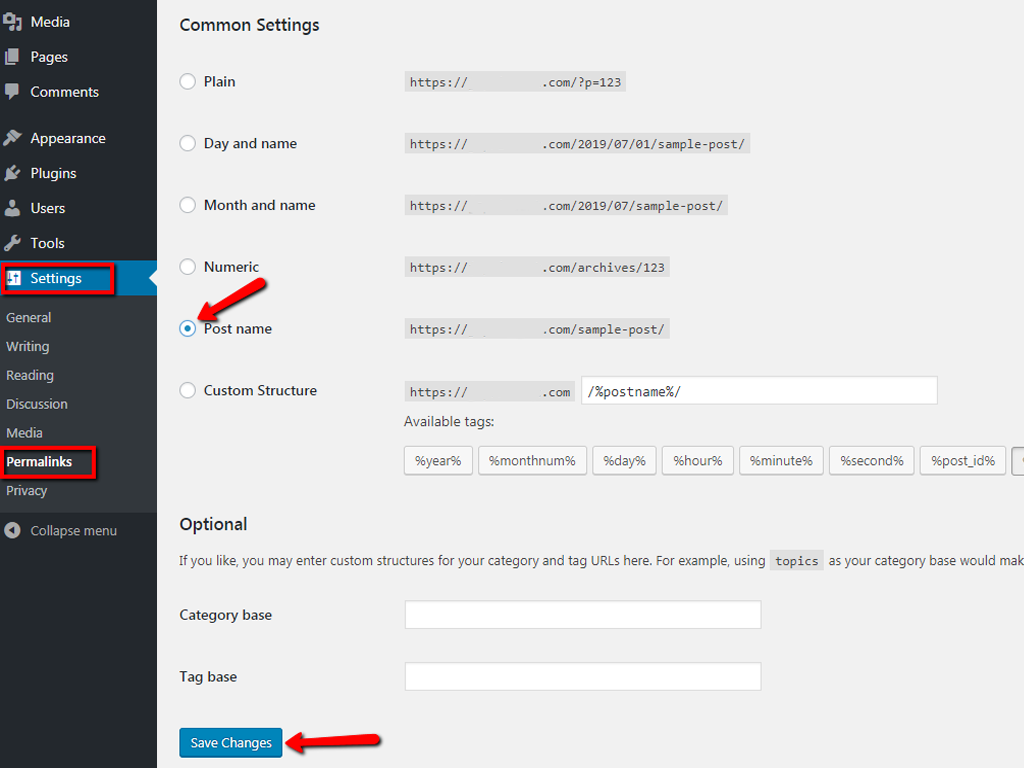
This is where you go to your WordPress Dashboard → Settings → Permalinks. Then, you need to choose Post Name and click on the button Save Changes. Yes, that's all. After this step, you will get the 404 Error for your old links. We address this in the next step.

Manually Edit Your .htaccess File
Now let's get those pesky 404 errors fixed manually. To do that, log in to your server using FTP, and then modify the .htaccess file, located where folders like /wp-content/ and /wp-includes/ are. The easiest thing to do is temporarily making the file writeable by changing the permissions to 666. After that, repeat the original solution.
Make sure that you don't forget to change the permissions back to 660. Your other option is to manually add the following code in your .htaccess file:
# BEGIN WordPress
<IfModule mod_rewrite.c>
RewriteEngine On
RewriteBase /
RewriteRule ^index\.php$ - [L]
RewriteCond %{REQUEST_FILENAME} !-f
RewriteCond %{REQUEST_FILENAME} !-d
RewriteRule . /index.php [L]
</IfModule>
# END WordPress
Test and Keep Testing
Finally, start testing the URLs that you have written down and make sure they are correctly redirected. You can also search your website in search engines and make sure those URLs redirect properly.
Contact us for Assistance
If none of the things in this post work for fixing your 404 error, go ahead and submit a ticket to our 24/7 technical support team. If you do that, please let us know the exact URLs that are giving unwanted or unexpected 404 errors, and that you walk us through the troubleshooting steps already completed. With that information, we will be able to add some next-level troubleshooting as soon as possible and get your problem solved.
We hope you find this article useful. Discover more about FastCloud - the top-rated Hosting Solutions for personal and small business websites in four consecutive years by the HostAdvice Community!

WordPress Hosting
- Free WordPress Installation
- 24/7 WordPress Support
- Free Domain Transfer
- Hack-free Protection
- Fast SSD Storage
- Free WordPress Transfer
- Free CloudFlare CDN
- Immediate Activation