How to Fix the “Installation Failed: Could Not Create Directory.” Error in WordPress
Updated on Nov 9, 2022
Errors on your WordPress site can stymie your work and cause significant inconvenience for both you and your visitors. For example, the message "Installation failed: could not create directory" may prevent you from providing a critical feature or functionality.
Fortunately, resolving this error is straightforward. You can quickly get your WordPress plugin or WordPress theme up and running by adjusting a few settings.
In this post, we'll look at what causes this error and how to fix it. Then, we'll walk you through three approaches for resolving the error, so you can finish your installation or update.
This post includes:
What Causes the “Installation Failed: Could Not Create Directory.” Error in WordPress
There are three main reasons why you might get the "Installation Failed: Could Not Create Directory." error message in WordPress:
- When installing a theme or plugin via your WordPress dashboard
- During a standard theme or plugin update
- While attempting to upload files to the wp-content directory on your server
In each scenario, the root cause of the problem is the same. However, let us examine each of these scenarios in turn.
New Themes or Plugins on Your Site
Your WordPress site consists of two parts: a database and various files stored on a server in folders or 'directories.' When you use the native WordPress installer to install a theme or plugin on your site, it must create a new directory to save its files in.
However, if the plugin or theme you're attempting to install lacks write permissions in your website's root directory, it will fail to complete this task. When this happens, you'll see an error message like "Installation failed: could not create directory."
This error is your server's way of telling you that adding the plugin or theme in question will cause changes to your site's files. In general, this is a problem that most new WordPress sites experience.
It's worth noting that this error has a similar but less common cause. If your server runs out of disk space to store your site's files, the same message may appear because there is no room for the new plugin or theme. To check WordPress disk usage, follow this guide.
This could be because old backup files were not deleted, or it could be because your hosting plan is too small for your site. In the latter case, you should consider upgrading to a hosting package with more storage.
Existing Themes or Plugins
When attempting to upgrade an existing WordPress theme or plugin on your site, you may encounter an error similar to the one described above. This one usually says, "Update failed: could not create directory."
This issue occurs for the same reasons that the "Installation failed, could not create directory." error does. When you update a WordPress plugin or theme, the files on your website's server must be rewritten. If your permissions are incorrect or there is insufficient free space, the process will be unable to access or upload new files.
Because the causes of these two problems are the same, the solutions are also the same. Any of the solutions listed below for resolving the "Installation failed: could not create directory" error should also work for a stalled update.
New Files in the wp-content Directory
Server file permissions are a security feature implemented by hosting providers to prevent unauthorized parties from altering your site or stealing sensitive information. However, if they aren't set correctly, they can sometimes lock you out of your own files.
This is why, if you try to bypass the "Installation failed: could not create directory." error in your WordPress dashboard by uploading the plugin's or theme's files directly to your server's wp-content directory, you'll almost certainly run into the same issue. The error is caused by a server issue, not a problem with your WordPress installation.
This problem may also affect your wp-content/uploads subdirectory, which contains all of your media files. Adding images, videos, or other similar content to your site by saving it to your server is similar to installing a new plugin or theme.
If you don't have write permissions in your root directory, uploading to wp-content/uploads will still result in the error we've been discussing. To fix it, you'll need to change the settings on your server, which we'll go over shortly.
Diagnosing the Error
The good news is that this error is relatively simple to correct. Most of the time, simply changing your permissions will solve the problem. However, before you begin working on that solution, you should ensure that it can actually solve your problem.
We've outlined two methods for determining whether your site is experiencing a permissions-related error in the sections below.
Use the WordPress Site Health Tool
The Site Health tool was introduced in WordPress 5.2. It includes a plethora of useful information about your WordPress site, such as performance test results, security checks, and WordPress configuration data.
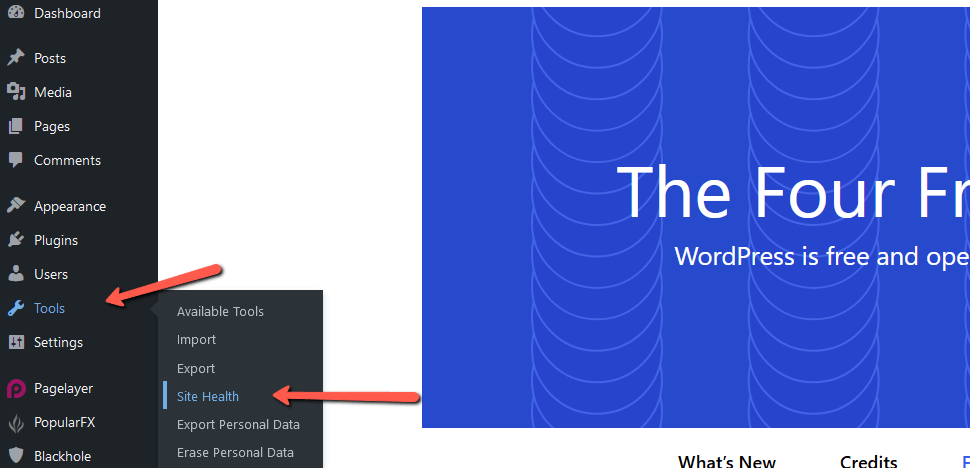
You can find it in your WordPress dashboard by going to Tools → Site Health. To check your file permissions settings, go to the Info tab and select:

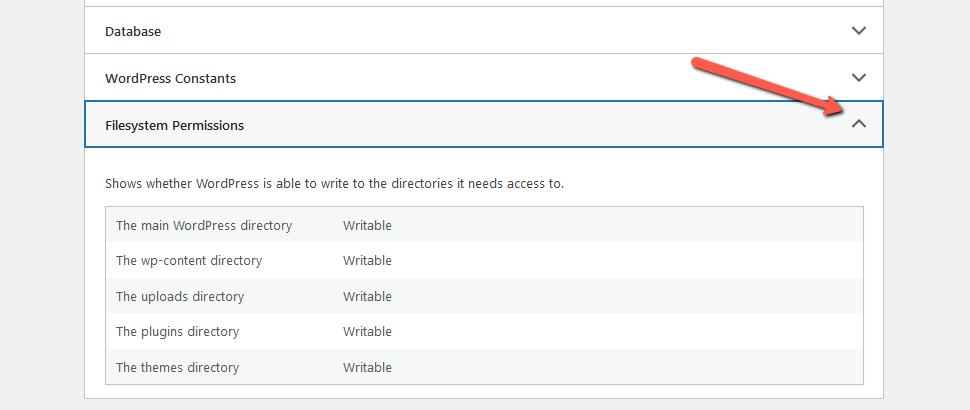
Then, scroll down to the last section, which should be labeled Filesystem Permissions:

Here you’ll see a list of key WordPress files, including the plugin and theme directories. Ideally, they will all be listed as “Writable”:
In the event that your permissions are not configured correctly, you’ll see “Not writable” listed next to the problematic folders. If this is the case, you’ll know that you need to correct your file permissions.
How to Resolve the WordPress "Installation Failed: Could Not Create Directory" Error
If the "Installation failed: could not create directory error" is caused by your site's permissions settings, you can resolve it by resetting them. To do so, you'll need to use an FTP client to connect to your server via File Transfer Protocol (FTP). For more information on different FTP clients and how to use them, check our FTP client tutorial section.
Note
As FastComet offers cPanel, you can use the cPanel File Manager tool in order to make the changes explained in this section.
- The first thing you will have to do after configuring your preferred FTP client is to access the directory in which your WordPress resides. For most people that will be the
public_htmlfolder.

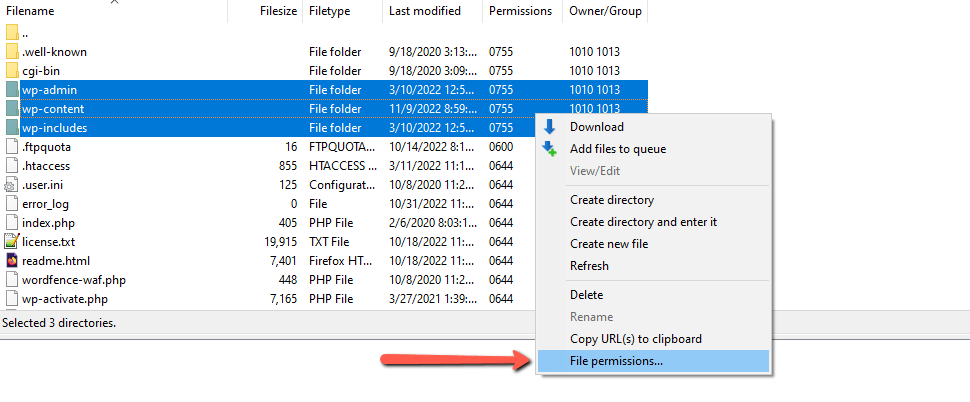
- After that, select the folders labeled
wp_content,wp_includes, andwp_admin. Right-click on them and choose File Permissions:

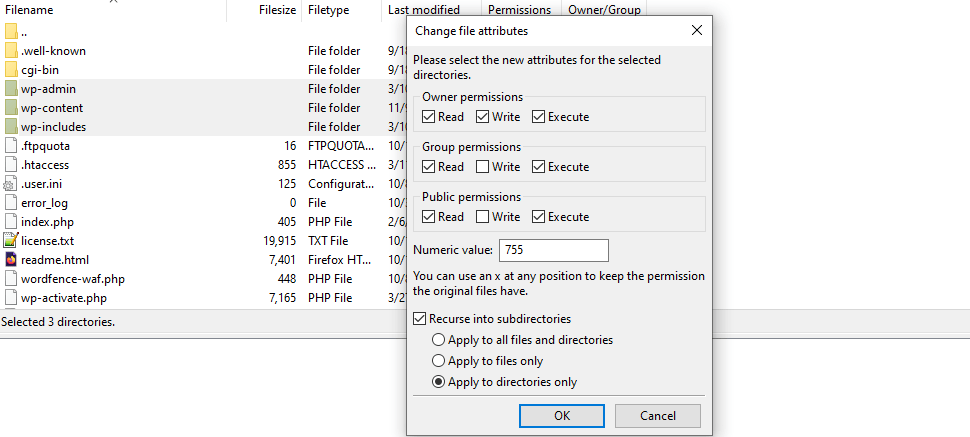
You should see a window that contains a handful of settings:

Check that the options here are set to the following values:
- Owner Permissions: Read, Write, Execute.
- Group Permissions: Read, Execute.
- Public Permissions: Read, Execute.
- Numeric value: 755.
- Recurse into subdirectories.
- Apply to directories only.
To close the window, press the OK button. Then, select all of the other files in public_html, open File Permissions, and change the settings to:
- Owner Permissions: Read, Write, Execute.
- Group Permissions: Read, Execute.
- Public Permissions: Read, Execute.
- Numeric value: 644.
- Recurse into subdirectories.
- Apply to files only.
Close the window once more. Return to your site and try installing or updating the plugin/theme again.
It's worth noting that some hosting companies, including those that use cPanel, have their own tools that you can use instead of FTP. You can usually find this tool by logging into your hosting account, going to the site that is causing the problem, and looking for a File Manager.
Conclusion
The plugins and themes on your WordPress site provide critical functionality for you and your users. When attempting to install or update one, encountering an error can throw a wrench in your plans and slow your progress.
You can use the Site Health tool or look at your server's error log to see if a file permissions issue is causing a plugin or theme installation error on your site. Following that, resetting your permissions via FTP should take only a few minutes.
We hope you find this article useful. Discover more about FastCloud - the top-rated Hosting Solutions for personal and small business websites in four consecutive years by the HostAdvice Community!

WordPress Hosting
- Free WordPress Installation
- 24/7 WordPress Support
- Free Domain Transfer
- Hack-free Protection
- Fast SSD Storage
- Free WordPress Transfer
- Free CloudFlare CDN
- Immediate Activation