
How to Make the Most of LiteSpeed Cache for WordPress
Website speed and performance are essential, and there is no question about them. Users want websites and content to load instantly and are typically not patient enough to wait more than just a few seconds before closing the tab. A quick and snappy website is not only good for retaining visitors, but it also helps to build trust with them. Speed is often equated to professionalism, which means quality. Therefore, we want to show you how to make the most out of the LiteSpeed Cache for WordPress plugin.
We have written many blog posts on website optimization, but if you have a WordPress website, the LightSpeed Cache plugin can be your best friend regarding website speed. It is a part of our FastCloud Extra Shared Hosting plan and available as an upgrade for our VPS and Dedicated CPU servers. The LiteSpeed Cache plugin can skyrocket your website’s performance. Read on as we take a deep dive into why it is considered one of the best.
What is LiteSpeed Cache?
A few years ago, we moved away from Cachewall as the caching solution for our FastCloud Extra hosting plan. Instead, we decided to replace it with the LiteSpeed Web Server. It not only offers superior performance to Cachewall but is still actively being developed and improved, receives regular updates, and offers much more than Cachewall did. We recommend reading our tutorial here if you want to learn more about LiteSpeed.
To sum up briefly, though, here are its main advantages over other web servers.
- Blazing-fast Performance – LiteSpeed, as the name suggests, is developed with speed in mind. It is there to make your websites zoom along. The web server accomplishes that through several key features:
- Efficient Resource Usage – The LiteSpeed Web Server can handle concurrent connections more efficiently than traditional servers like Apache. That, in turn, reduces CPU and memory usage, boosting performance;
- Server-side Caching – Two of the many features the LiteSpeed Web Server has are both server-side and client-side caching. That allows the server to optimize the way content is served. You can check out LiteSpeed’s benchmarking page to see how caching affects various websites;
- HTTP/3 Support – The LiteSpeed Web Server was one of the first web servers to offer full, unconditional support for the then-new HTTP/3 (also known as QUIC). This new transport layer protocol moves data quickly between client and server and even has the capability to compensate for slow networks;
- Enhanced Security – In addition to speeding up your websites, the LiteSpeed Web Server is equipped with a suite of security features to protect it as well:
- Anti-DDoS Measures – Through the usage of connection throttling and bandwidth limits, the web server can mitigate the effects of DDoS attacks;
- ModSecurity Compatibility – LiteSpeed is fully compatible with ModSecurity (one of the most popular open-source web application firewalls) rules. It can enhance the already strong firewall on any server using it;
- Brute-force Protection – LiteSpeed also offers features to prevent brute-force attacks;
- Seamless – The LiteSpeed Web Server is a fully compatible drop-in replacement for any Apache configurations (.htaccess, mod_security, mod_rewrite, etc.). Additionally, it is fully integrable with popular control panels such as cPanel;
- Scalability – Finally, the LiteSpeed Web Server is optimized to handle traffic spikes without degrading website performance. This is possible mainly due to the event-driven architecture (instead of process-driven), allowing it to handle more processes with fewer resources.
In short, the LiteSpeed Web Server is a standout among others of its class for its speed, efficiency, scalability, and robust features. It is a top choice for web hosting providers who wish to offer their customers the best without sacrificing performance or security.
In case you are unsure about your server and if it is running LiteSpeed, there are two quick and easy ways to find out. All you need for the first one is your browser and your website. Open the website and the browser’s console (F12 on Chromium browsers). Click on the Network tab and then on your website’s header. That will show you a list of all the resources on that page. Click on any of them and scroll down until you see Server; it should say LiteSpeed.
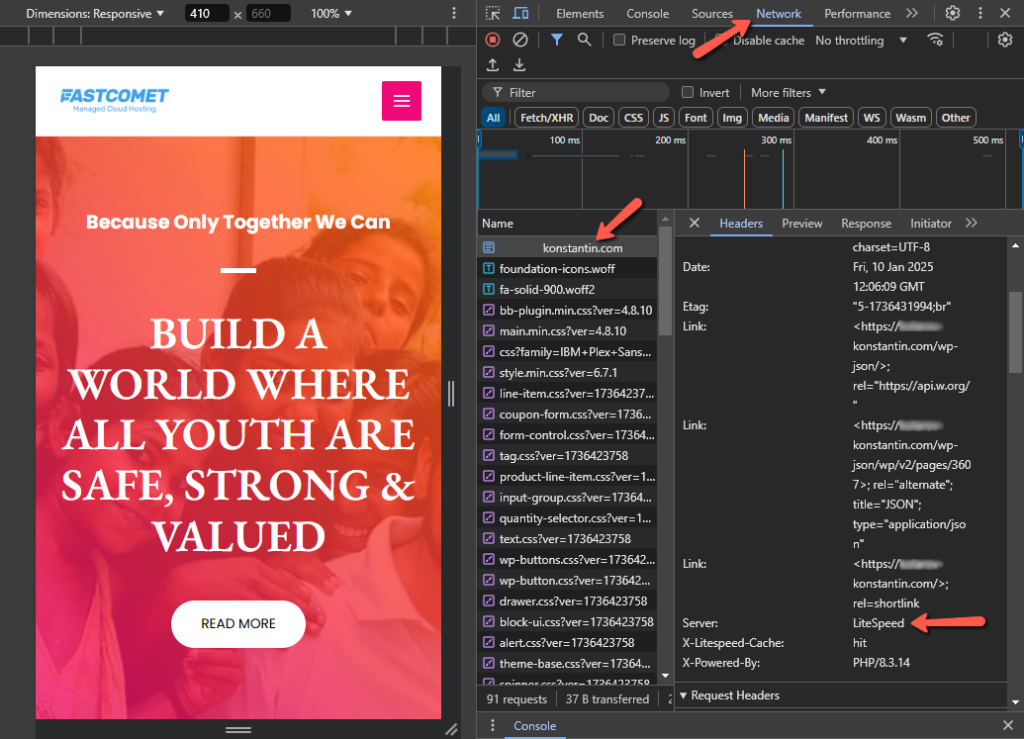
The second method is to use a command prompt if you have access to it. All you need to do is run the “curl -I example.com” command (no quotes) and replace example.com with your domain. The server line will show the server type, but you might also get x-litespeed-cache-control and x-litespeed-tag lines, which also confirm the presence of LiteSpeed.

Now that we know what the LiteSpeed Web Server is and how to check if it is present, let us explore the LiteSpeed Cache for WordPress plugin and show you why it is one of the best ways to speed up your website.
What is the LiteSpeed Cache for WordPress?
LiteSpeed Cache for WordPress (LSCWP for short) is a plugin for the popular content management system. As you can guess from the name, its primary function is to cache static data for better website performance. However, it does a lot more than that. It is an all-in-one optimization suite for your website. From caching to media and your database, it will ensure your website is running as smoothly and efficiently as possible.
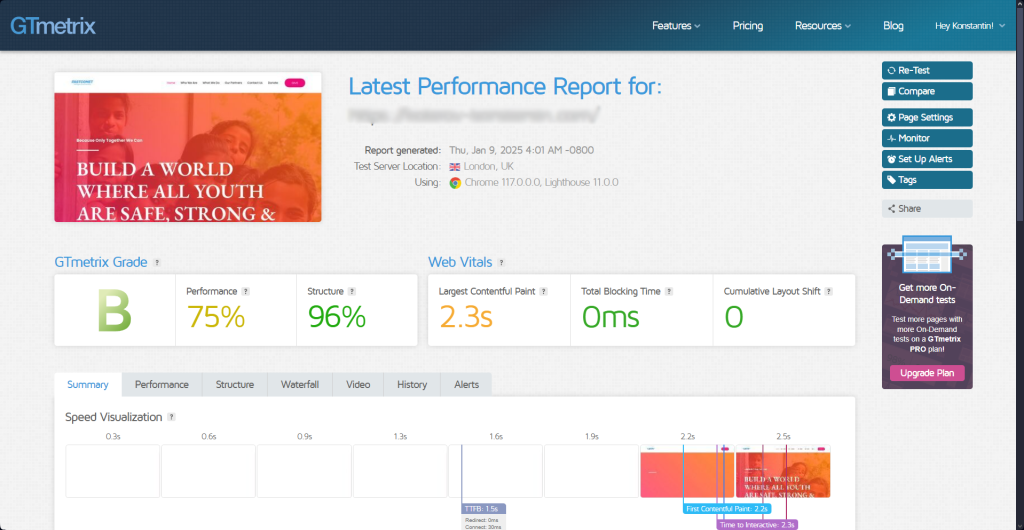
The main feature of the plugin is, naturally, its caching capabilities. A large portion of the plugin’s settings are devoted to it. Fortunately, setting it up is child’s play, mainly because there are descriptions under each and every option to tell you what they do. With that in mind, let us have a look at just how much installing the plugin impacts a website’s performance. We created a website and loaded it with plugins and content, then ran two tests: one before and one after installing and activating LSCWP.
The plugin’s mere activation had a tangible impact on the website’s performance. Here is what the test showed before.
And here is what it looks like after we turned LSCWP on.
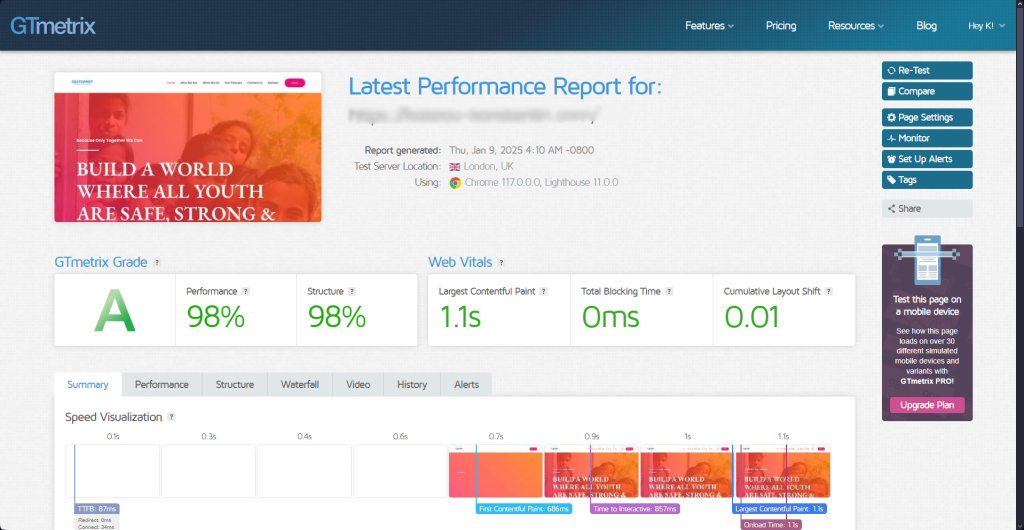
As you can see, even turning the plugin on has had a substantial effect.
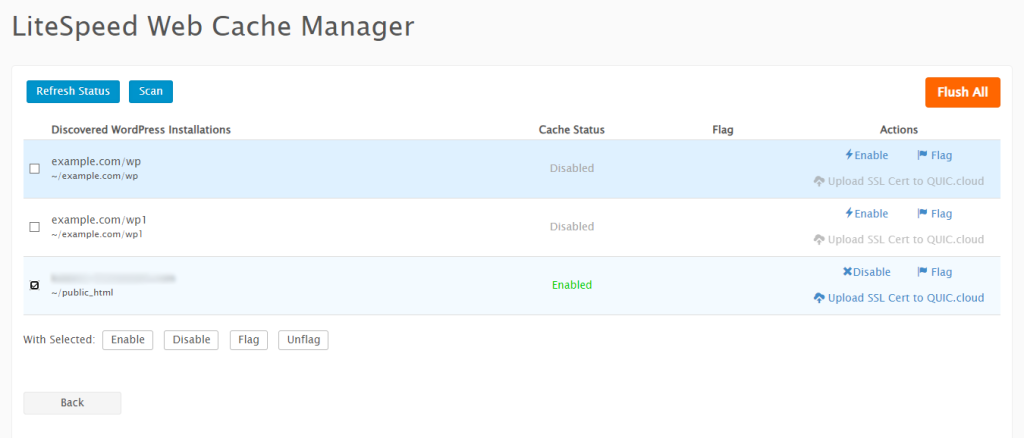
Additionally, our customers on the FastCloud Extra hosting plan or those with a private hosting solution who have purchased the LiteSpeed web server can use the LiteSpeed Web Cache Manager in the Advanced section of their cPanel account.

After clicking on WordPress Cache at the bottom of the page and scanning for the plugin, you will be able to enable or disable the cache and flush the cache of all websites with the plugin. This is a handy little tool in case you want to perform any of those actions without logging into the backend of each website.
However, to get the most out of the LiteSpeed Cache plugin, you will have to make a few adjustments to the settings. Read on for our recommendations.
How to Make the Most of LSCWP
The LiteSpeed Cache plugin for WordPress has many options that users can play around with—so many that they can become overwhelming. However, we are here to help! We have compiled a list of the most impactful settings that should offer the biggest improvement to your website’s performance.
Before we proceed, though, we must clarify something. The LSCWP plugin should work with most websites right out of the box, and the same applies to most of its settings. However, depending on your website’s configuration, the plugins and themes it uses, and countless other factors, some settings can cause issues. The settings we will describe below work with most websites, but if you encounter any instability or other problems with your website because of those settings, we strongly recommend you discuss those with your developers.
With that said, read on for the best settings to make your website’s performance skyrocket.
LSCWP Presets
Even before we dive deep into the numerous options the LiteSpeed Cache for WordPress plugin offers, there is an even easier way to optimize your website. The developers are kind enough to offer their users presets that activate several settings simultaneously. Found in the Presets tab of the plugin’s settings, you can simply choose the one you deem best for your website and be on your way without any further intervention. Here are the current available presets.
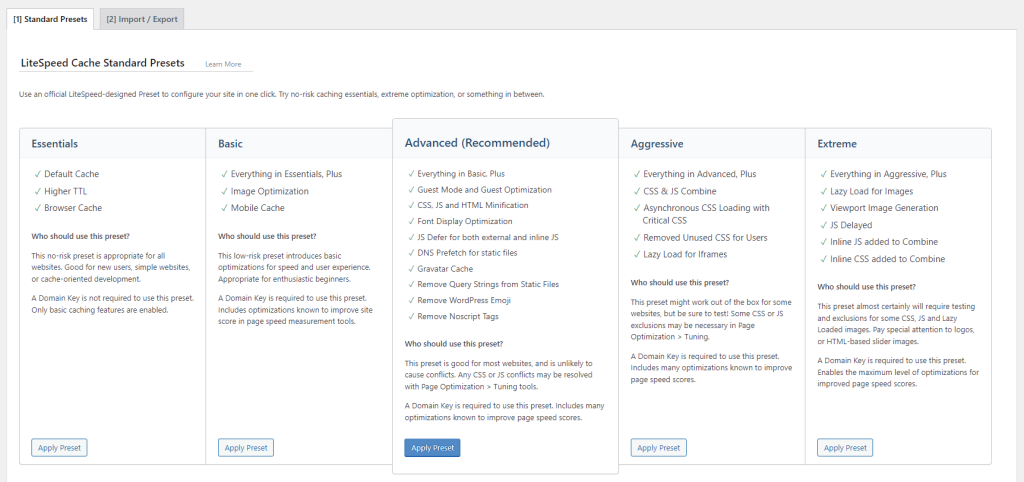
As you can see, each preset says precisely what it does, and the description is clear enough to inform you what it can and cannot do for you, as well as what websites it should work on and what to watch out for.
General Tab
As the name suggests, the General tab holds a few overall settings for setting up the plugin.
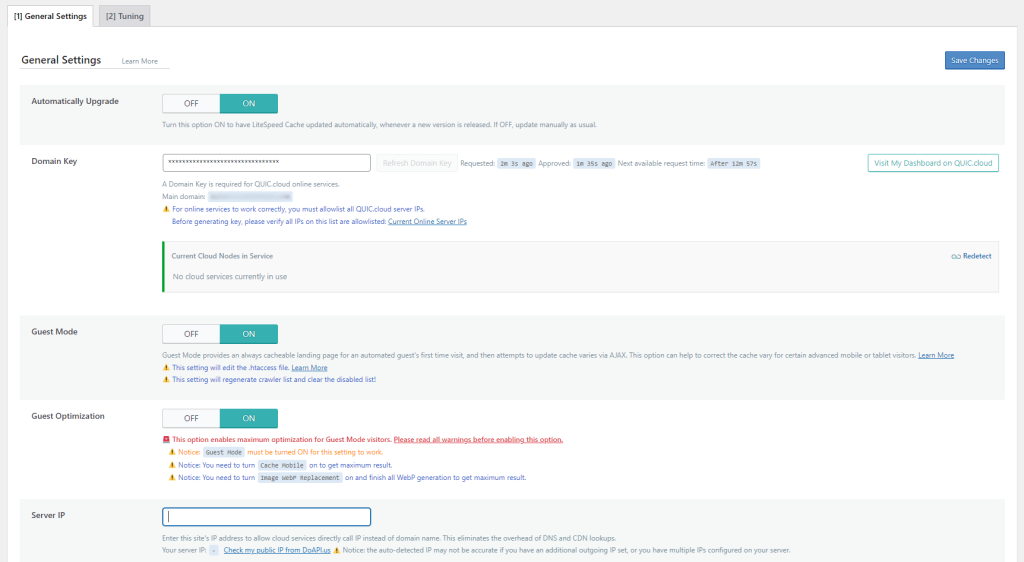
Here is a quick breakdown of what each setting does.
- Automatically Upgrade – Self-explanatory. The plugin will automatically update when a new version is available. We recommend setting it to ON;
- Domain Key – You should request a domain key. It is necessary if you want to use QUIC. cloud’s CDN services. LSCWP integrates very well with CDN services like QUIC.cloud and CloudFlare;
- Guest Mode and Guest Optimization – Turn these ON. They will make first-time visitors experience faster load speeds and improved performance;
- Server IP – You should place your host’s IP here. That will eliminate the need for DNS or CDN lookups;
- Notifications – If you want to receive notifications about LSCWP news, releases, etc., turn this option ON.
That is all you need to know about the General tab of the LiteSpeed Cache plugin. Now, let us move on to the main part of the plugin: Cache.
Cache Tab
The main event! This is the tab that will boost your website’s performance the most. While there are many settings you can adjust here, we will tell you exactly which ones will have the most significant impact without bogging you down with unnecessary explanations.
This tab will help your website the most when it comes to loading times and performance because it will optimize how your site and server cache static elements. When such an element is cached, it does not have to load every single time it is requested. That stops the server from spending resources and time loading those elements, therefore expediting the website’s own loading speeds. It also keeps the load on the server low.
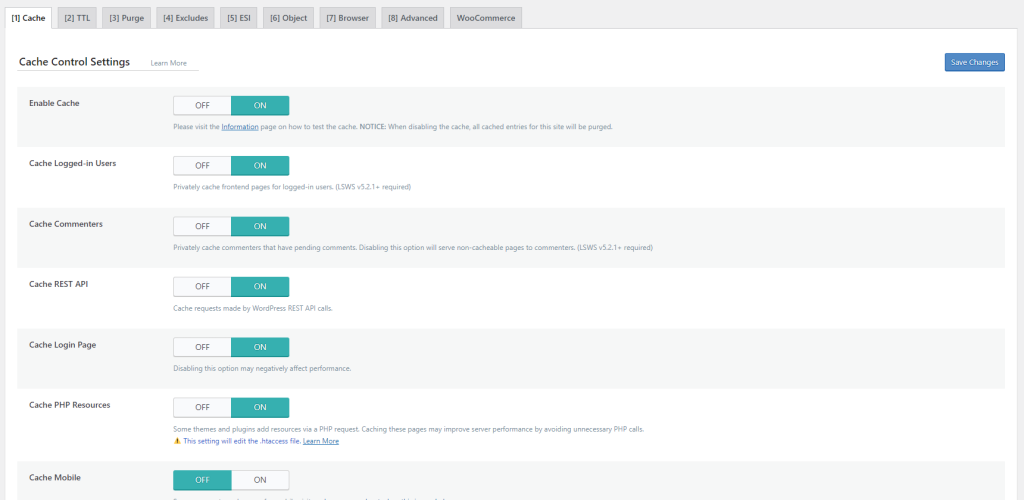
With that said, here are the most bang-for-your-buck settings to toggle and adjust. We will go tab by tab and mention only the options that need adjustment.
- Cache – This is where the majority of LSCWP’s cache options are. You do not need to enable all of these, and we recommend you even disable some:
- Enable Cache – Obviously, turn it ON. This option enables LSCWP to cache your website;
- Cache Logged-in Users – Most websites do not need this option enabled. The only time we recommend enabling it is if you are running a membership website;
- Cache Commenters – Set it to OFF. You do not need this option unless your website is getting a large volume of comments;
- Cache REST API – Leave it as ON. This will cache requests from the WordPress REST API, improving website performance;
- Cache Login Page – A website’s login page is one of the most visited pages, so caching it can save on server resources and improve performance. Set to ON;
- Cache Mobile – Turn this ON so your website can serve the necessary content in either desktop or mobile-friendly format;
- Purge – This tab contains options on when the cache is purged so it can be regenerated anew. There are two options to draw attention to here:
- Purge All on Update – You should set this to ON. That way, every time the plugin is updated, the website’s cache will be regenerated, ensuring your visitors are never served old versions of cached content;
- Serve Stale – This option should be disabled. It allows your website to serve the old cache while a new version is being generated. There is no real benefit to doing that, as that old cache only takes up space;
- Object – This is the second big hitter for the plugin. Object cache is a caching method that requires some additional resources to function. However, it allows for efficient and optimized storage and retrieval of cached content. To use Object cache, your hosting server must use Memcached or Redis. Naturally, we have ensured that our customers have access to this technology via our FastCloud Extra (which uses Memcached) or our private hosting solutions (which can have either Memcached or Redis). Here is how to set it up in LSCWP:
- Object Cache – Turn this ON to take advantage of your server’s object cache;
- Method – Choose either Memcached or Redis, depending on what you have available;
- Host – Place your caching server’s IP address here;
- Port – Memcached and Redis work on specific ports, which you must place here. If you are using FastCloud Extra, contact us so we can provide you with the port;
- Store Transients – Deactivate if Cache WP Admin is enabled, which we recommend it is;
- Browser – The last important caching tab is where you can enable browser caching. It is another method for caching static content and speeding up your website. There is only one toggle here (Browser Cache), so set it to ON. As for the Time to Live (TTL), we recommend leaving it as default or setting it to a lower value (43800, which equates to one month) if you have a dynamic website.
Those are all the essential options and settings in the Cache tab of the LiteSpeed Cache plugin for WordPress. There are many more, but those ones will improve your website the most instantly. Let us move on to image optimization because, yes, this plugin does that as well!
Image Optimization
As if offering multiple caching solutions was not enough, LSCWP has an image optimization feature that will boost your website’s performance even more. Here, you can find settings allowing visitors to load your website’s images more quickly and efficiently, boosting your site’s speed. We recommend you check out our blog post about why image optimization is important to learn more.
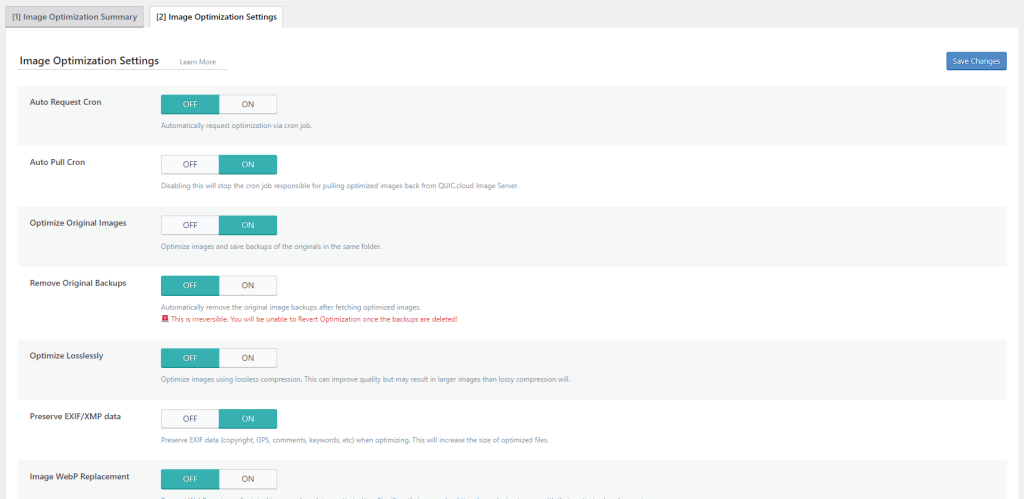
As you can see, there are two tabs, and we will focus on the second one: Image Optimization Settings. The first one is there primarily to provide information about your images and their compression, but it is also where you request image optimization. Here are the best settings for optimizing your images with LSCWP. You will need a domain key.
- Auto Request Cron and Auto Pull Cron – Enable both of these options. That will streamline the optimization of your images;
- Optimize Original Images – Turn this ON so that the plugin will keep a backup of the original images before their optimization. It does not impact performance and is a good safety net;
- Optimize Losslessly – If you turn this ON, your images will have a marginally larger size, but their quality will be unaffected by the optimization;
- Image WebP Replacement – If you want to use the WebP format for your images, turn this ON. The size of such images is usually more optimized without sacrificing quality.
Changing these options should speed up your website significantly without noticeably lowering the quality of your images. When you have uploaded your images and are ready to have them optimized, simply go to the Image Optimization Summary tab and hit the Send Optimization Request button. After a few moments, you will see a notification letting you know that your images were sent to and then received from the optimization server. On the right, you will see a summary of the optimization.
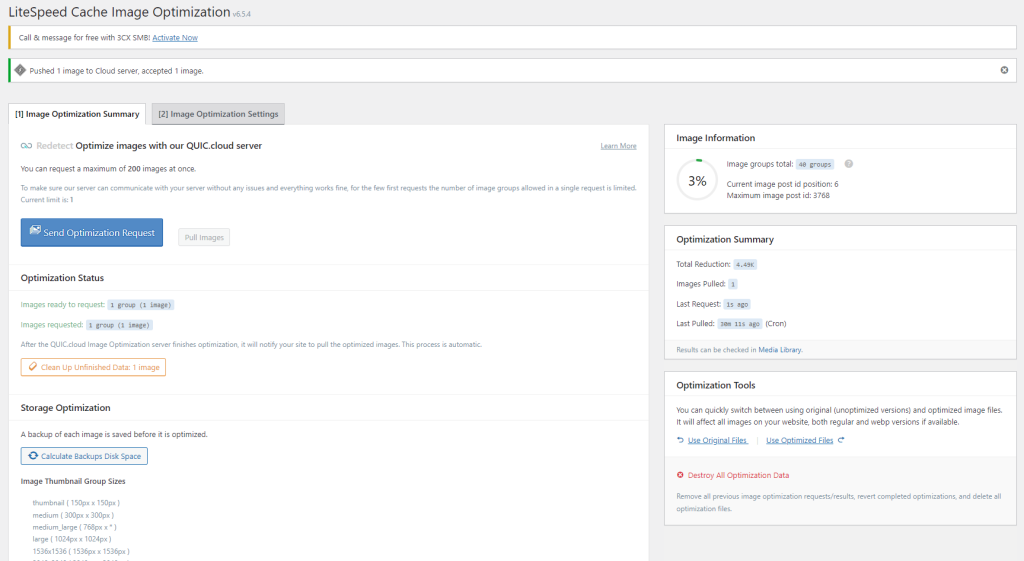
With that done, your website’s images should now be of much smaller size, making them not only less resource intensive to load but will happen more quickly as well.
Page Optimization
The next tab on the list is Page Optimization. Here, you will find options for optimizing CSS, JS, HTML, media, and localization, to name the most important ones. However, this is where we must issue a disclaimer.
Since most options here affect your pages’ code, we recommend testing each option individually and ensuring that it works with your specific website. If you look at the Presets tab you will see that the last two options have a similar warning themselves. That said, we recommend enabling CSS, JS, and HTML minification in their respective tabs if that will not cause any issues with your website. For all the other options, especially in those three tabs, you can check out our tutorial on Page Optimization for further details.
However, there are still a few other tabs outside the ones we pointed out, so here are the best options to adjust there.
- Media Settings – This tab contains options about how images load on your page. This is what we recommend:
- Preload Featured Image – Browsers with the preload feature will be able to fetch any featured images ahead of time, before the page or post begins rendering, speeding up the process. Turn it ON;
- Lazy Load Images – Turn this ON as well. That way, only the images on your screen will load, instead of any other images that may be further down the page. Those will load only when you scroll to them;
- VPI – Standing for Viewport Images, these are the images that are currently on your screen. Turn both options here ON if you have enabled Lazy Load Images previously. That way, any images that are currently on the screen will load alongside the page, while the others on the page will lazy load;
- Localization – Finally, this tab allows your website to cache Gravatars and external resources locally, allowing for faster fetching and loading times. Enable these options:
- Gravatar Cache – Your users’ gravatars will be cached locally, costing minimal space. That will speed up the loading of the page or post;
- Gravatar Cache Cron – Enabling this option will allow LSCWP to refresh your Gravatar cache automatically;
- Localize Resources – This option allows your website to store and optimize all external JavaScript locally.
As you can see, the Page Optimization tab has some pretty solid options. Once more, though, ensure you thoroughly understand and test the CSS, JS, and HTML options. They can cause instability with some websites. They should work with most, but better safe than sorry! As for the others we mentioned, you should have no issues changing them.
Database
The final set of options we want to touch upon is the Database Optimization tab. From here, you can tend to your database and clean it up. As you know already, a bloated database is not good for website performance. LSCWP allows you to tidy it up and make it much easier for your website and server to navigate and access.
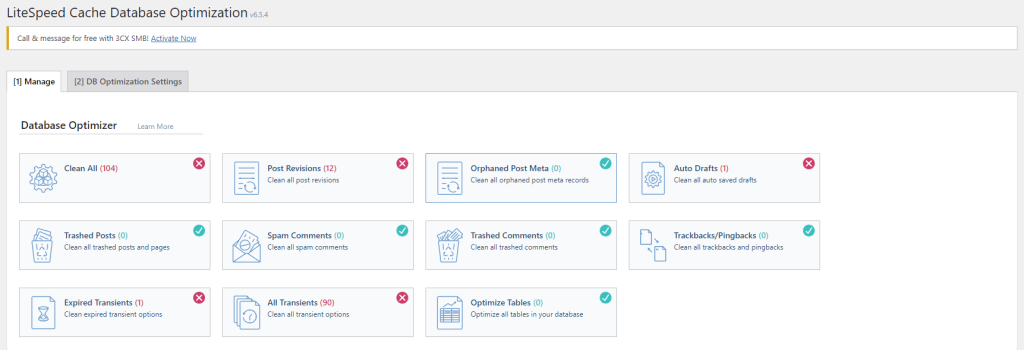
As you can see from the screenshot above, there are many options for cleaning and optimizing your database. We recommend removing everything except Post Revisions and Auto Drafts, as those can be rather important. You never know when you might want to go back to an older version of a post or a draft. You should clean everything else up once in a while to keep your database nice and lean.
Regarding adjusting settings, only two are in the DB Optimization Settings.
- Revisions Max Number – This number indicates how many post revisions are to be stored;
- Revisions Max Age – This number (in days) is how long each revision will be stored.
That is all for the database optimization settings the plugin offers. Now, there is only one more feature that will speed up your website to discuss. It is how to connect the plugin to either Cloudflare or QUIC.cloud.
CDN
Standing for Content Delivery Network, a CDN’s primary purpose is to eliminate the issues distance to a website’s host may cause when accessing it. As we all know, the further your computer is from a website’s hosting server, the longer that website will take to load.
Sometimes, it may even time out if the server is too far away and the connection is not perfect.
A CDN avoids that issue by distributing your website’s content to data centers worldwide. That allows users to load your website from the closest one instead of your hosting server, which may be on the other side of the globe. However, CDNs have evolved to be much more, and if you would like to read more about the most popular one, we recommend you check out our CloudFlare tutorial. In it, we go into more detail about how a CDN works and what Cloudflare offers as services.
You can connect LiteSpeed Cache for WordPress to Cloudflare or QUIC.cloud (another popular and reliable CDN service) to improve your website’s performance. You can do this in the CDN tab of the settings menu.

Connecting to either Cloudflare or QUIC.cloud is extremely easy. If you click on the link in the Manage tab, like the one in the image above, you will be taken to QUIC.cloud’s website, where you can create an account with them and connect your plugin to their services. On the other hand, to use Cloudflare, you only need to log into your account with them and grab your API token from there. If you are unsure how to do it, go back to the LSCWP plugin, and in the CDN Settings tab, scroll to the bottom.

There, turn on Cloudflare API and click on the link under it. When you have the token, paste it in the field alongside your email address and domain and save your settings. That is it!
We strongly recommend using a CDN service in conjunction with the LiteSpeed Cache for WordPress plugin. The benefits are numerous, but here are the most prominent ones.
- Faster loading speeds;
- Improved performance;
- Reduced server load;
- Scalability;
- Enhanced user experience;
- Increased reliability;
- Better security.
The best part about using a Content Delivery Network is that the two we mentioned have stellar free plans. Both offer a wide array of features without charging a single cent.
With all of this said and the options we discussed, you now know how to make the most out of the LiteSpeed Cache for WordPress. You should see significant improvements in your website’s page load speed and overall performance. Your server will be more happy because it will experience less load, too! If you want to learn even more about the plugin and the options we did not mention, head over to our tutorial, where we explain everything in great detail.
Maximize Speed and Performance
As you can see for yourself, the LiteSpeed Cache for WordPress is more than a plugin. It is a complete performance optimization solution. It can boost your website’s speed, enhance the user experience, and make it much more efficient than it was before. Whether your website is a simple blog or a full-blown e-commerce store, the plugin offers the flexibility and power to make your website skyrocket.
Not only that, but it is one of the most user-friendly plugins we have ever seen. You do not need to be a tech expert to understand what it can do for you, especially with our help! That is why our recommendations will help you make the most out of the LiteSpeed Cache for WordPress. Making the changes should take you no more than a few minutes. Afterwards your website will feel much lighter and faster. If you are using our FastCloud Extra hosting plan–or have purchased a VPS or Dedicated CPU server with the LiteSpeed Web Server–do not hesitate to take advantage of this plugin. It will transform your website.

The latest tips and news from the industry straight to your inbox!
Join 30,000+ subscribers for exclusive access to our monthly newsletter with insider cloud, hosting and WordPress tips!

No Comments